Installing vSphere with Tanzu using NSX / AVI Advanced Load Balancer – Part 2
This is the second part of my installation guide for vSphere with Tanzu, using AVI Advanced Load Balancer.
In this part, I’ll go through the configuration of AVI for vSphere with Tanzu and the actual Supervisor deployment.
Configure AVI for vSphere with Tanzu
Connect AVI to vCenter
AVI need to connect to vCenter to install/scale/remove it’s Service Engines. Since AVI can run on multiple platforms, there are also options to connect it to AWS, GCP,… But in our case, vSphere is our only option.
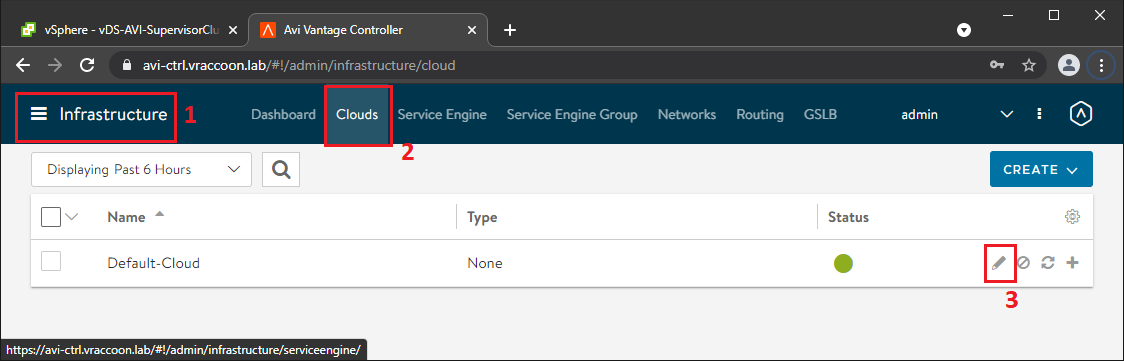
Navigate to Infrastructure (1) –> Clouds (2) –> Default-Cloud Edit (3)
As of now, it’s only supported to use the Default-Cloud.
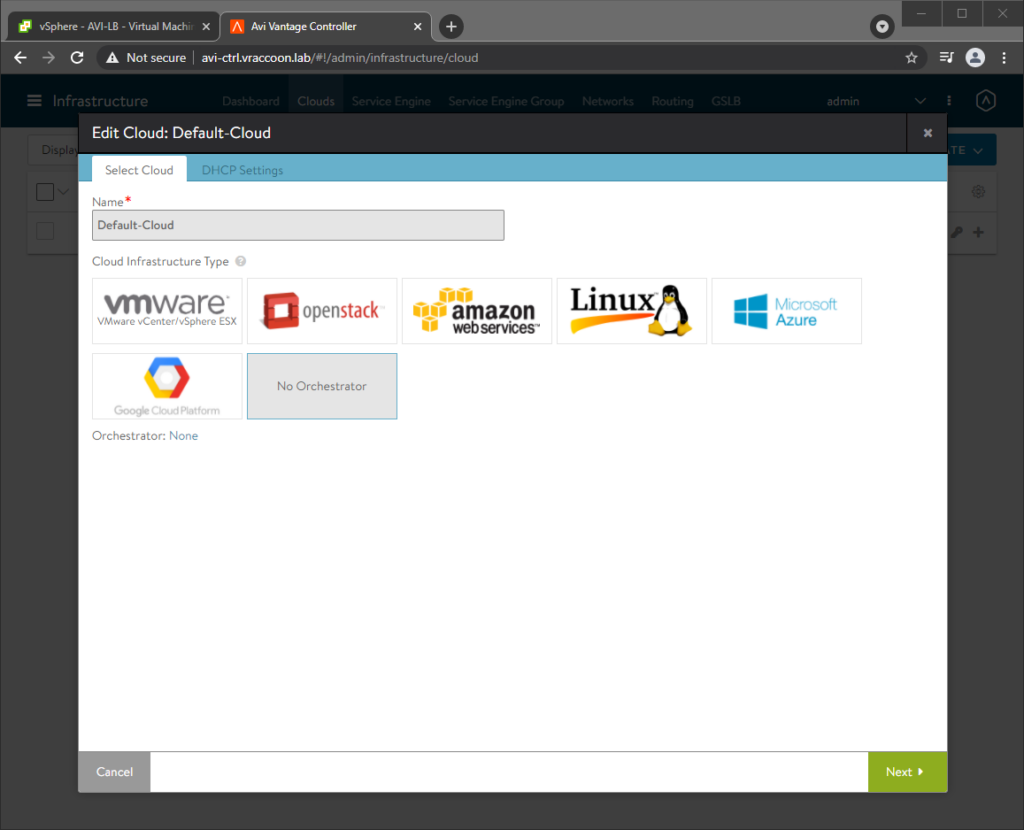
In the Edit-Wizard, click Select Cloud and select VMware vCenter/vSphere ESX. The tabs will change slightly after selecting. Click Next
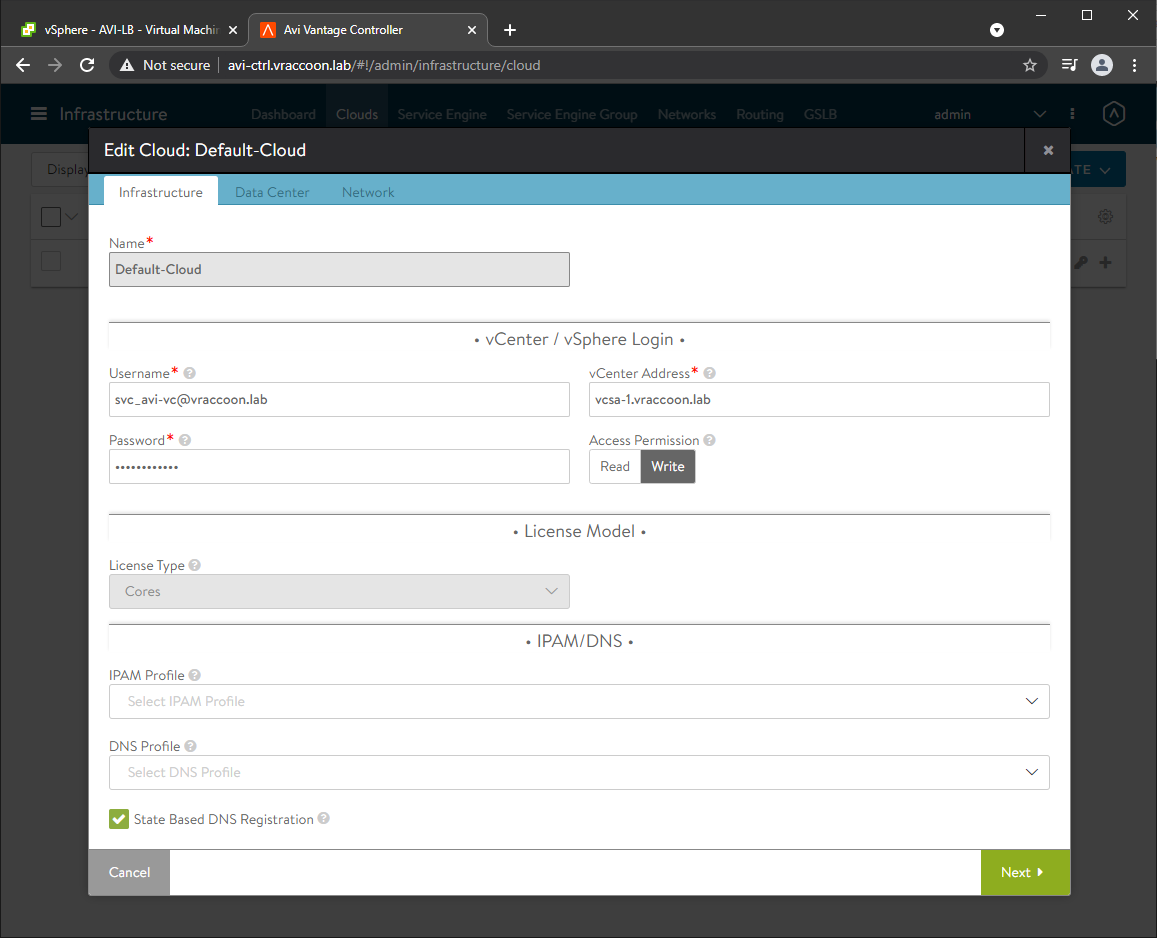
In the Infrastructure tab, fill out the section vCenter / vSphere Login. For easy of use, you can use the administrator@vsphere.local account. In real life you might want to use a service account with limited permissions. For information about which permissions are required check VMware User Role for Avi Vantage (select the correct version in the upper right corner).
Make sure, you have Access Permissions: Write selected.
You can ignore the rest. We will come back later for the IPAM/DNS settings. Click Next.
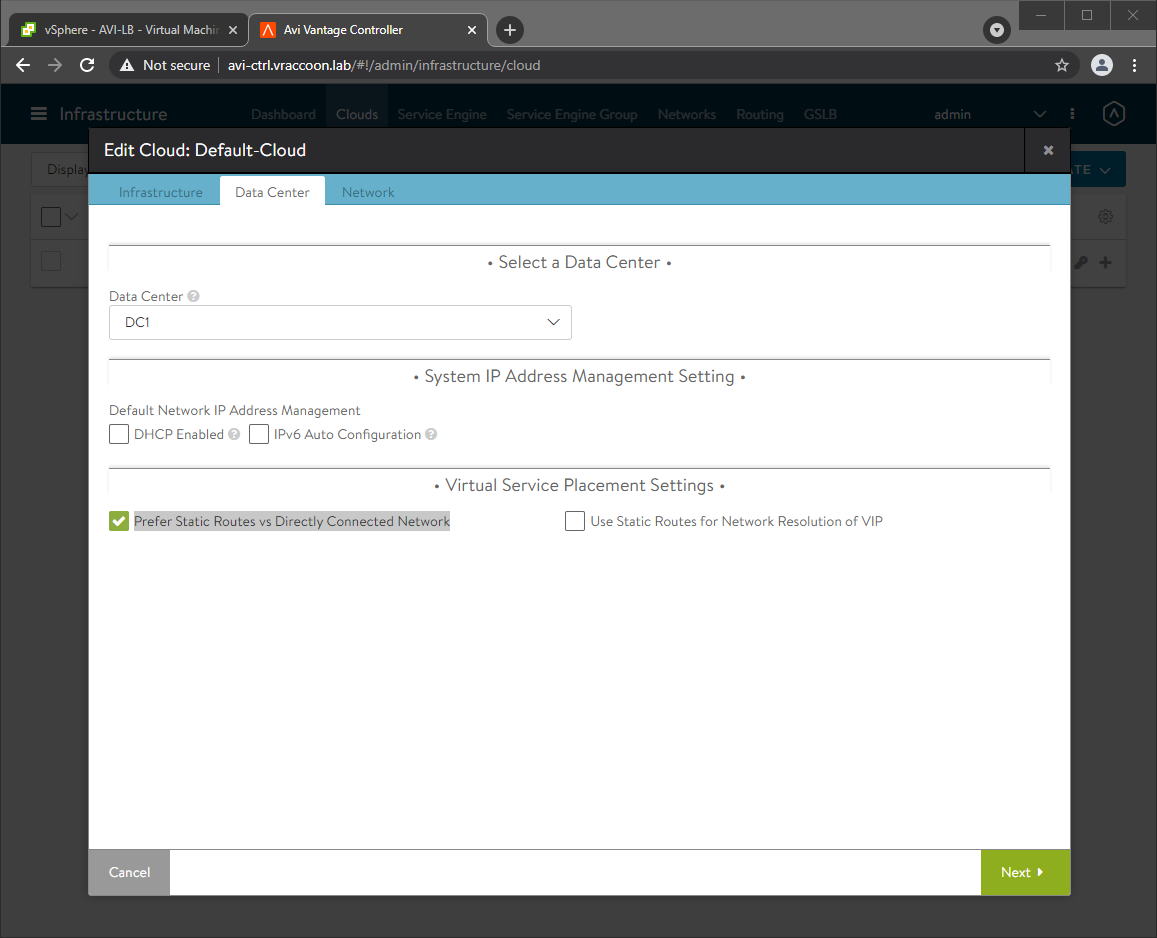
On the Data Center tab, select the vSphere Datacenter you want to use for AVI (it doesn’t have to be the same datacenter, where your Supervisorcluster will be).
If you have a DHCP Server in your network(s), you might wanna use it by default. In my case, I don’t have a DHCP Server. Thus, I left DHCP Enabled unselected.
Set Prefer Static Routes vs Directly Connected Network and click Next.
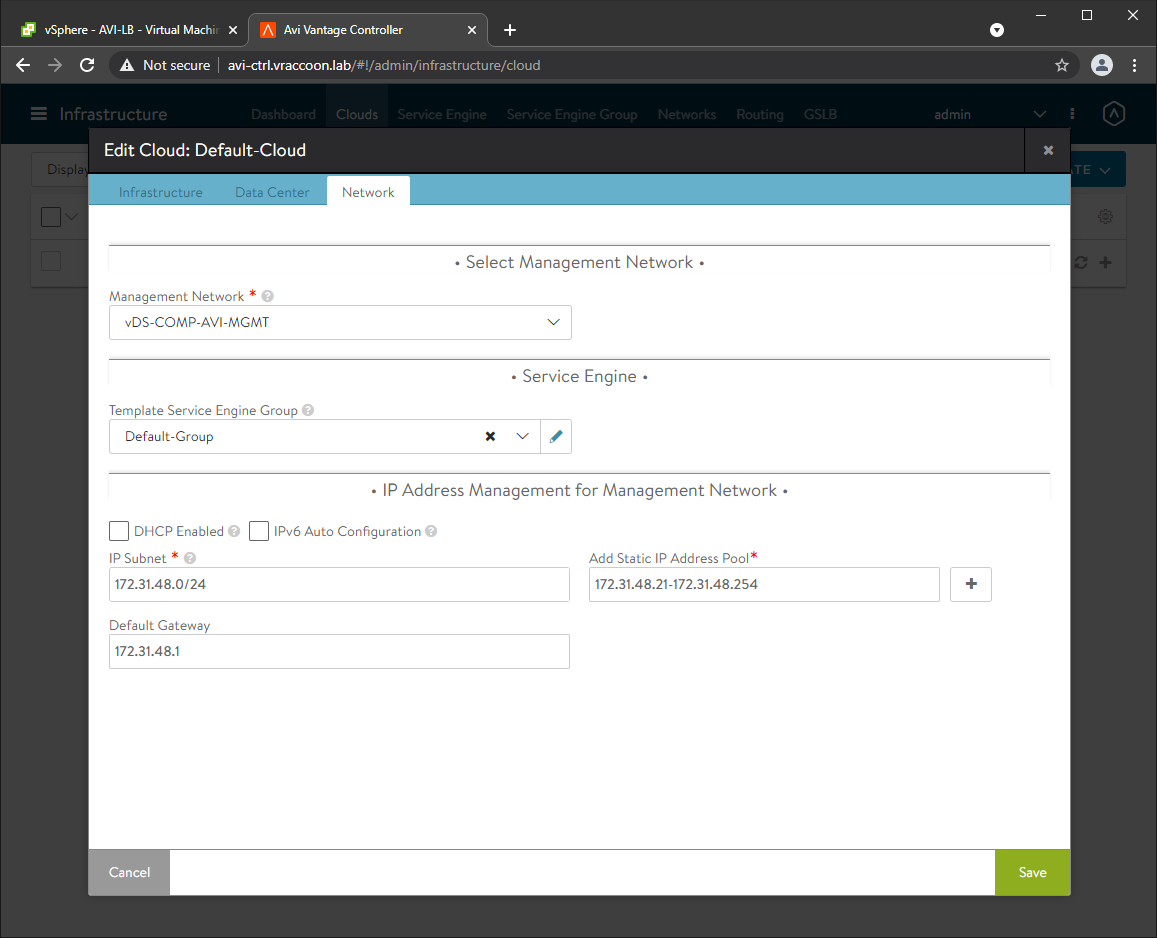
In the Network tab, select the following:
Management Network – The network, where the AVI Controllers are (and the Service Engine will be).
Template Service Engine Group – Default-Group (we will modify this group in a bit).
On the previous screen, you define the global DHCP default setting for DHCP. Section IP Address Management for Management Network is specific for the management network. I’m not using DHCP Servers, so I have to specify Subnet, Gateway and a Static IP Address Pool manually.
Since my controllers have already IPs within this network, I have to exclude them from the pool. These IPs are now managed by AVI.
Click Save.
Configure Service Engines
Next, we will configure some details around the Service Engines.
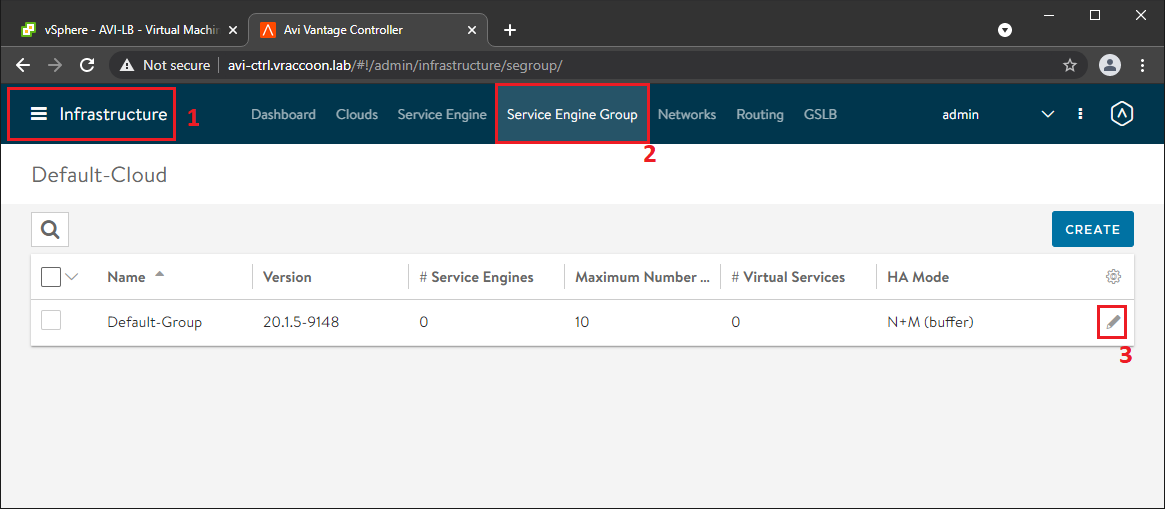
Navigate to Infrastructure (1) –> Service Engine Group (2) –> Default-Group Edit (3)
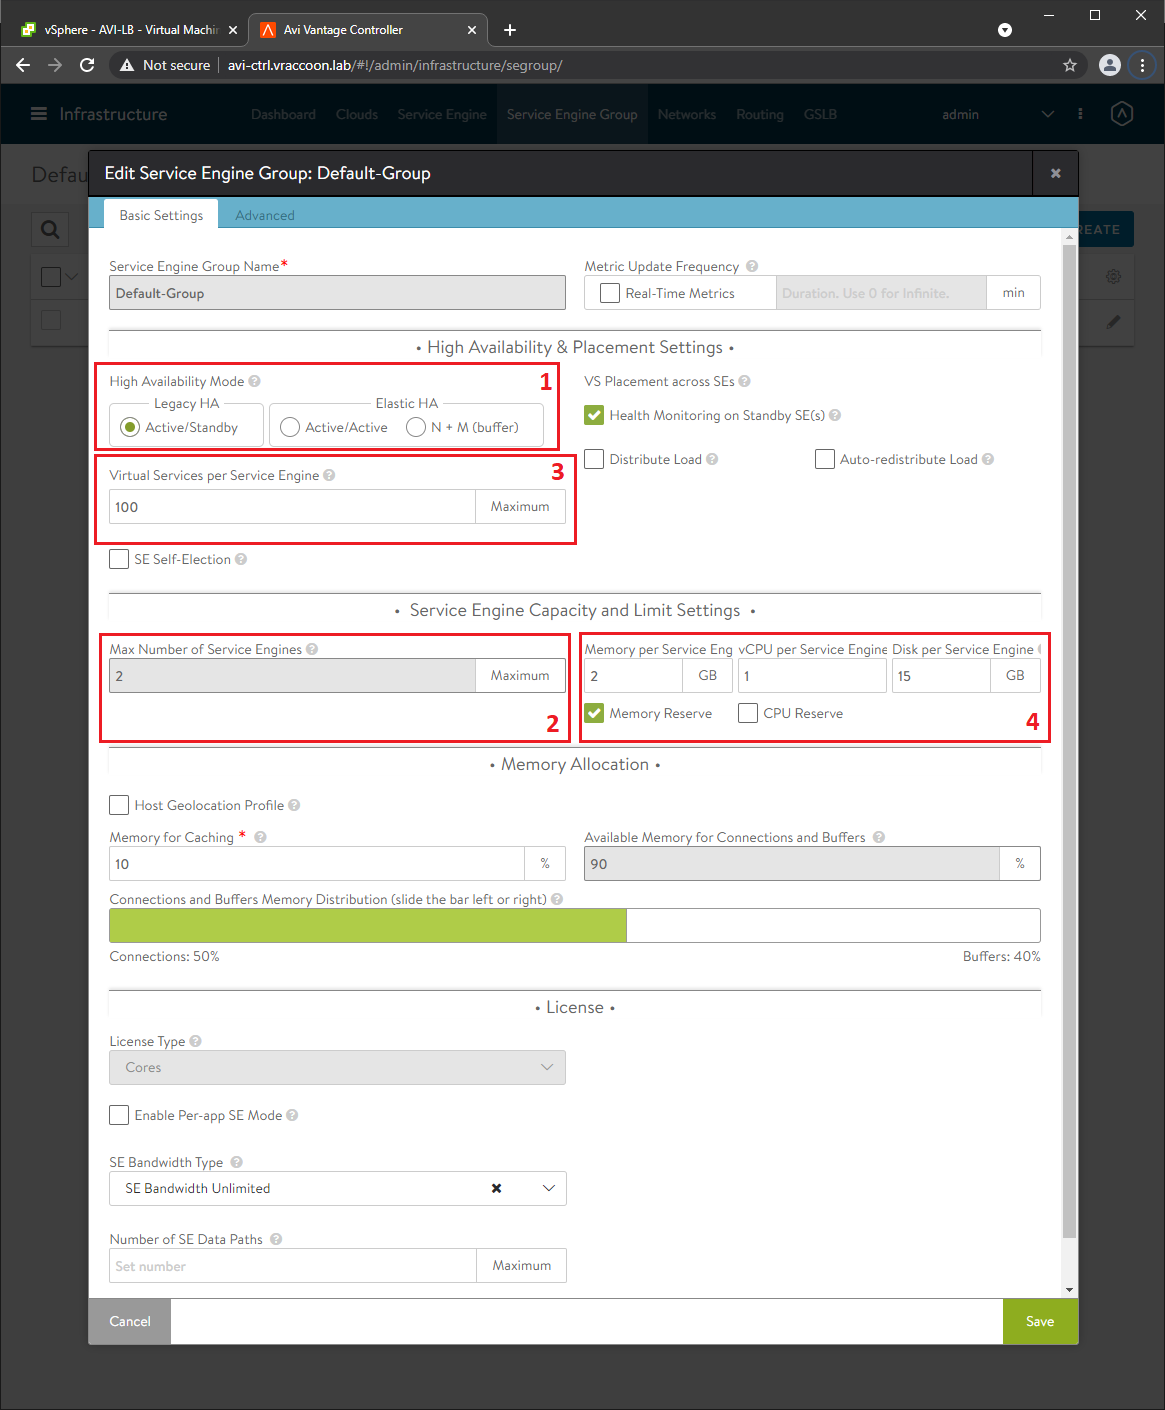
Since I’m using AVI Essentials license, it only allows Active/Standby (1) as High Availability Mode.
AVI Essentials also only allows a Max Number of Service Engines of 2 (2). Therefore, I need to increase the Virtual Services per Service Engine to 100 (3). Feel free to modify Memory/CPU Settings too. Then click on Advanced (4)
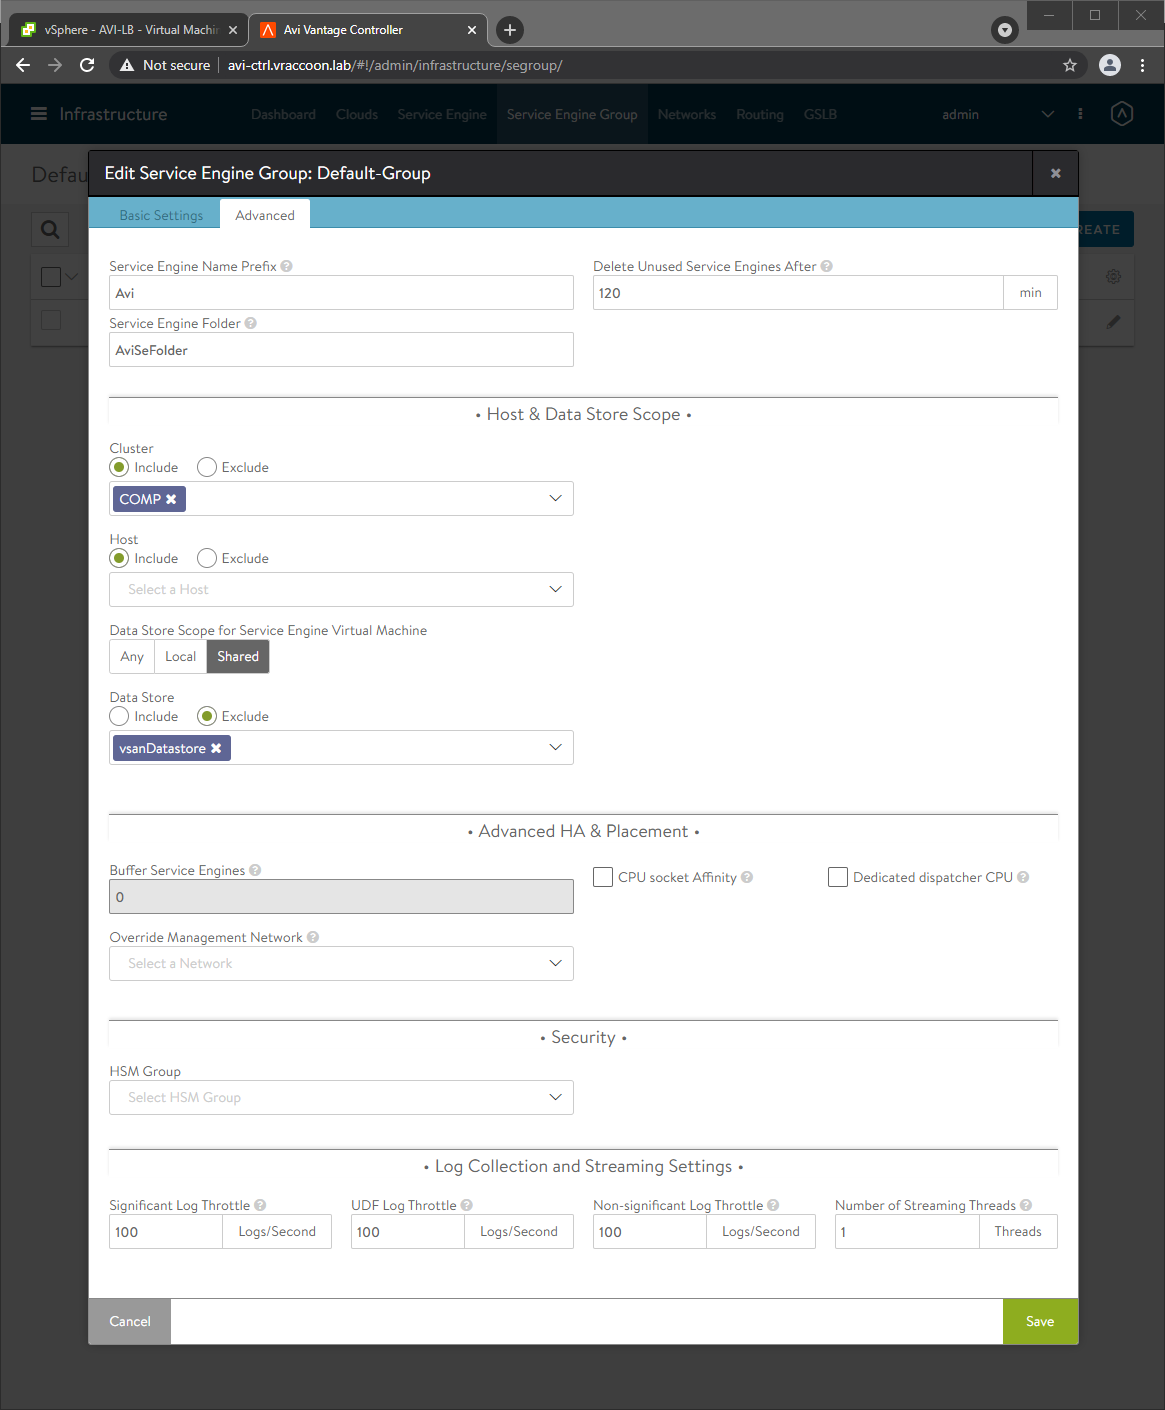
Next, select the cluster where your Servic Engines will live (again, it doesn’t have to be the vSphere Cluster, that will become the Supervisorcluster) and select a datastore to use. Then click Save.
Configure DataNetwork IP Pool
Since I don’t have a DHCP Server for my Data Network, I need to set up an IP Pool to use. For my management network, it was part of the cloud provider setup.
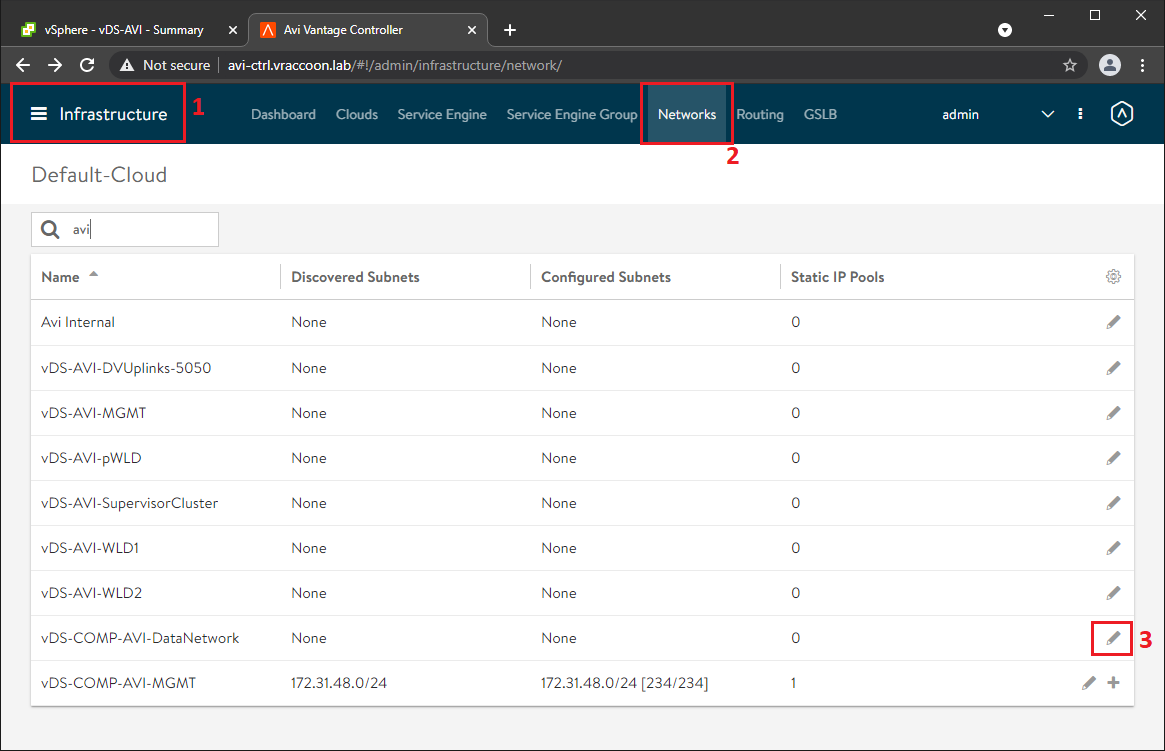
For Data Network navigate to Infrastructure (1) –> Networks (2)
Here you’ll see a bunch of already discovered networks/portgroups. Click Edit pencil for your Data Network (3).
Make sure, DHCP Enabled is not checked. Then click Add Subnet and Add Static IP Address Pool. Enter the network information (remember that you probably have a gateway in this subnet, that should not be parts of the Address Pool). Make also sure that Use Static IP Address for VIPs and SE is checked. Then click Save and Save again.
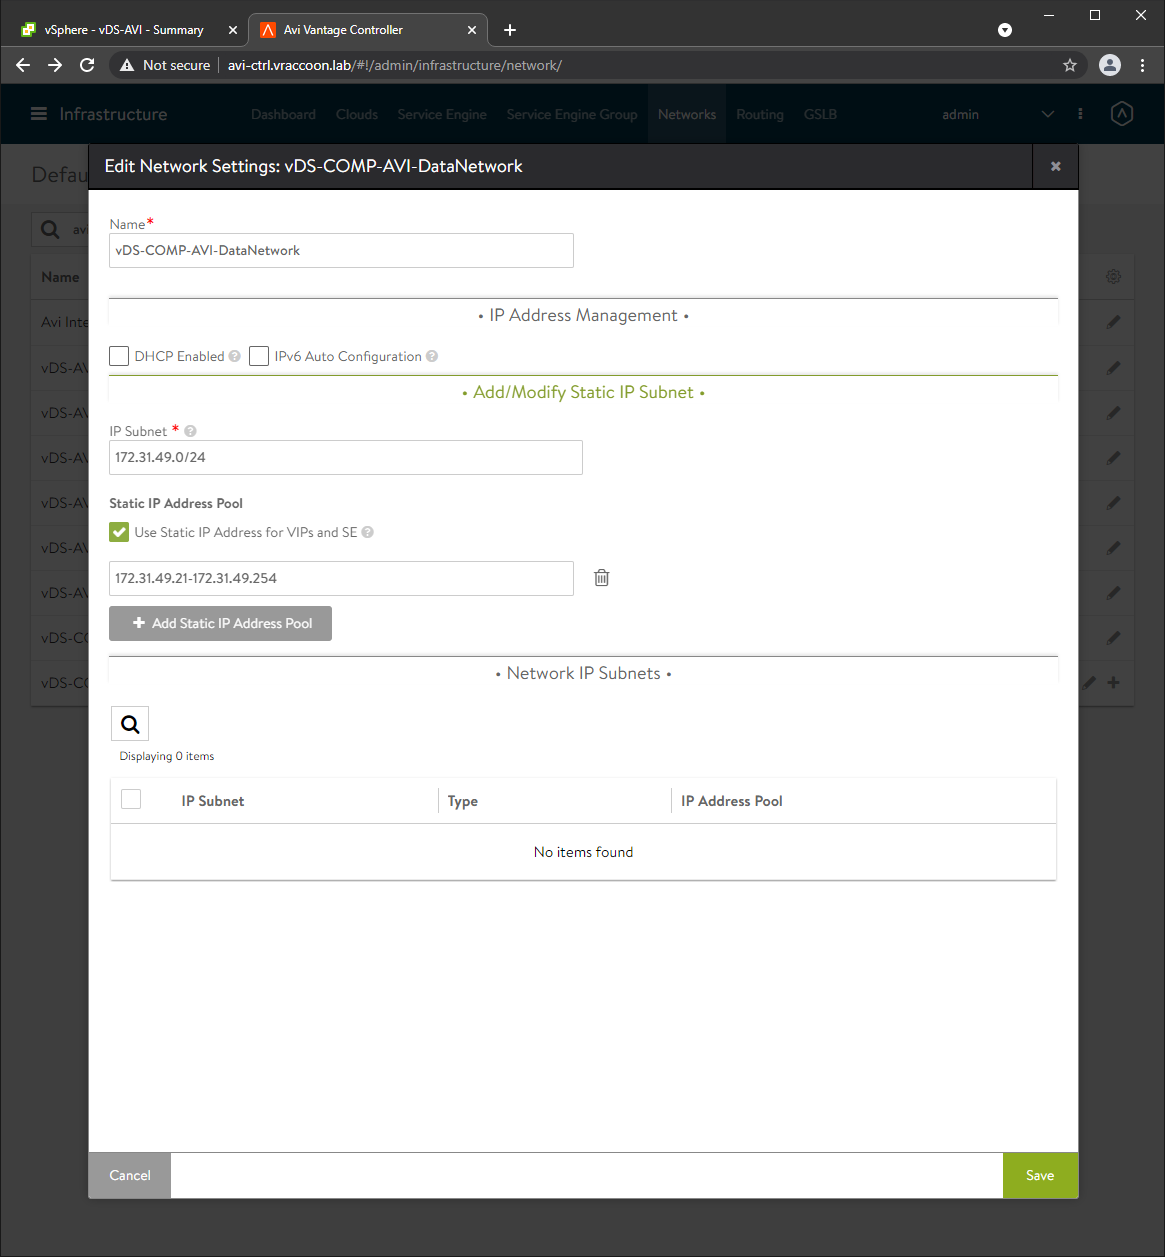
In my case, I’ve now two IP Pools configured:

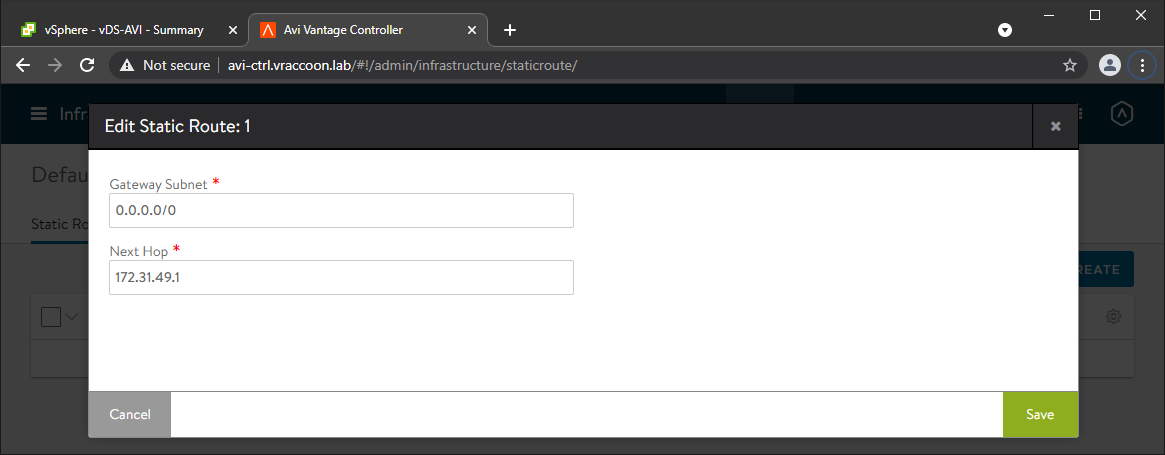
Configure Default Route for Data Network
Next, I need to configure the default gateway for my Data Network.
Navigate to Infrastructure (1) –> Routing (2) –> Static Route (3) –> Create (4)
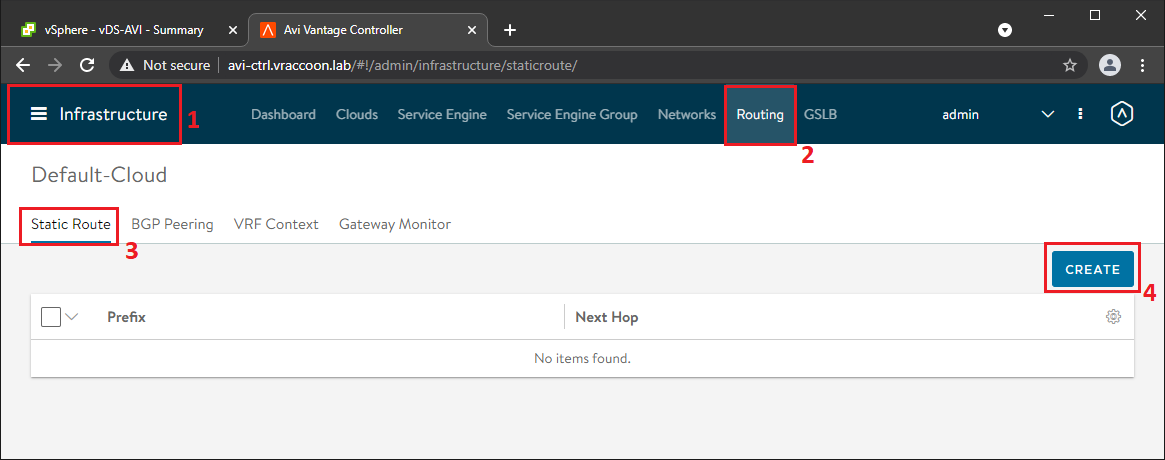
Straight forward, create a 0.0.0.0/0 route for my DataNetwork.
IPAM Profile
One more thing to do, creating the IPAM profile.
Navigate to Templates (1) –> Profiles (2) –> IPAM/DNS Profiles (3) –> Create (4) –> IPAM Profile (5)
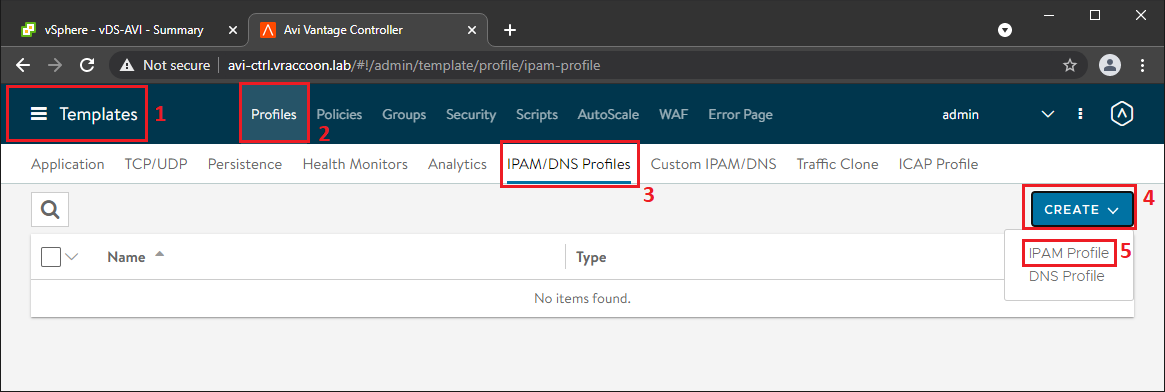
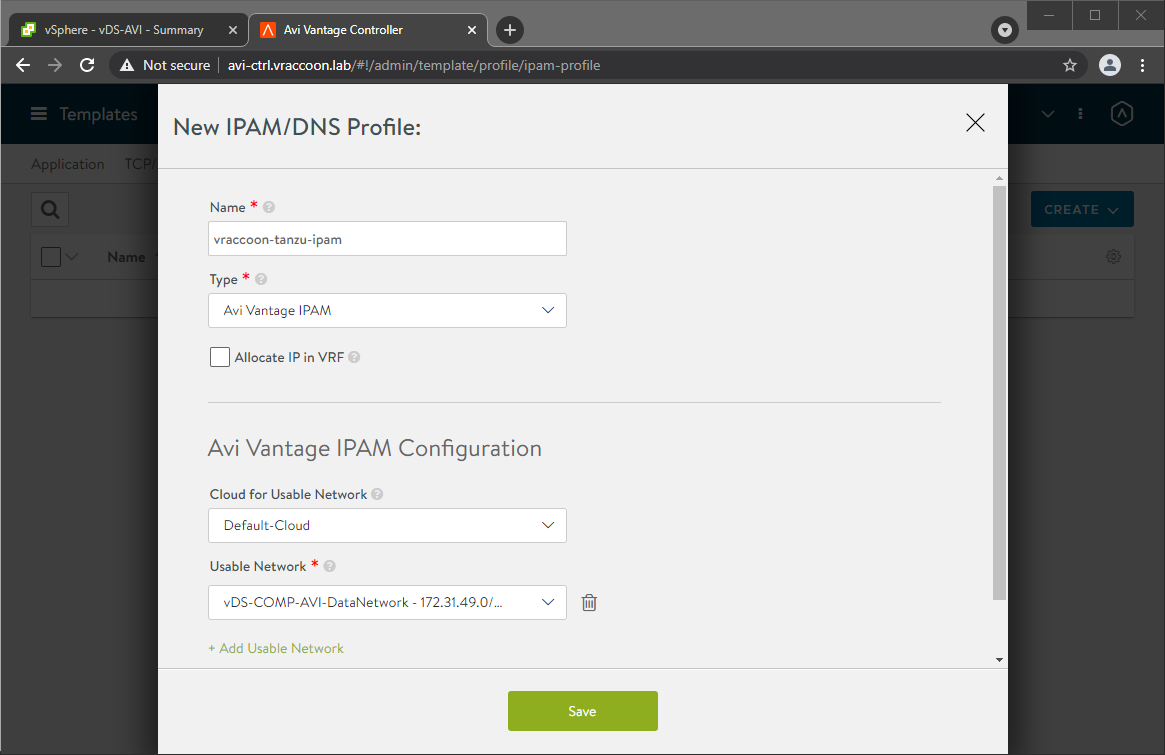
Name it and click Add Usable Network, select Default-Cloud and as Usable Network, select your Data Network. If you are using the search function, be aware that it is case sensitive. Then click Save.
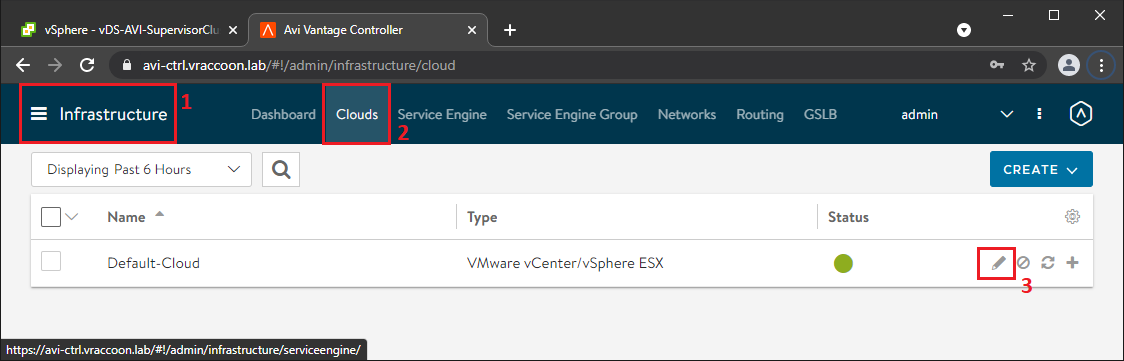
Now, we have to assign the IPAM Profile to our Default-Cloud.
So again navigate to Infrastructure (1) –> Clouds (2) –> Default-Cloud Edit (3)
In the IPAM/DNS Section, you can now select the recently generated IPAM Profile and click Save.
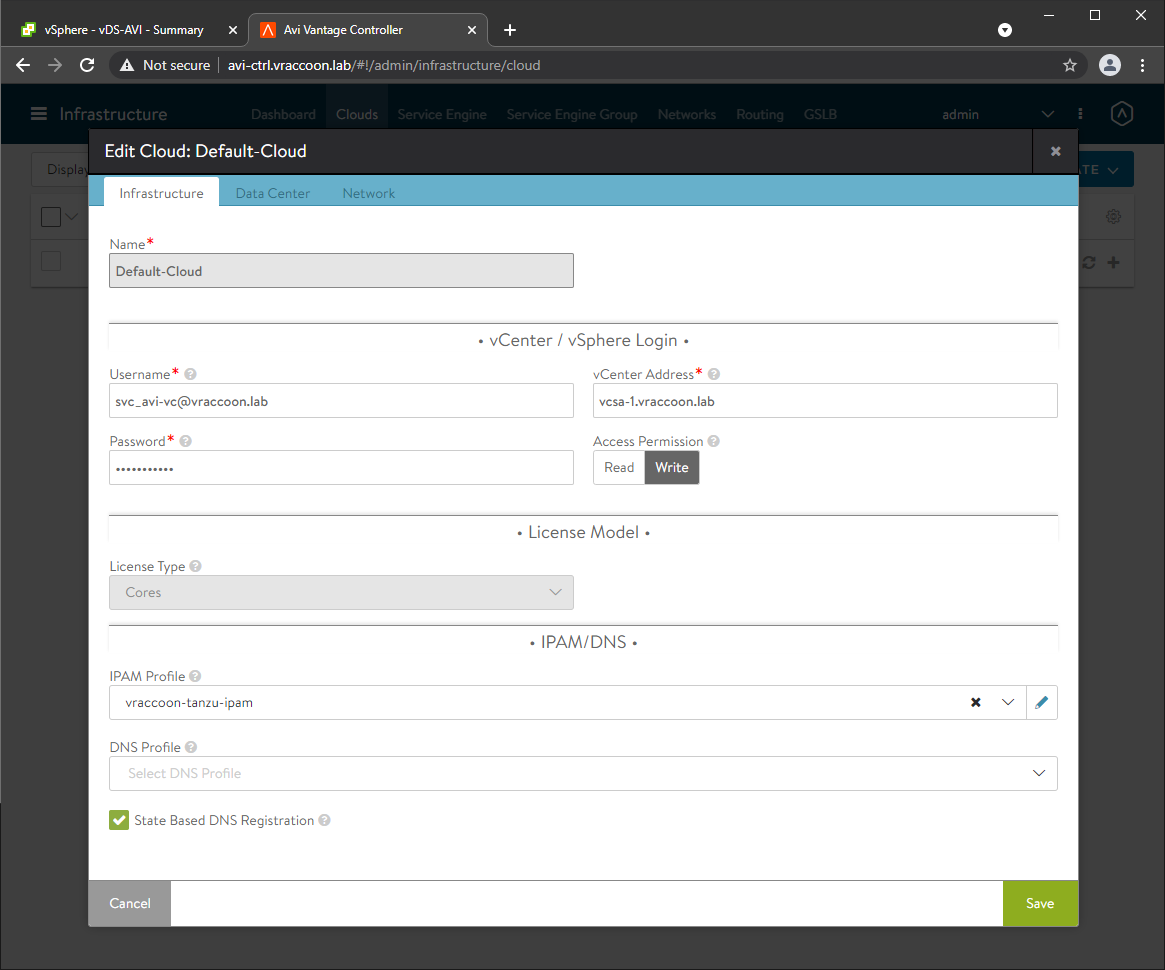
The status of your Default-Cloud should be green by now.
That’s it for the AVI Controller configuration. Next, we configure our Supervisor Cluster from vSphere.
Install Supervisor Cluster
I’m not going into each an every detail during this. I assume, that your vSphere Cluster is already up and running (including HA/DRS), has a Virtual Distributed Switch configured, at least one Storage Policy and there is a Content Library containing Tanzu Kubernetes Cluster Images.
Let’s make that regular vSphere Cluster a Supervisorcluster with AVI as its Load Balancing solution.
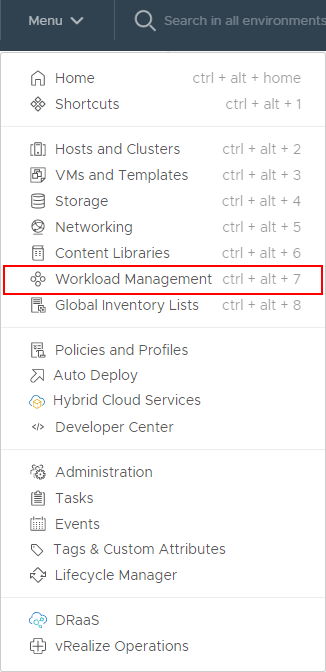
In your vCenter navigate to Menu –> Workload Management
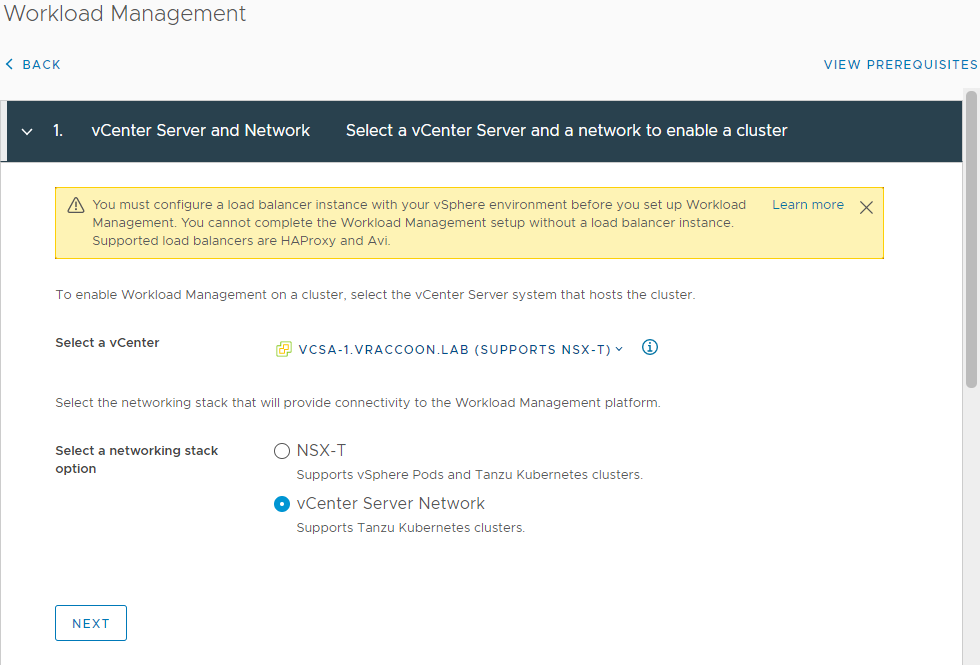
Go to tab Clusters and click ADD CLUSTER

Select vCenter Server Network (this contains the options for HAProxy and AVI LoadBalancer). Click NEXT
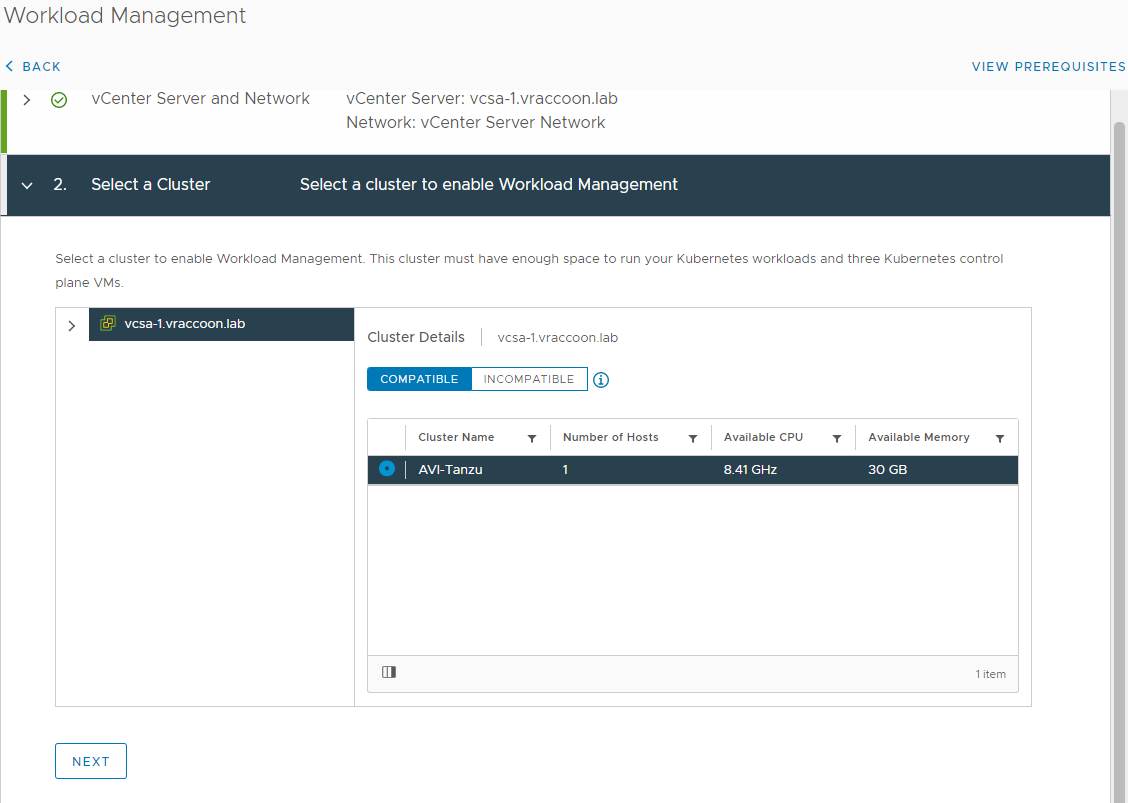
In the 2- Select a Cluster, select the vSphere Cluster that you want to become a Supervisorcluster.
If you don’t see any clusters you can either click on INCOMPATIBLE to get a hint why existing clusters might not be compatible or check the Documentation on prerequisites. Then click NEXT.
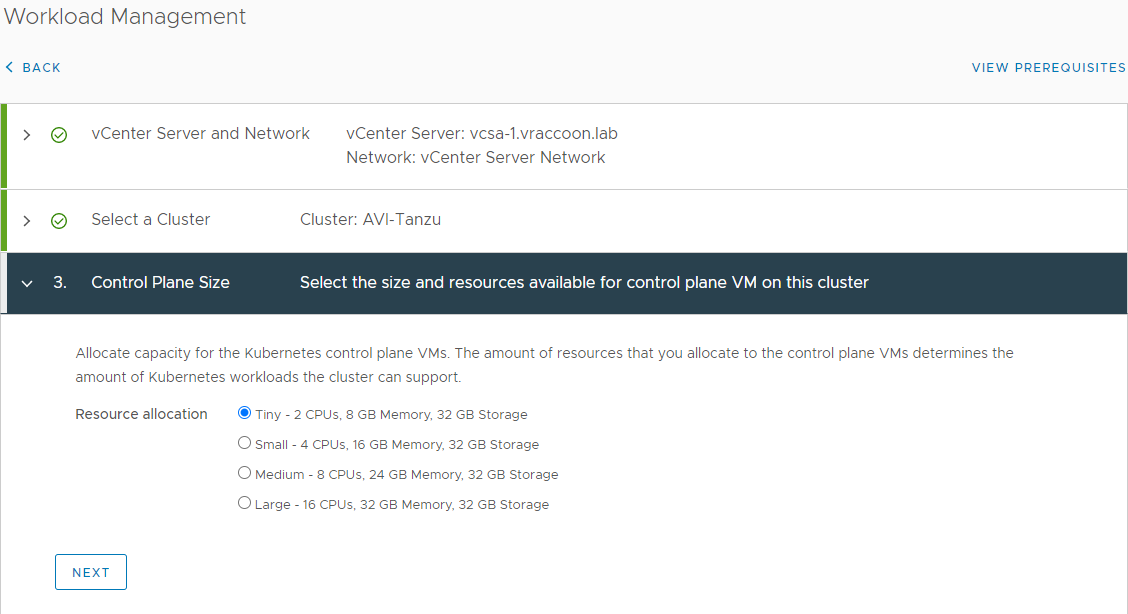
Select a Control Plane Size. I’ll go with Tiny, because this is only a demo environment.
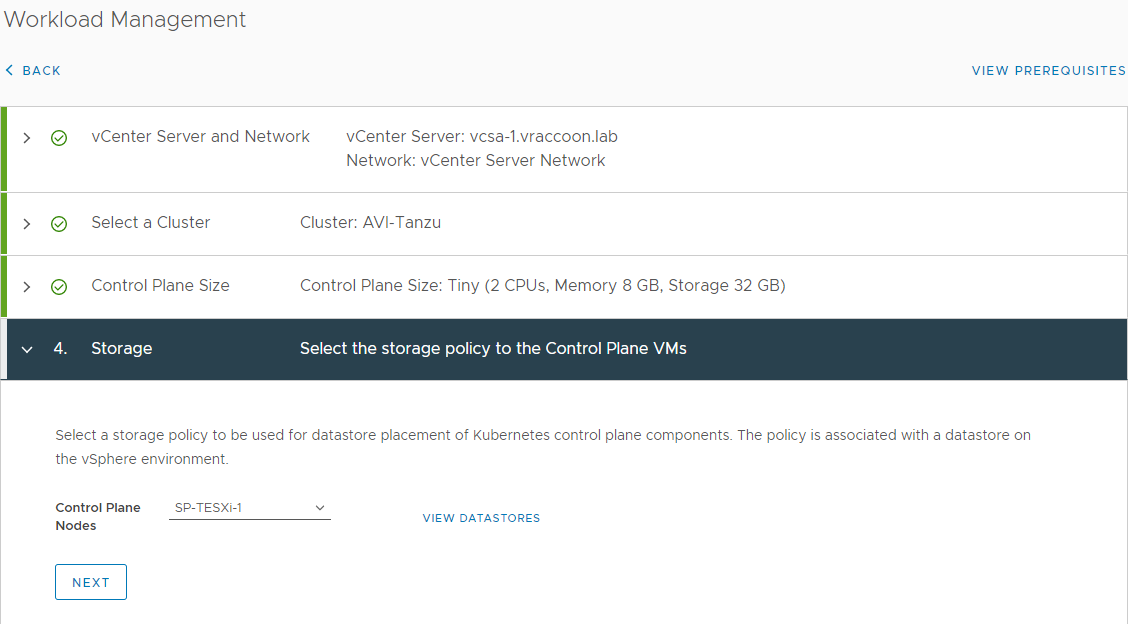
In Section 4 – Storage, select a storage policy where your Supervisorcluster-VMs will be stored. And click Next. This is not necessary the storage, where your Tanzu Kubernetes Clusters will be saved.
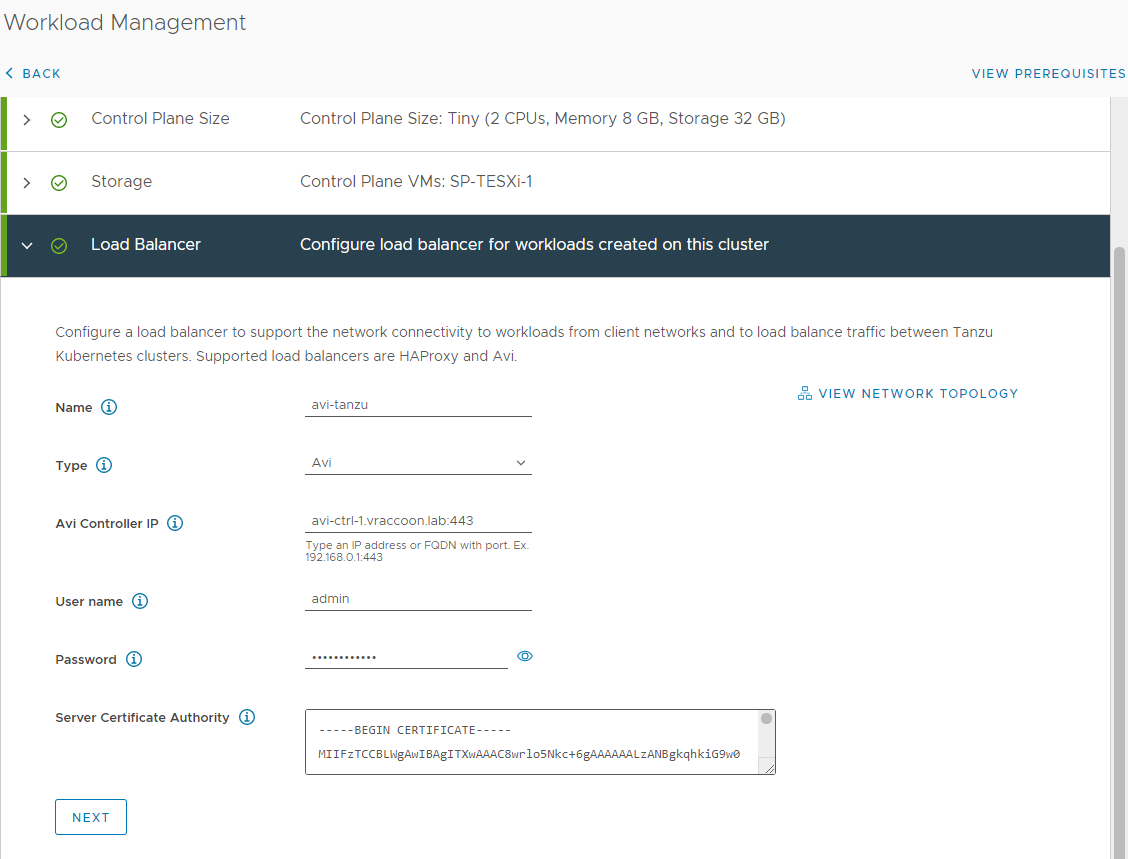
Section 5 – Load Balancer is where we enter our AVI specific configurations.
Name – Really just a user-friendly name. Enter whatever you want as long as it is DNS compliant.
Type – Select AVI
AVI Controller IP – FQDN:Port of either your AVI controller cluster or single AVI controller. AVI default port is 443.
User name – admin (unless you have created an additional one)
Password – <admin password>
Server Certificate Authority – The Certificate for the AVI Controller Cluster (created of at the end of Part 1).
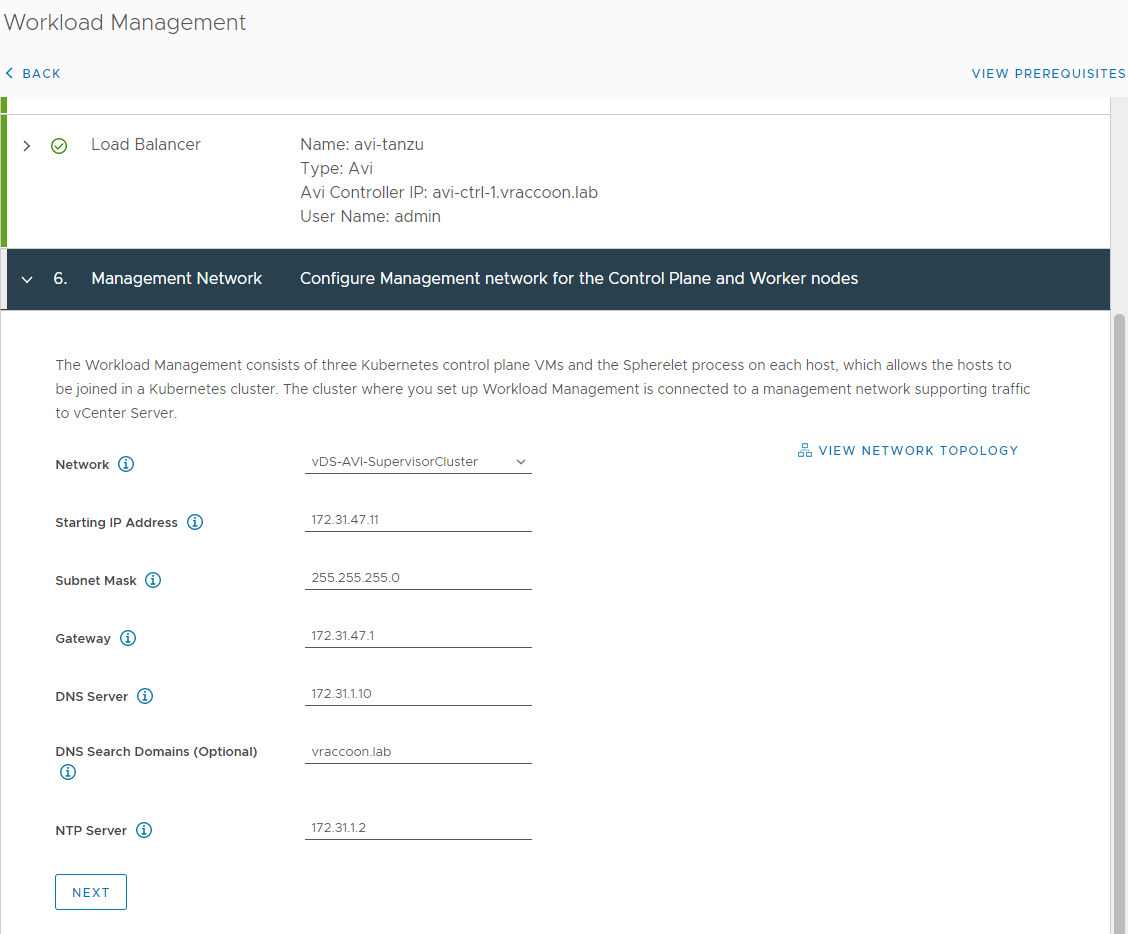
Section 6 – Management Network is about the Supervisorcluster-VMs.
The three Supervisorcontrolplane-VMs have two network interfaces each. One in the Primary Workload Domain Network and one in a Management Network. The documentation isn’t a hundred percent clear about this. At one point it says, the management interfaces have to be in the very same network as the vCenter and the ESXi servers, at another point it reads that it could be its own subnet.
Let’s picture a production environment. The “Primary Workload Domain Network” is clearly a network where real workload live. The “Supervisorcontrolplane Management Network” is a management network. Typically, you will seperate these networks. Maybe even in different security zones. If you now have a VM that has a network interface in both of them, you are literally briding two security zones. One of them even containing your vCenter and ESXi servers. In my opinion, from a security perspective, this feels a bit … uncomfortable.
For HAproxy, you must do it this way, otherwise your Supervisorcluster will not come up (and even worse, HAproxy is actually routing traffic through it’s management network …).
But for AVI, both is possible. So I’m going with a dedicated Supervisorcluster Management Network, which only contains the 5 Supervisorcluster-VM-IPs plus a gateway.
Section 7 – Workload Network defines, where your Tanzu Kubernetes Cluster will live (or VMs provisioned with the recently introduced vm-services).
You have to define at least one Workload Domain Network, which will become the Primary Workload Domain Network (“pwld in my case). This is where the Supervisorcluster-VMs will live and potentially also Tanzu Kubernetes Clusters.

I will create another two Workload Domain Networks (“wld-1” and “wld-2”).
Make sure, your AVI Data Network can reach these Workload Domain Networks.
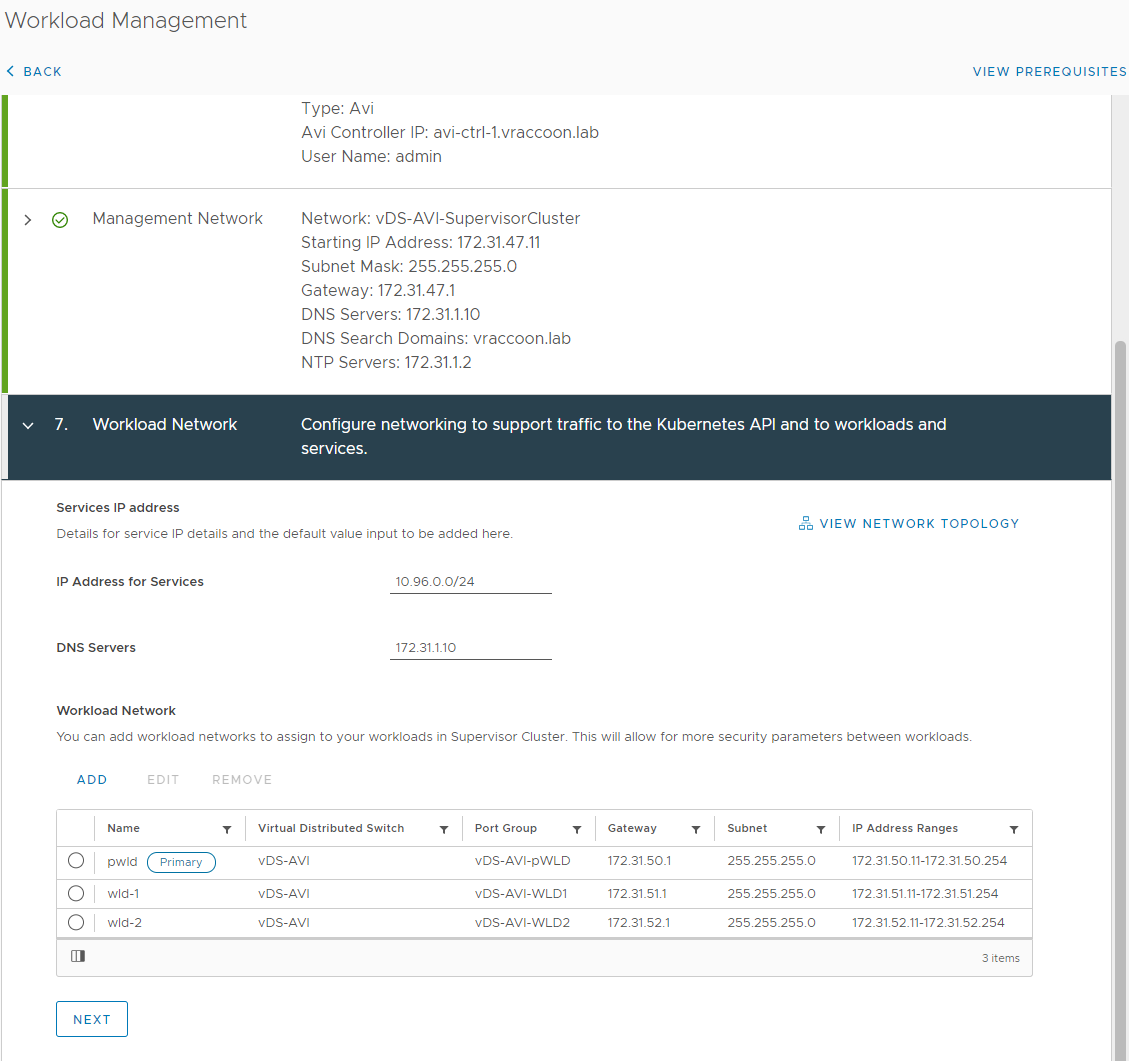
Note – At the time of writing this post, it is not possible to change this configuration later without deprovisioning the whole supervisorcluster an everything that lives in it. So make sure, you thought about the amount and size of Workload Domain Networks you wanna use properly 😉
In section 8 – Tanzu Kubernetes Grid Service Configuration, simply choose the Content Library which contains the Cluster images. If you don’t know how to create this Content Library, check Create a Subscribed Content Library for Tanzu Kubernetes Releases.
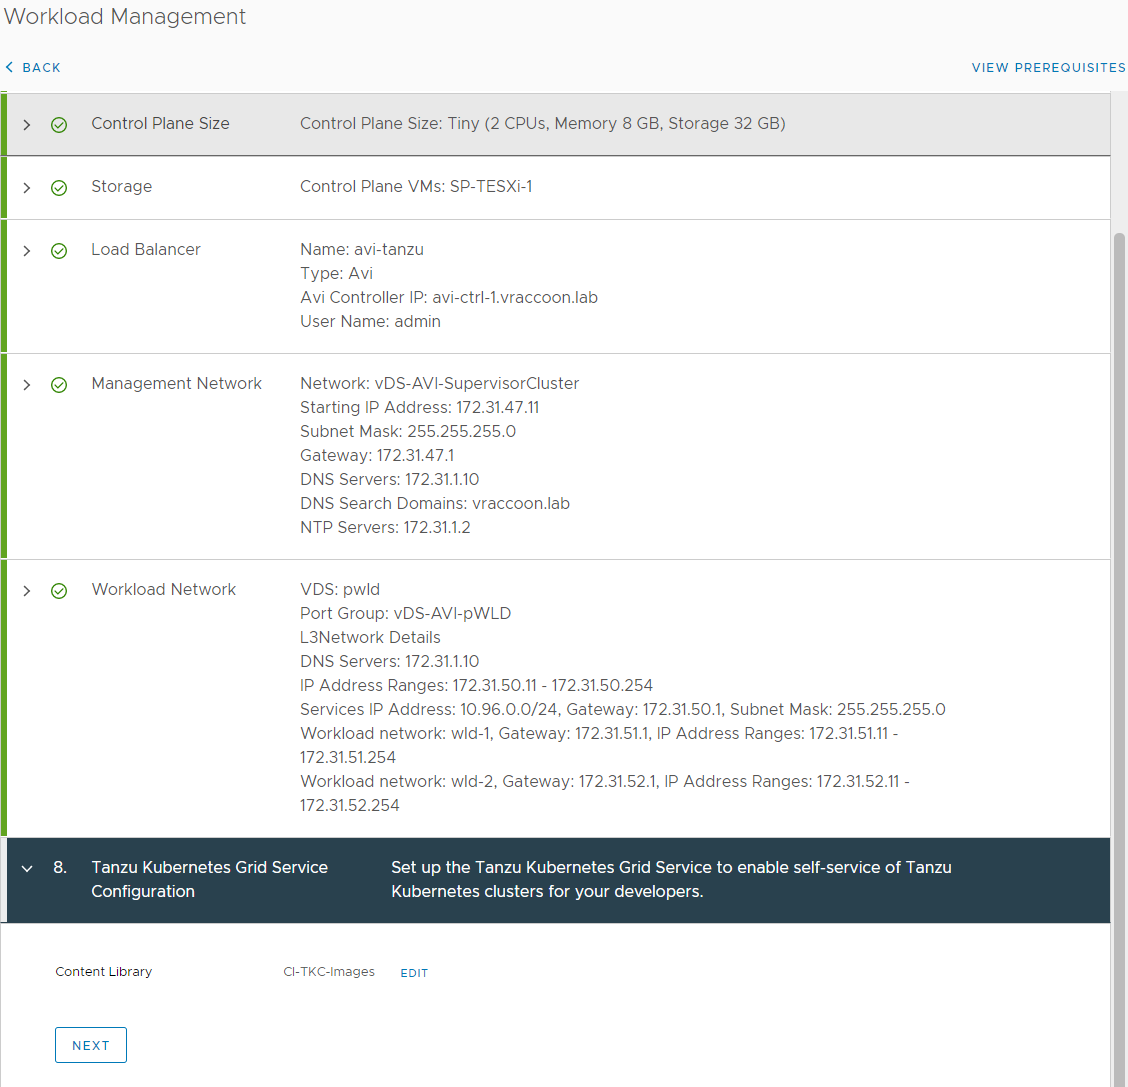
In section 9 – Review and Confirm, simply review and confirm =D
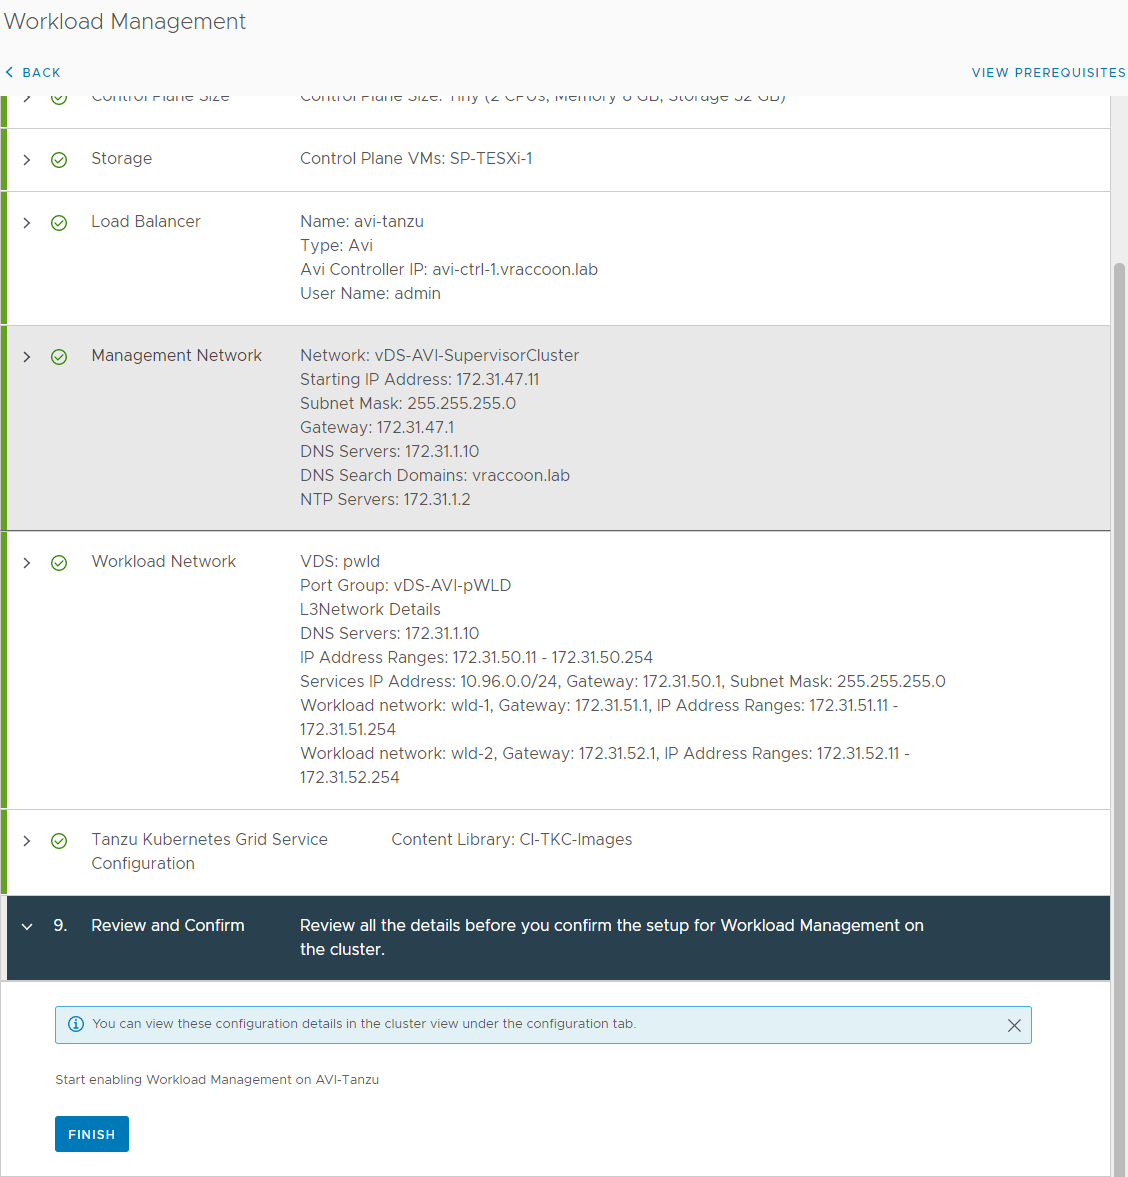
Time for a beer … two – depending on your Lab performance =D
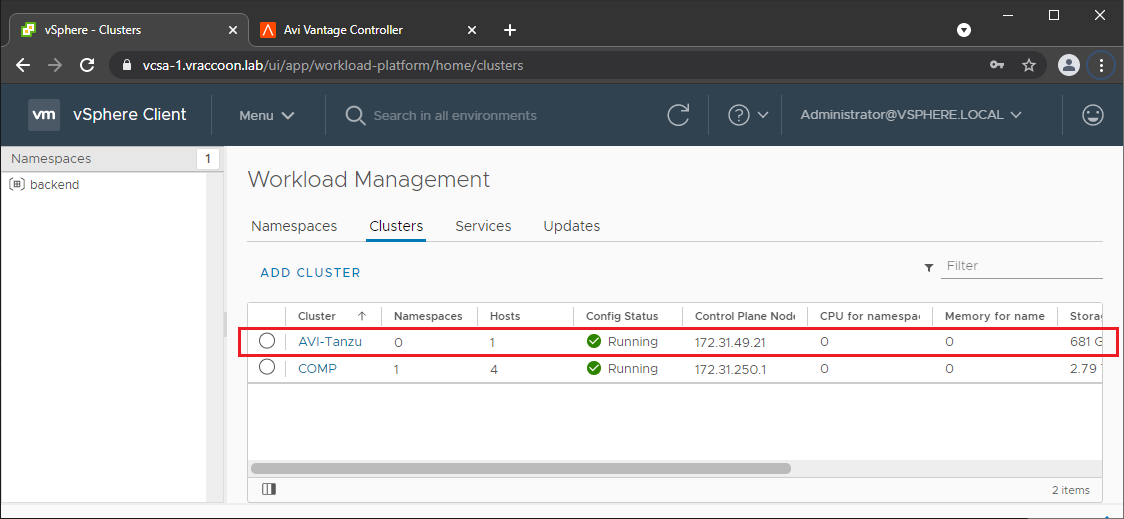
Eventually your Cluster provisioning will finish and you can start using it.
I hope, this post is helpful for installing vSphere with Tanzu with AVI Advanced Load Balancer Service. AVI in itself is quite complex and can hold a lot of pitfalls, even though we are using only a very small subset of it’s features for vSphere with Tanzu.
How to add the static route for multiple data network ?