Replace System/Controller Certificate in AVI Essentials
In a recent post, I described how to use AVI Controller Cluster Custom SSL/TLS Certificate. This was pretty straight forward. Now, I had a customer, that wanted to use AVI Essentials instead of AVI Enterprise which I was using for my post.
Of course, it’s also possible to replace the Controller certificate with a custom cert, but it’s far more complicated, as for some reason, you can’t perform this task through the GUI anymore. The required buttons to add a certificate are simply not there.
Instead, you have to do this via REST API. And in this post, I’m going to demonstrate how.
Prepare Certs and json files
I assume, you have the certificate and key already as PEM Files available. Since we need to replace the linebreaks with “\n” in both of them.
sed -i ':a;N;$!ba;s/\n/\\n/g' avi-ctrl.crt
sed -i ':a;N;$!ba;s/\n/\\n/g' avi-ctrl.key
Now we have the both, key and certificate as one-liner, which is needed for the REST POST.
Next, we build the the json file with the certificate, that we will push to AVI later. Without key and certificate, it looks like follow:
{
   "format":"SSL_PEM",
   "certificate_base64":false,
   "certificate":{
      "certificate":""
   },
   "key_base64":false,
   "type":"SSL_CERTIFICATE_TYPE_SYSTEM",
   "key":"",
   "name":"avi-custom-cert"
}
Simply copy the key and certificate one-liners at their respective positions and save the file as addcert.json.
{
   "format":"SSL_PEM",
   "certificate_base64":false,
   "certificate":{
      "certificate":"-----BEGIN CERTIFICATE-----\nMIIFzTCCBLWgAwIBAgITXwAAAC8wrlo5Nkc+6gAAAAAALzANBgkqhkiG9w0BAQsF\nADBIMRMwEQYKCZI<OUTPUT REDACTED>OxyXe9Ti6/WEncZiFSDXzQJOppIuWFyWNoyacF2hE6/sqkpFmnQA7AbN3weZMz0\nPA==\n-----END CERTIFICATE-----\n"
   },
   "key_base64":false,
   "type":"SSL_CERTIFICATE_TYPE_SYSTEM",
   "key":"-----BEGIN PRIVATE KEY-----\nMIIEvQIBADANBgkqhkiG9w0BAQEFAASCBKcwggSjAgEAAoIBAQC+HWk5JRL4WMue\nBrfo3X5yjZ+vUv0f7xh4R1A6bf<OUTPUT REDACTED>KMpe1teEJpw/9UWiXPwT42vPDdCSw16cnPgVR+dqT6vgUS1HlVN7\nuMPyIfhkqCPsnett4zeSTRA=\n-----END PRIVATE KEY-----",
   "name":"avi-custom-cert"
}
Login to AVI Controller
Let’s login to AVI-Controller using curl. We will save the cookie for later use.
curl -k "https://avi-ctrl-2.vraccoon.lab/login?include_name=true" \
  -H "content-type: application/json;charset=UTF-8" \
  --data-raw $'{"username":"admin","password":"Password123\u0021"}' \
  --cookie-jar cookie.txt
Now I have a file called “cookie.txt” from which I extract the CSRFTOKEN. I have to provide it as header information too.
CSRFTOKEN=$(cat cookie.txt | grep csrftoken | awk '{print $7}')
Upload Certificate
We are now ready to upload our certificate. I’ll save the response as cert.json, because it contains the certificate UUID, which I need in the next step.
curl -k -s "https://avi-ctrl-2.vraccoon.lab/api/sslkeyandcertificate?include_name" \
  -H "content-type: application/json;charset=UTF-8" \
  -b cookie.txt \
  -H "x-csrftoken: $CSRFTOKEN" \
  -H "referer: https://avi-ctrl-2.vraccoon.lab/" \
  -d "@add-cert.json" \
  | jq > cert.json
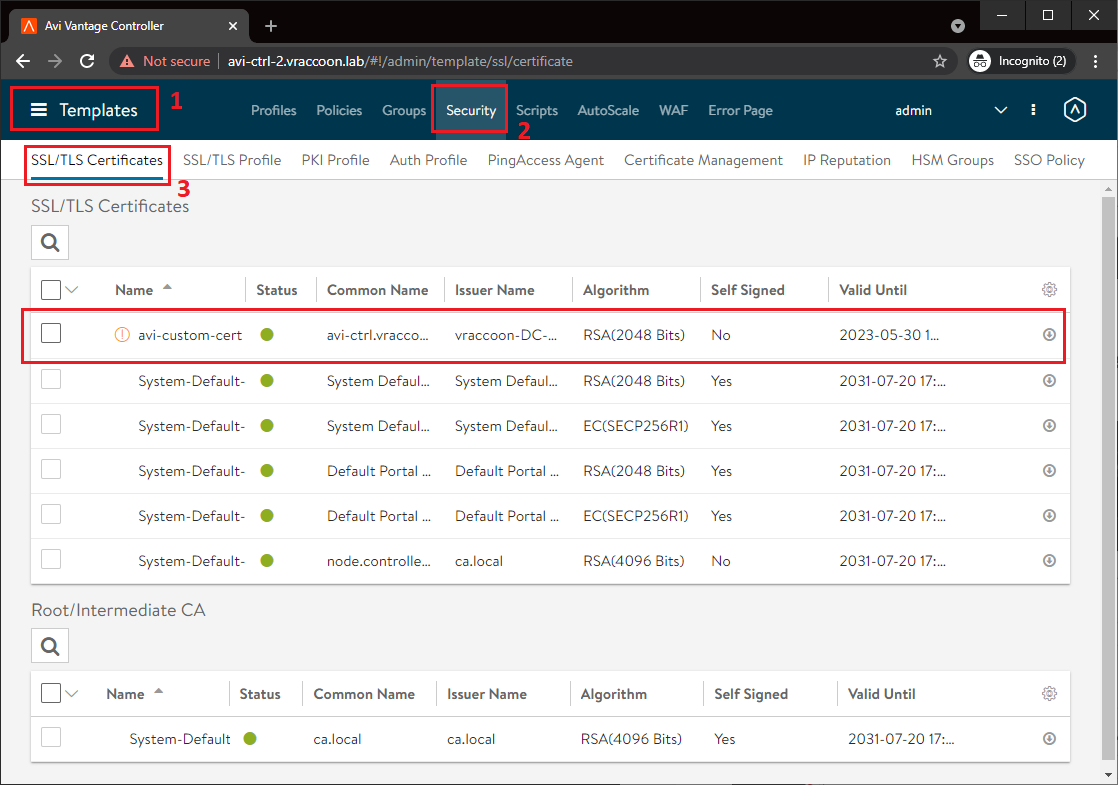
At this point, you will see the certificate beeing available in the WebGUI. Just navigate to Templates (1) –> Security (2) –> SSL/TLS Certificates (3).
Apply Certificate to Controller
In theory, this last step could be performed through GUI, but I got a run =D
Next, I’ll extract the certificate UUID from the cert.json file.
CERTUUID=$(jq -r .uuid cert.json)
And finally, apply the previously uploaded certificate to the controller(s).
curl -k "https://avi-ctrl-2.vraccoon.lab/api/systemconfiguration/?include_name" \
  -X "PUT" \
  -H "content-type: application/json;charset=UTF-8" \
  -b cookie.txt \
  -H "x-csrftoken: $CSRFTOKEN" \
  -H "referer: https://avi-ctrl-2.vraccoon.lab/" \
  -d "{\"portal_configuration\":{\"sslkeyandcertificate_refs\":[\"https://avi-ctrl-2.vraccoon.lab/api/sslkeyandcertificate/$CERTUUID\"]}}"
This is it. It might take a minute and you might have to reset your browser cache, but then the certificate is applied.
UPDATE: I was told, that in AVI version 20.1.6, it should be possible to do this via GUI. But I had no chance to test it myself yet.