Installing vSphere with Tanzu using NSX / AVI Advanced Load Balancer – Part 1
It’s been a little over a year by now, since vSphere with Tanzu was released. Back then it was called vSphere with Kubernetes or still Project Pacific by some people. A lot has changed since then. At the beginning it was only available together with VMware Cloud Foundation and the only networking option was NSX-T. Later HAproxy became an option. But HAproxy has a lot of drawbacks, e.g. a very weird traffic flow, it’s not really horizontal scalable and at the end of the day, it’s a single VM, providing all your LoadBalancing services, so it is a single point of failure, something you definitely don’t want in production.
These are just a few reasons, why I would not recommend it for production environments. For labs/tests though, its great because its super easy to install.
With vSphere 7.0 Update 2, a third option was introduced – NSX Advanced Loadbalancers (or in short AVI). While NSX-T still has even more advantages, AVI is definitely a very good solution you can use in production too!
This is the first of two posts, where I demonstrate how to install vSphere with Tanzu, using AVI Advanced LoadBalancer.
General Overview
The AVI Advanced LoadBalancer consists of two major parts – AVI Controller VMs and Service Engine VMs.
Controller VMs
Controller VMs provide management and controlplane services. Controllers have only a management interface.
You can either have a standalone controller or form a cluster out of three controllers (for redundancy).
Service Engine VMs
Service Engine are coming in pairs (for redundancy) and are provisioned on demand by the controlplane. Depending on your license, you have different options on the specific specs of them.
Service Engines have two interfaces. The first one is a management interface. This is where they receive instructions from the Controller VMs and also where you would connect to troubleshoot.
The second interface is sitting in the Data Network. This is where the Virtual Services (VIPs) are sitting. This means, this is also where your Kubernetes LoadBalancer Services will live. Thus, this network needs connectivity to the individual Workload networks.
vSphere Cluster
I’m using two different vSphere Clusters for my setup. And in theory, you could split the components on even further vSphere clusters.
vSphere Cluster “COMP” – Contains all the AVI components (Controllers and ServiceEngines).
vSphere Cluster “AVI-Tanzu” – Will become my Supervisorcluster, containing the SUpervisorcluster-VMs and the Tanzu Kubernetes Clusters later on.
Network Setup
| Name | Subnet | Description |
|---|---|---|
| Management | 172.31.1.0/24 | Contains vCenter, ESXi, DNS, NTP, AD,… |
| vMotion | 172.31.2.0/24 | vMotion Network for ESXi Server in all Clusters |
| Supervisorcluster Management | 172.31.47.0/24 | Contains the Management NIC from the three Supervisorcluster VMs |
| AVI Management | 172.31.48.0/24 | Contains Management Interface from both, AVI Controllers and AVI ServiceEngines |
| AVI DataNetwork | 172.31.49.0/24 | Contains Frontend IP from AVI Virtual Services, sitting on AVI ServiceEngines Thus, this is where Kubernetes Services from type LoadBalancer will live |
| Primary Workload Management | 172.31.50.0/24 | Contains the second NIC from the three Supervisorcluster VMs |
| Workload Domain Network 1 | 172.31.51.0/24 | This is one of the production networks, where the Tanzu Kubernetes Cluster or Tanzu-provisioned VMs will live |
| Workload Domain Network 2 | 172.31.52.0/24 | This is one of the production networks, where the Tanzu Kubernetes Cluster or Tanzu-provisioned VMs will live |
Install AVI Controller Cluster
Deploy the Controller VMs
The basic installation is straight forward. Just deploy the AVI OVA, as it is only asking for Name and IP information. I’m using version 20.1.5.
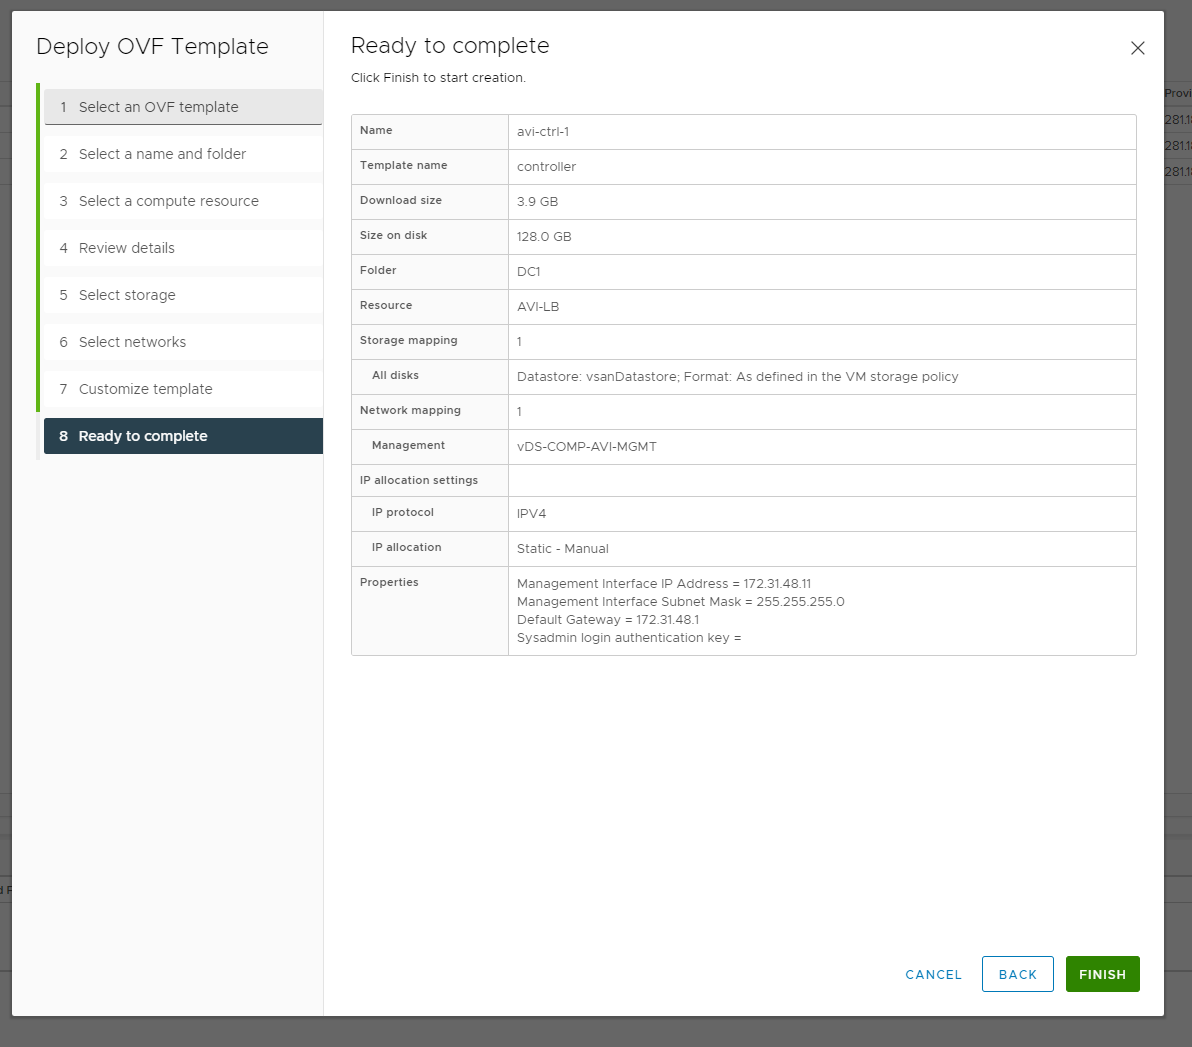
Repeat this step two more times for controller 2 and 3. Power them on and set the initial admin password on all three of them. First power on can take 10-15mins, so don’t get nervous if the web GUI is not accessible immediately.
Build the Cluster
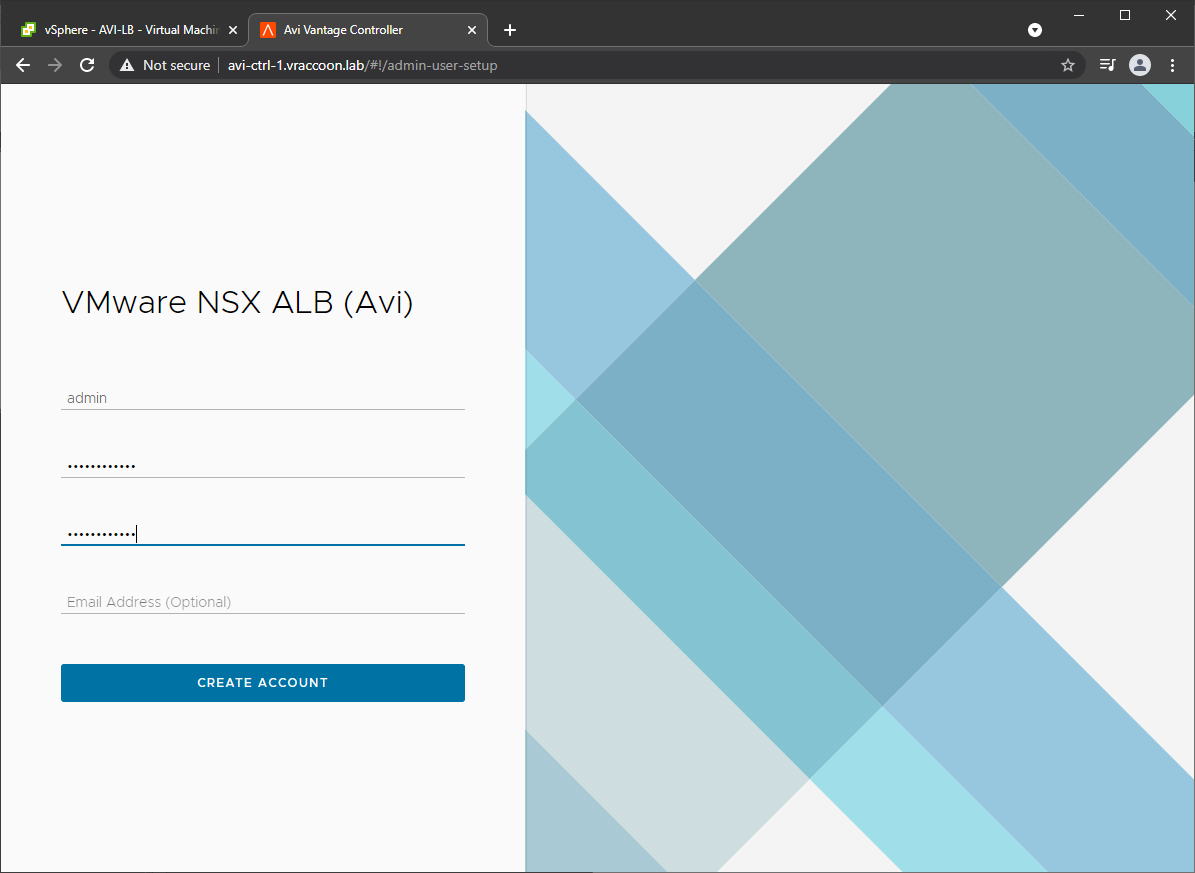
From here on, continue only on controller 1 (avi-ctrl-1.vraccoon.lab in my case). Don’t do the System Settings on controller 2 or 3. It will happen automatically when forming the cluster.
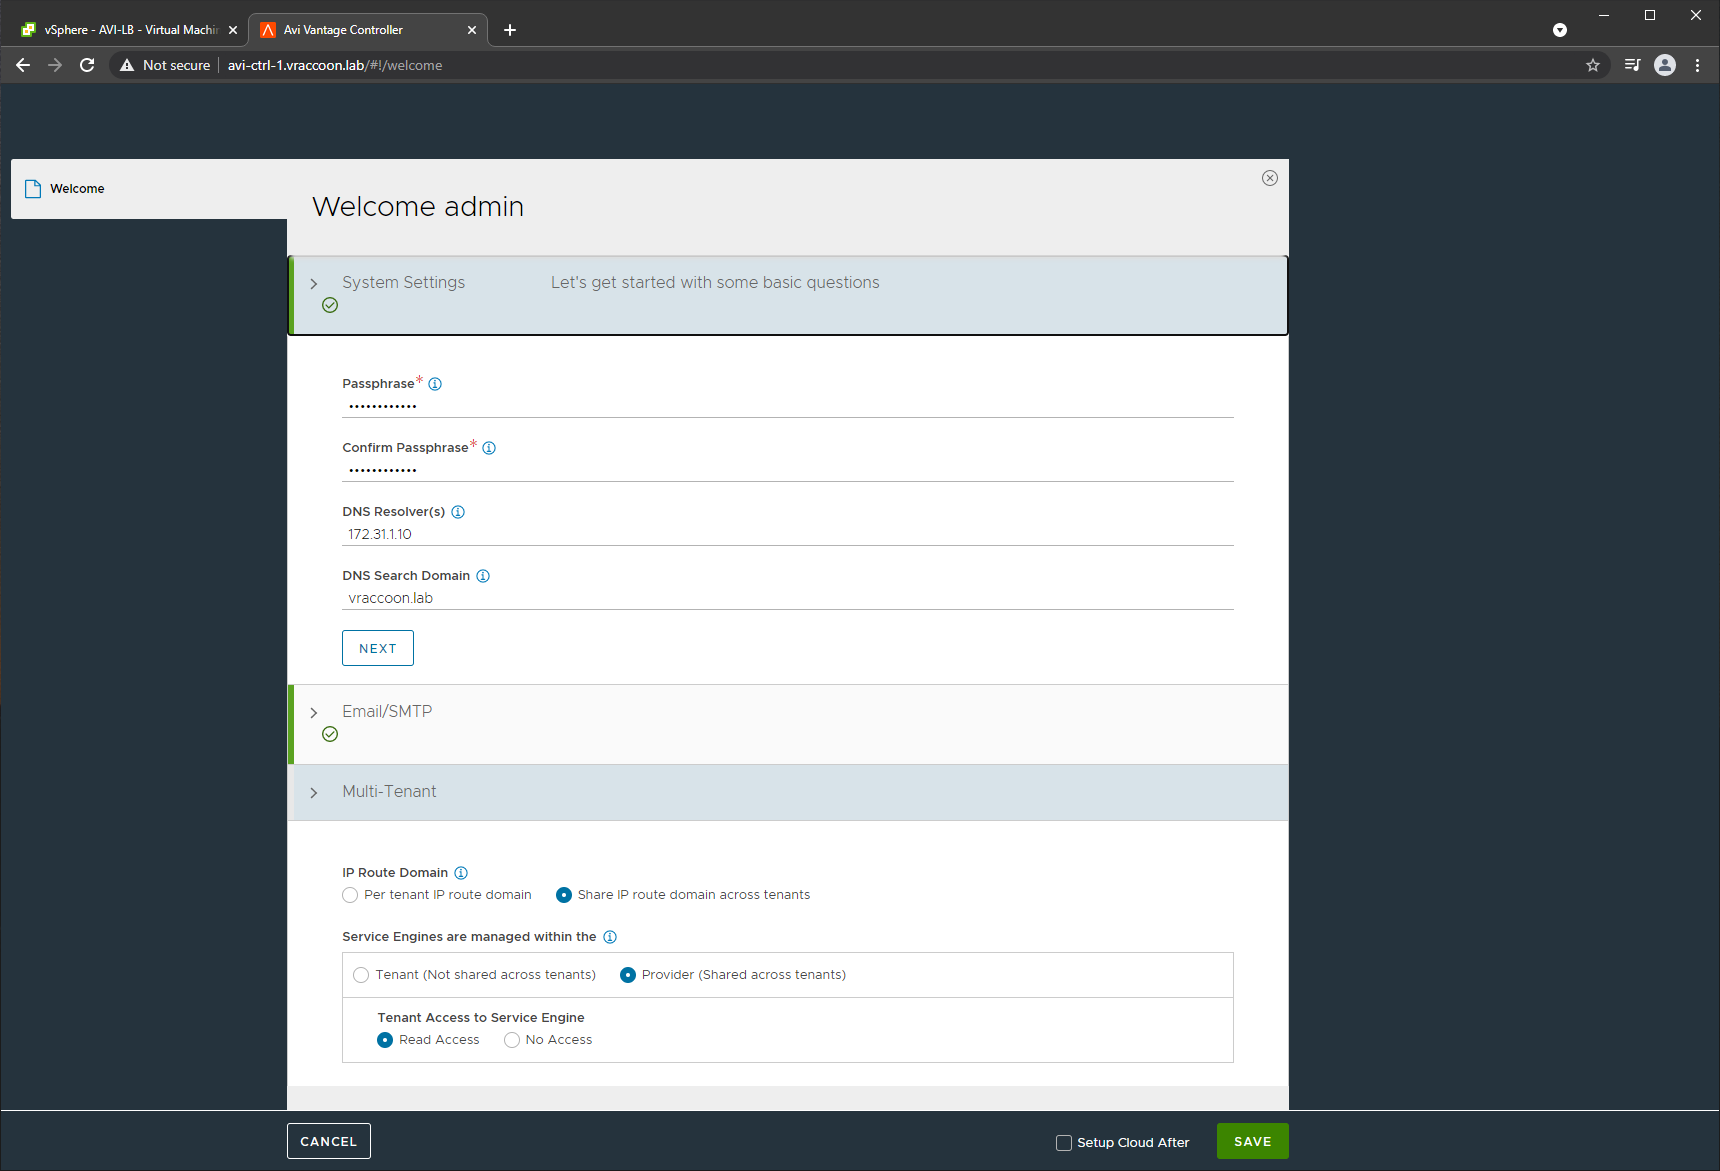
Back on controller 1, enter a Passphrase, DNS and Email/SMTP information according to your environment.
For Multi-Tenant, only the following is supported for use with vSphere with Tanzu:
IP Route Domain – Share IP route domain across tenants
Service Engines are managed within the – Provider (Shared across tenants)
Tenant Access to Service Engine – Read Access
Click Save.
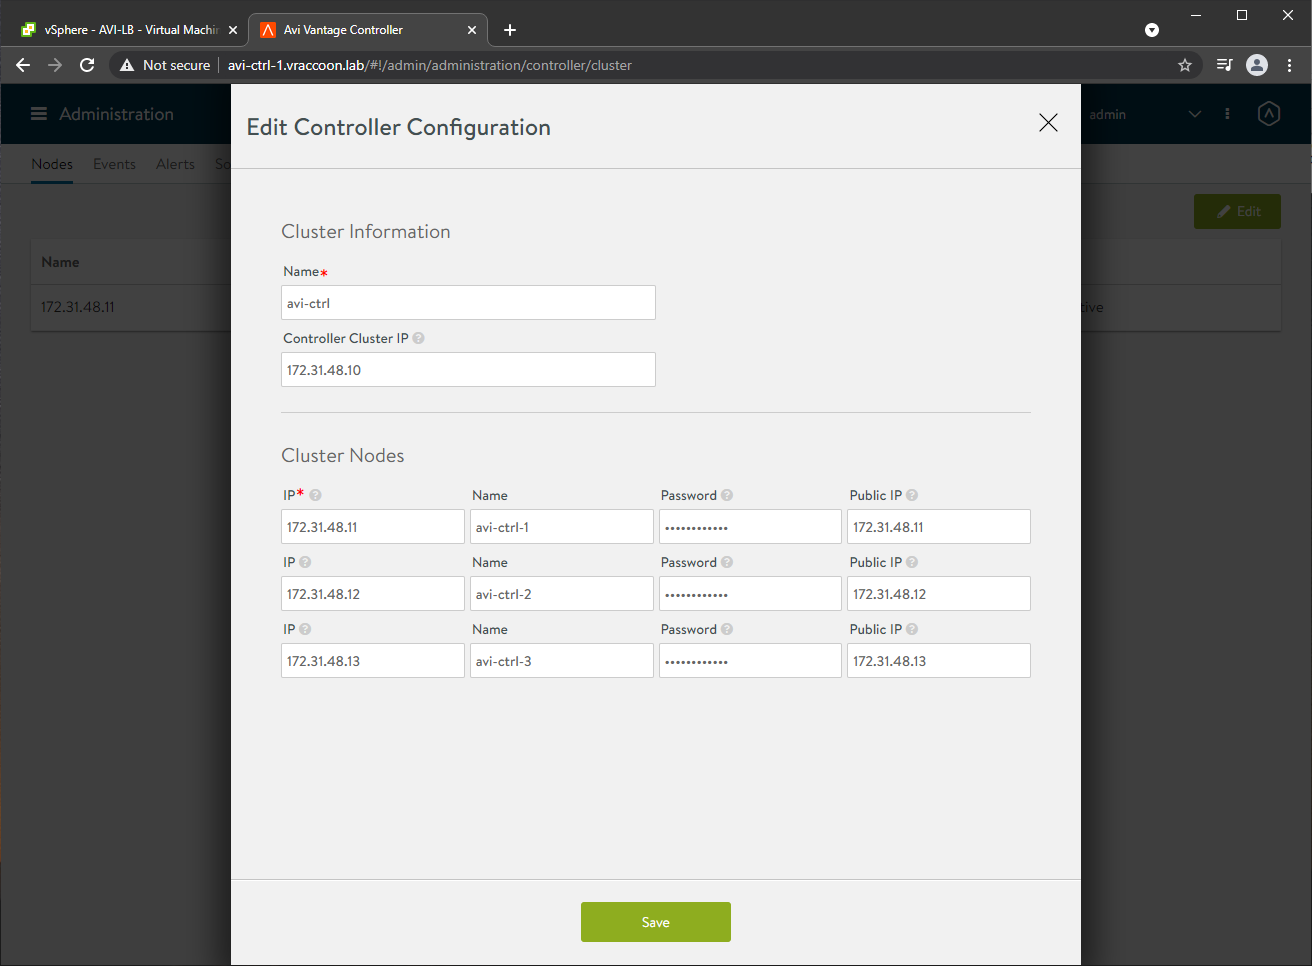
Next, we will add the other two controllers to the cluster.
Navigate to Administration (1) –> Controller (2) –> Nodes (3) –> Edit (4)
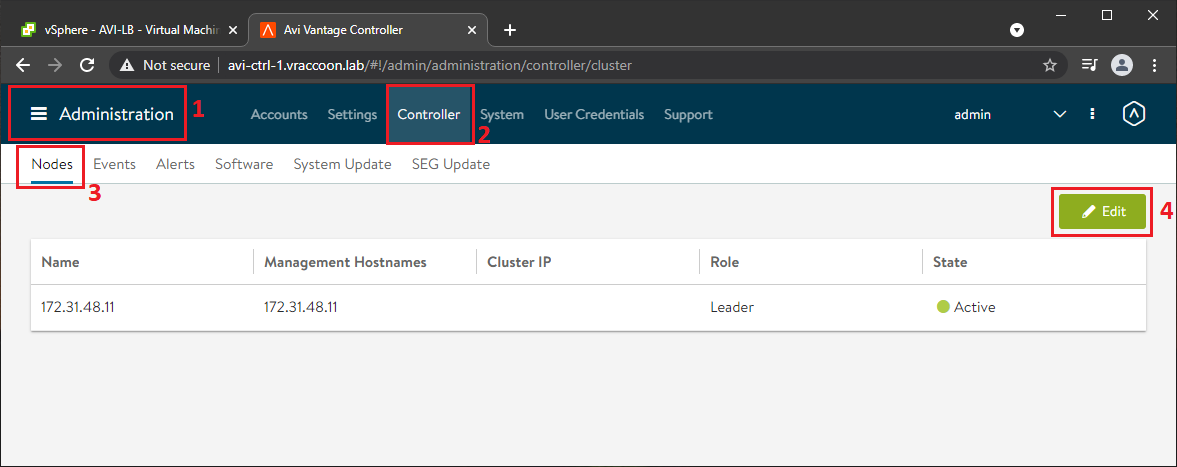
Populate the form with the other two controller node’s information. I decided to use real names for the controllers instead of the IP (which is default).
Then click Save.
After clicking save, it will first validate if the other nodes are reachable and in a valid state. If so, cluster creation will start.

You can also check the current state via CLI. SSH to the controller, stat the shell and run the following commands:
admin@avi-ctrl-1:~$ shell
Login: admin
Password:

[admin:avi-ctrl-1]: > show cluster status
+-------------------------+------------------------------------+---------------------+
| State                   | Reason                             | Up Since            |
+-------------------------+------------------------------------+---------------------+
| CLUSTER_UP_HA_NOT_READY | ['CLUSTER_COPYING_DB_FROM_LEADER'] | 2021-05-30 09:21:50 |
+-------------------------+------------------------------------+---------------------+
[admin:avi-ctrl-1]: > show cluster nodes
+------------+------------------+------------------+---------------------+
| Name       | Role             | State            | Up Since            |
+------------+------------------+------------------+---------------------+
| avi-ctrl-1 | CLUSTER_LEADER   | CLUSTER_ACTIVE   | 2021-05-30 09:21:50 |
| avi-ctrl-2 | CLUSTER_FOLLOWER | CLUSTER_STARTING | 2021-05-30 09:21:50 |
| avi-ctrl-3 | CLUSTER_FOLLOWER | CLUSTER_STARTING |                     |
+------------+------------------+------------------+---------------------+
Replace the certificate
Last thing for my base deployment of the AVI Controller Cluster is to change the SSL/TLS Certificate.
I’ve already written a dedicated post, how to do this: AVI CONTROLLER CLUSTER CUSTOM SSL/TLS CERTIFICATE
Now, we have our AVI Cpntroller Cluster up and running. So far, there where no specific configurations for vSphere with Tanzu. I’ll cover that in INSTALLING VSPHERE WITH TANZU USING NSX / AVI ADVANCED LOAD BALANCER – PART 2.