AVI Controller Cluster Custom SSL/TLS Certificate
Since VMware vSphere 7.0 Update 2 it is possible to integrate NSX Advanced LoadBalancer (aka AVI) into vSphere with Tanzu. As part of the installation wizard, you need to provide the AVI Controller SSL/TLS certificate to vSphere. In a Lab environment this is pretty straight forward, because most of the time you only have one AVI Controller with a self-signed certificate.
But in production environments, you might want to have 3 Controllers (for redundancy of course) and also use a valid certificate, signed by your own Certificate Authority.
In this post, I want to demonstrate how to create a certificate, that can be used for the cluster address, but is also valid for each individual controller.
In contrast to NSX-T manager cluster, where you need a certificate for each individual manager, plus another one for the VIP, the AVI controller cluster has only one certificate.
Create the certificate
There are two different ways to create the Certificate Signing Request (CSR). You can either use the wizard within the AVI controller, or entirely create it yourself with a tools of your choice. I decided to use the openssl tool as my way to go.
Create the certificate config
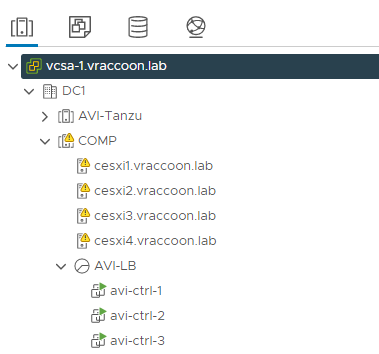
I have three AVI Controller Nodes plus the VIP:
- avi-ctrl.vraccoon.lab – 172.31.48.10
- avi-ctrl-1.vraccoon.lab – 172.31.48.11
- avi-ctrl-2.vraccoon.lab – 172.31.48.12
- avi-ctrl-3.vraccoon.lab – 172.31.48.13
Thus, my openssl config looks like this:
[ req ]
default_bits = 2048
distinguished_name = req_distinguished_name
req_extensions = req_ext
prompt = no
[ req_distinguished_name ]
countryName = DE
stateOrProvinceName = Germany
localityName = BER
organizationName = vRaccoon
organizationalUnitName = LAB
commonName = avi-ctrl.vraccoon.lab
[ req_ext ]
subjectAltName = @alt_names
[alt_names]
DNS.1 = avi-ctrl.vraccoon.lab
DNS.2 = avi-ctrl-1.vraccoon.lab
DNS.3 = avi-ctrl-2.vraccoon.lab
DNS.4 = avi-ctrl-3.vraccoon.lab
Note, that all three controller’s FQDN and the VIP is added as Subject Alternate Names (SAN).
In theory, it would also work if you only enter the VIP as SAN. But in case you navigate to any of the controller directly, the certificate would not match the FQND, hence throwing a certificate warning.
Create the certificate signing request and key
Next, I’ll create the CSR and the key:
vraccoon@ubu:~$ openssl req -nodes -newkey rsa:2048 -keyout avi-ctrl.key -config avi-ctrl.cnf -out avi-ctrl.csr
Generating a RSA private key
......................................................................+++++
........................+++++
writing new private key to 'avi-ctrl.key'
-----
vraccoon@ubu:~$ ll
total 24
drwxrwxr-x  2 vraccoon vraccoon 4096 May 29 13:35 ./
drwxr-xr-x 21 vraccoon vraccoon 4096 May 29 13:35 ../
-rw-rw-r--  1 vraccoon vraccoon  472 May 29 13:35 avi-ctrl.cnf
-rw-rw-r--  1 vraccoon vraccoon 1184 May 29 13:36 avi-ctrl.csr
-rw-------  1 vraccoon vraccoon 1704 May 29 13:36 avi-ctrl.key
Create the certificate
Now, we can get the CSR signed. I am using an Active Directory Certificate Services.
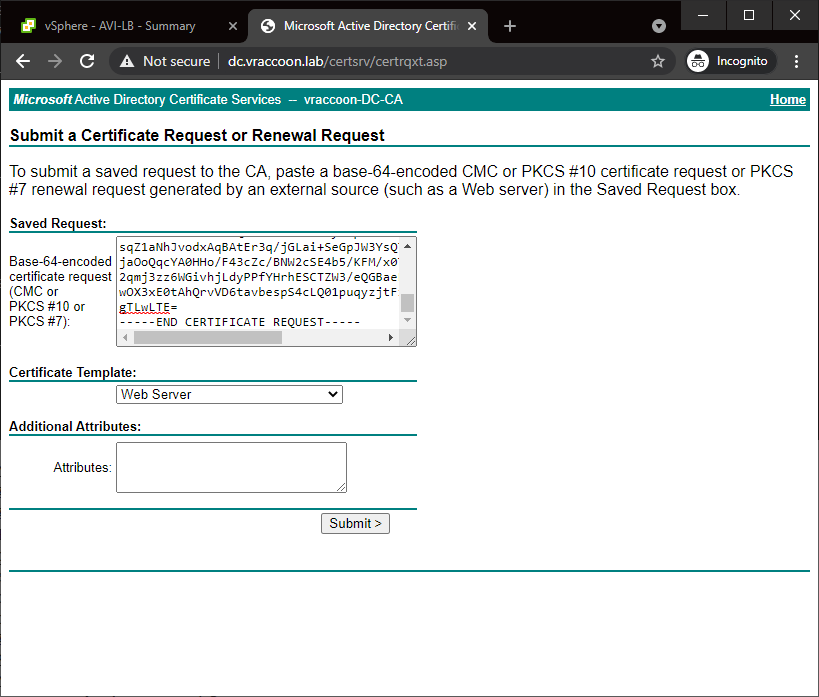
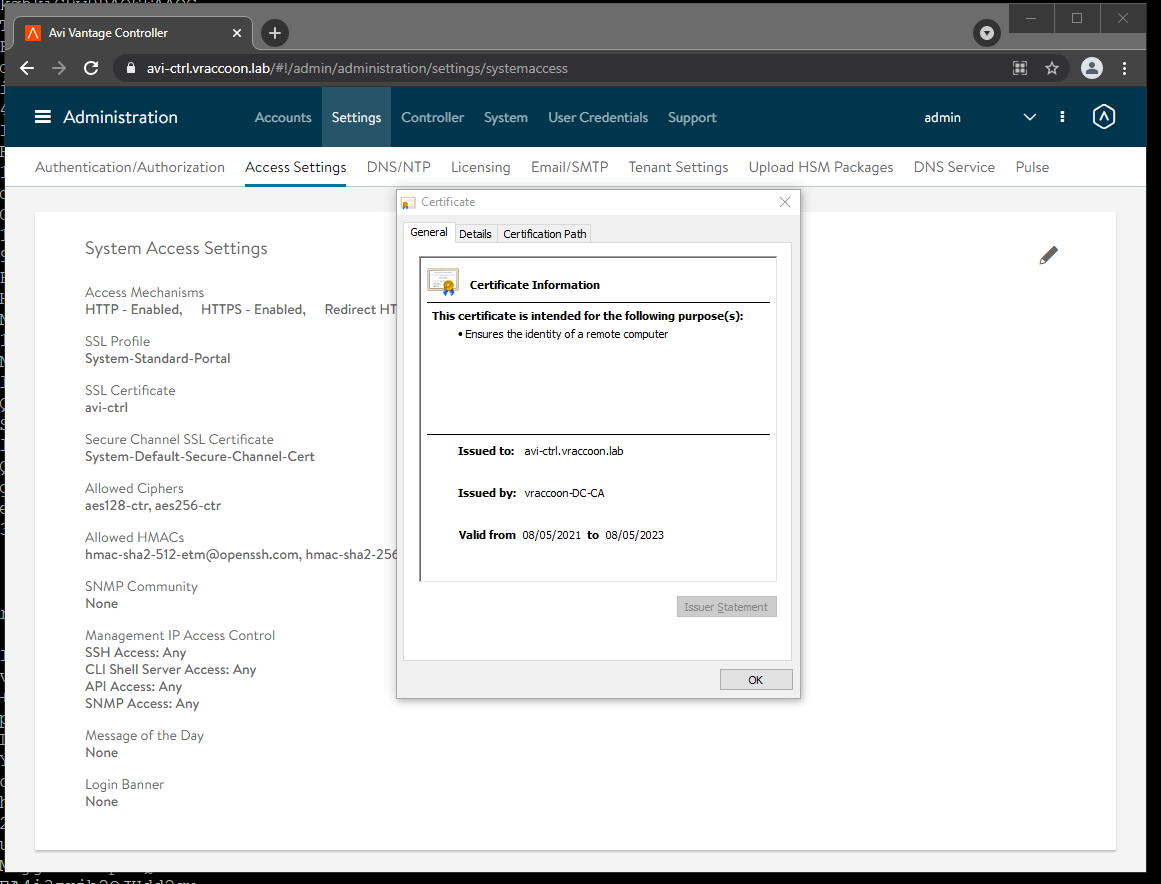
Let’s validate the certificate, just to be sure:
vraccoon@ubu:~$ openssl x509 -noout -text -in avi-ctrl.crt
Certificate:
    Data:
        Version: 3 (0x2)
        Serial Number:
            5f:00:00:00:2d:ec:0d:27:29:2a:2d:d5:1a:00:00:00:00:00:2d
        Signature Algorithm: sha256WithRSAEncryption
        Issuer: DC = lab, DC = vraccoon, CN = vraccoon-DC-CA
        Validity
            Not Before: May  8 21:50:34 2021 GMT
            Not After : May  8 21:50:34 2023 GMT
        Subject: C = DE, ST = Germany, L = BER, O = vRaccoon, OU = LAB, CN = avi-ctrl.vraccoon.lab
        Subject Public Key Info:
            Public Key Algorithm: rsaEncryption
                RSA Public-Key: (2048 bit)
                Modulus:
                    00:bf:23:dc:1e:f2:0f:bb:ea:bc:40:7d:14:65:e7:
                    3d:e2:d0:2c:be:4f:16:d3:f4:e2:dc:88:a7:bd:b8:
                    69:da:0d:8a:30:9f:a6:ae:ca:89:4d:f5:28:03:80:
                    3b:e3:e6:eb:18:1d:63:e9:1e:c2:fa:b0:59:9d:07:
                    b5:a7:27:31:a9:e8:f8:17:e6:55:03:81:77:ae:58:
                    41:09:91:f8:89:fe:38:0e:f2:23:81:86:06:bd:f3:
                    45:fa:fc:af:8a:d4:55:02:f9:22:96:b8:50:80:f5:
                    4c:bd:78:3d:f1:6a:52:5e:55:6b:2b:04:2f:5b:8a:
                    b1:d5:66:8e:76:81:a5:42:d5:3c:5b:f5:8e:69:a0:
                    c9:e8:df:ee:aa:42:3a:53:58:e6:3a:2e:ea:d5:15:
                    de:2e:87:12:89:93:29:ea:2a:8c:2e:65:ec:31:73:
                    95:67:48:a8:79:db:4f:cd:f2:e7:f8:7f:42:5c:35:
                    23:c7:47:a2:be:6a:0b:a3:5c:e2:f1:d2:31:53:7d:
                    06:20:2f:55:a6:37:f7:ed:43:42:d1:00:89:e4:d8:
                    43:ba:15:82:08:4e:16:97:cf:8e:b1:f3:95:12:e6:
                    57:8b:15:1e:0b:24:53:7a:01:4d:86:e4:b6:10:98:
                    26:e6:fe:0a:1a:f6:ad:82:e2:0c:95:65:1f:6a:4c:
                    2c:ab
                Exponent: 65537 (0x10001)
        X509v3 extensions:
            X509v3 Subject Alternative Name:
                DNS:avi-ctrl.vraccoon.lab, DNS:avi-ctrl-1.vraccoon.lab, DNS:avi-ctrl-2.vraccoon.lab, DNS:avi-ctrl-3.vraccoon.lab
            X509v3 Subject Key Identifier:
                B5:9E:D1:F1:0B:C2:73:0C:84:92:DF:15:3D:32:B3:B0:91:3A:B8:4E
            X509v3 Authority Key Identifier:
                keyid:BC:3B:1B:FE:9D:6D:E0:32:5E:C6:33:ED:5C:CB:87:8A:BB:F7:D1:65

            X509v3 CRL Distribution Points:

                Full Name:
                  URI:ldap:///CN=vraccoon-DC-CA,CN=dc,CN=CDP,CN=Public%20Key%20Services,CN=Services,CN=Configuration,DC=vraccoon,DC=lab?certificateRevocationList?base?objectClass=cRLDistributionPoint

            Authority Information Access:
                CA Issuers - URI:ldap:///CN=vraccoon-DC-CA,CN=AIA,CN=Public%20Key%20Services,CN=Services,CN=Configuration,DC=vraccoon,DC=lab?cACertificate?base?objectClass=certificationAuthority

            1.3.6.1.4.1.311.20.2:
                ...W.e.b.S.e.r.v.e.r
            X509v3 Key Usage: critical
                Digital Signature, Key Encipherment
            X509v3 Extended Key Usage:
                TLS Web Server Authentication
    Signature Algorithm: sha256WithRSAEncryption
         51:54:9b:7d:69:dc:a4:e2:0c:5d:d6:9b:fd:31:6e:c9:b2:9d:
         b7:06:77:75:ac:51:e8:eb:bd:3c:a9:af:27:79:e2:fa:a8:3c:
         26:a3:e6:fb:61:37:48:4a:d9:22:3b:93:d4:b9:67:78:e3:2c:
         ce:af:da:6d:43:77:28:8b:b0:ac:18:d7:6e:e8:5a:96:1f:19:
         31:3d:09:8f:56:39:fd:6b:2f:73:71:ee:ad:b6:7c:c0:91:7d:
         f0:96:38:e0:0d:9a:d1:f4:09:ac:32:b8:ab:3e:bc:d3:c8:f4:
         b1:01:cf:6b:e6:5b:51:e4:1a:4a:92:67:21:1a:f4:ab:8a:40:
         2e:73:f7:8c:8e:18:07:9f:8c:56:a5:cc:be:e8:bf:c0:76:1b:
         54:38:1f:47:4c:47:60:9c:9a:de:25:2f:24:5a:a4:54:ef:22:
         c6:c8:b1:11:1f:6a:89:82:bb:a3:fb:68:52:4e:79:70:20:9b:
         70:36:91:66:63:fb:fa:ab:d6:11:0b:af:be:37:95:98:11:eb:
         ef:10:db:92:1e:07:e8:e6:c9:db:66:0c:5d:ff:2a:60:2e:f2:
         12:ef:af:a9:c0:fc:fb:af:4b:f3:2e:b4:0e:1d:8a:08:93:a7:
         a6:e1:96:22:55:2f:cf:3d:d0:74:30:c9:49:94:f5:b1:96:a7:
         31:69:2c:42
Assign the certificate
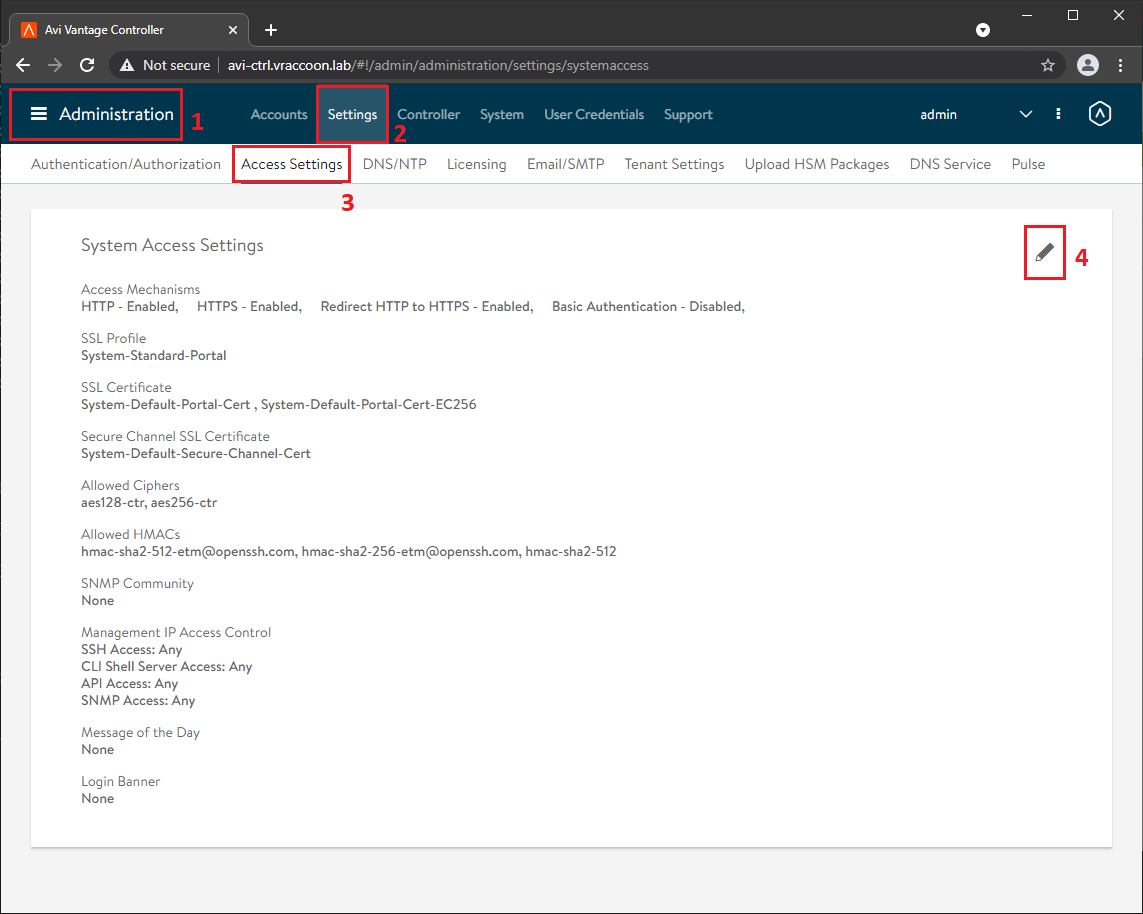
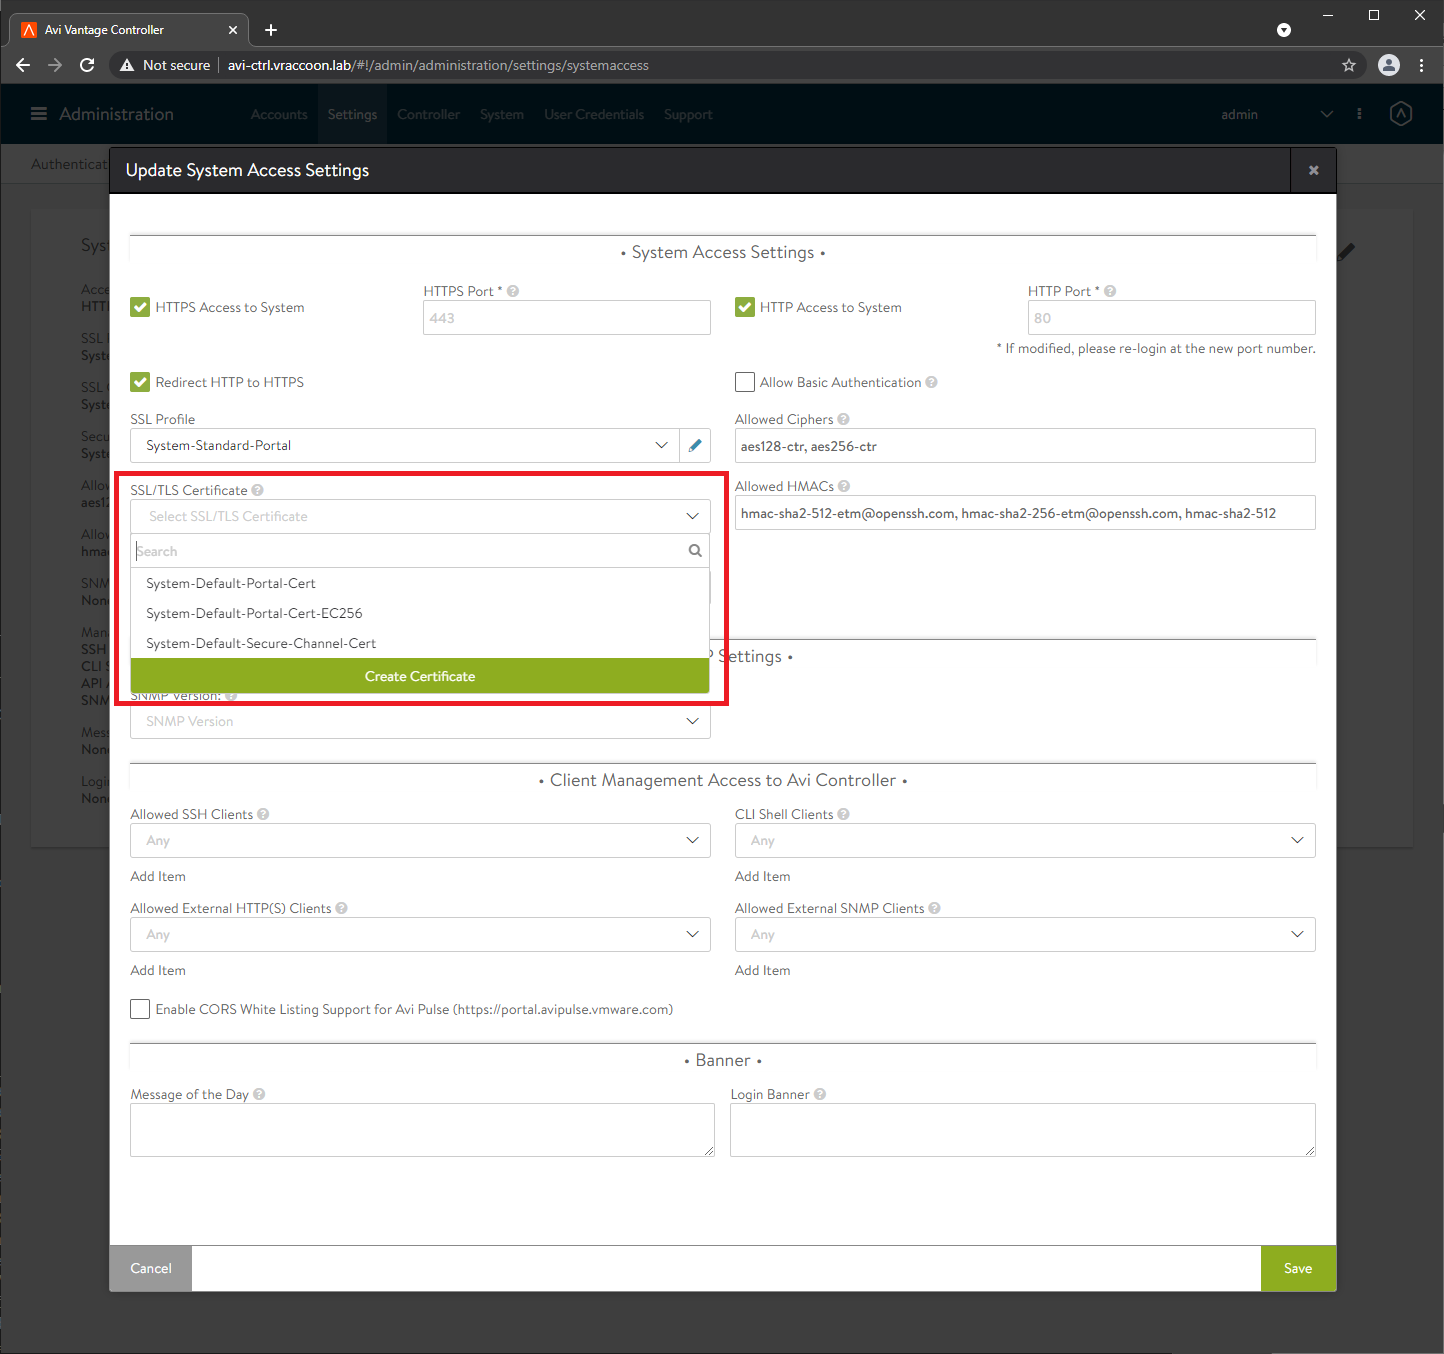
I’ve already formed the three controllers to a cluster. After log in, navigate to:
Administration (1) –> Settings (2) –> Access Settings (3) –> Edit (4)
Remove the selected default certificates under SSL/TLS Certificate
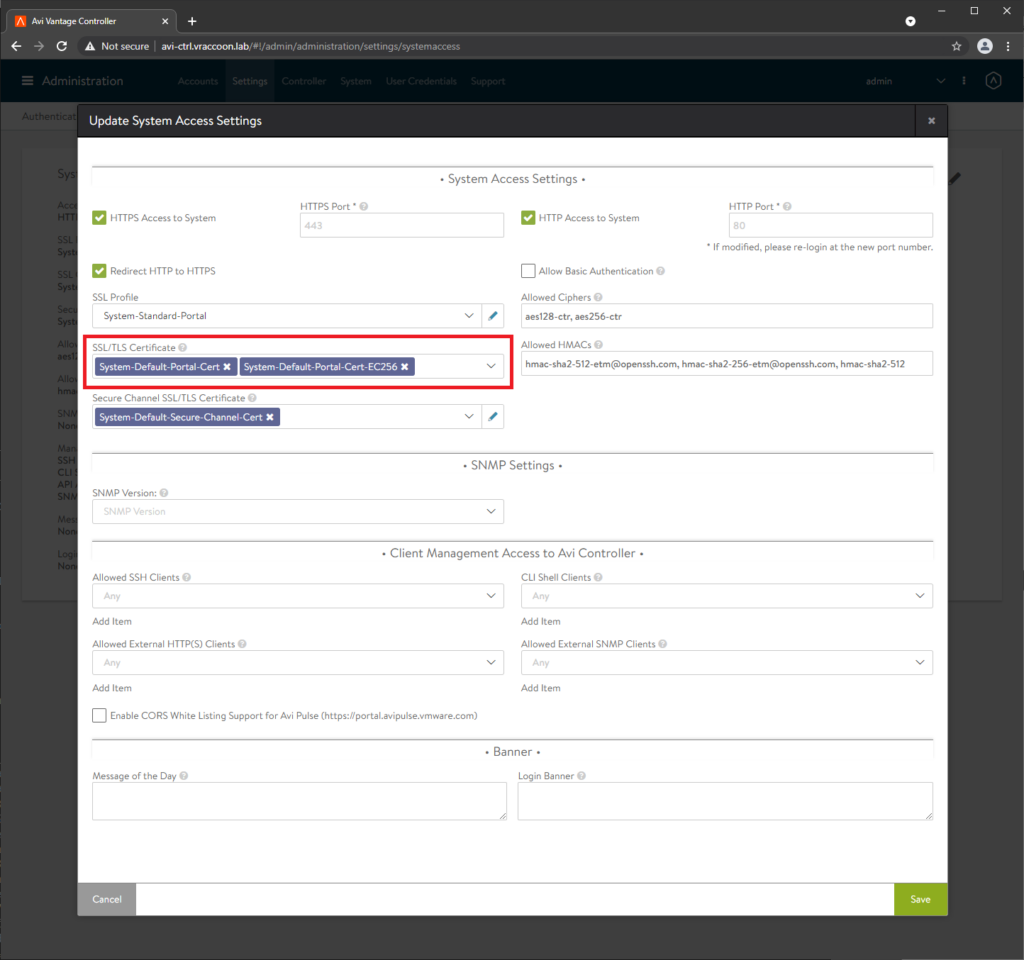
Click the drop down arrow –>Create Certificate
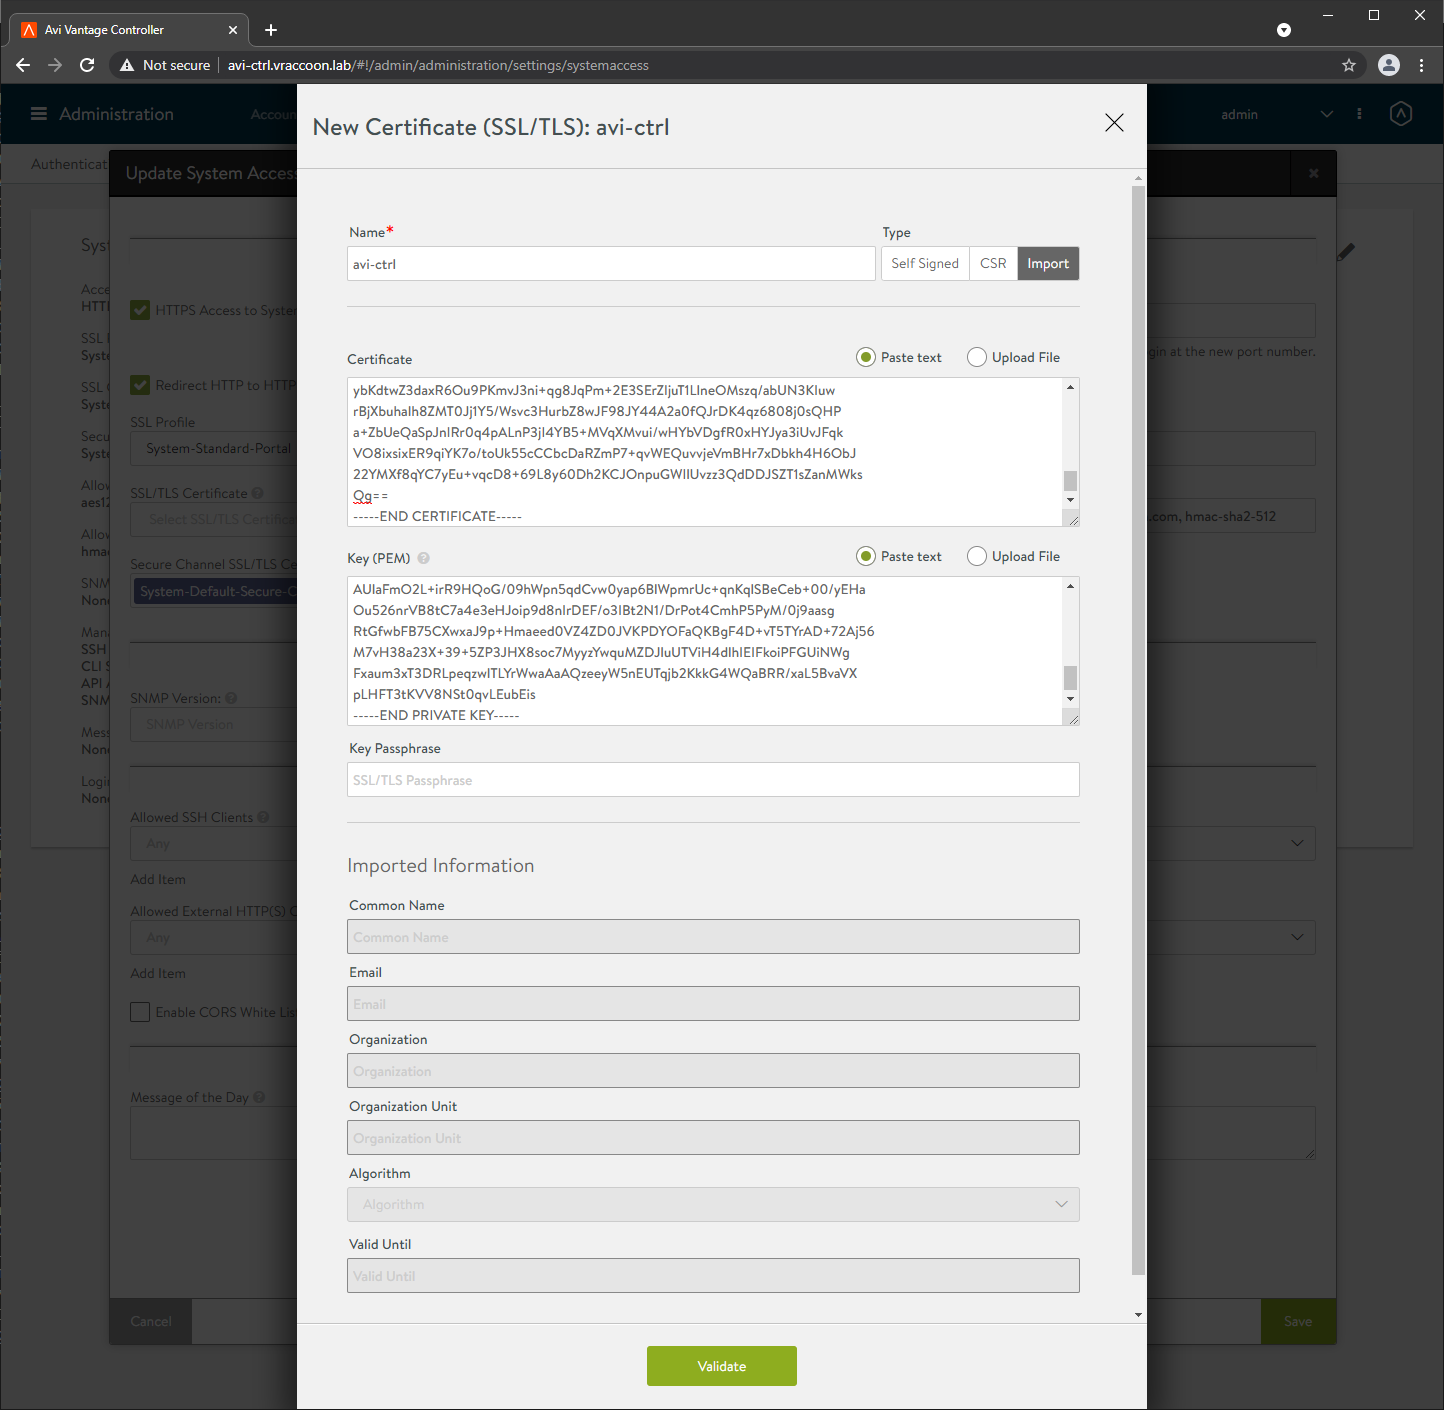
In the New Certificate Window, click Import and either upload or paste the certificate and key. You must also assign it a name. The name doesn’t need to match the fqdn, it’s just for reference.
Click, Validate –> Save
Note – If you click CSR just left to Import, you can create the CSR from within here, instead of using the openssl tool. If you do so, don’t forget to add multiple SAN entries.
Under SSL/TLS Certificate, you should now see your certificate selected. If so, click Save.
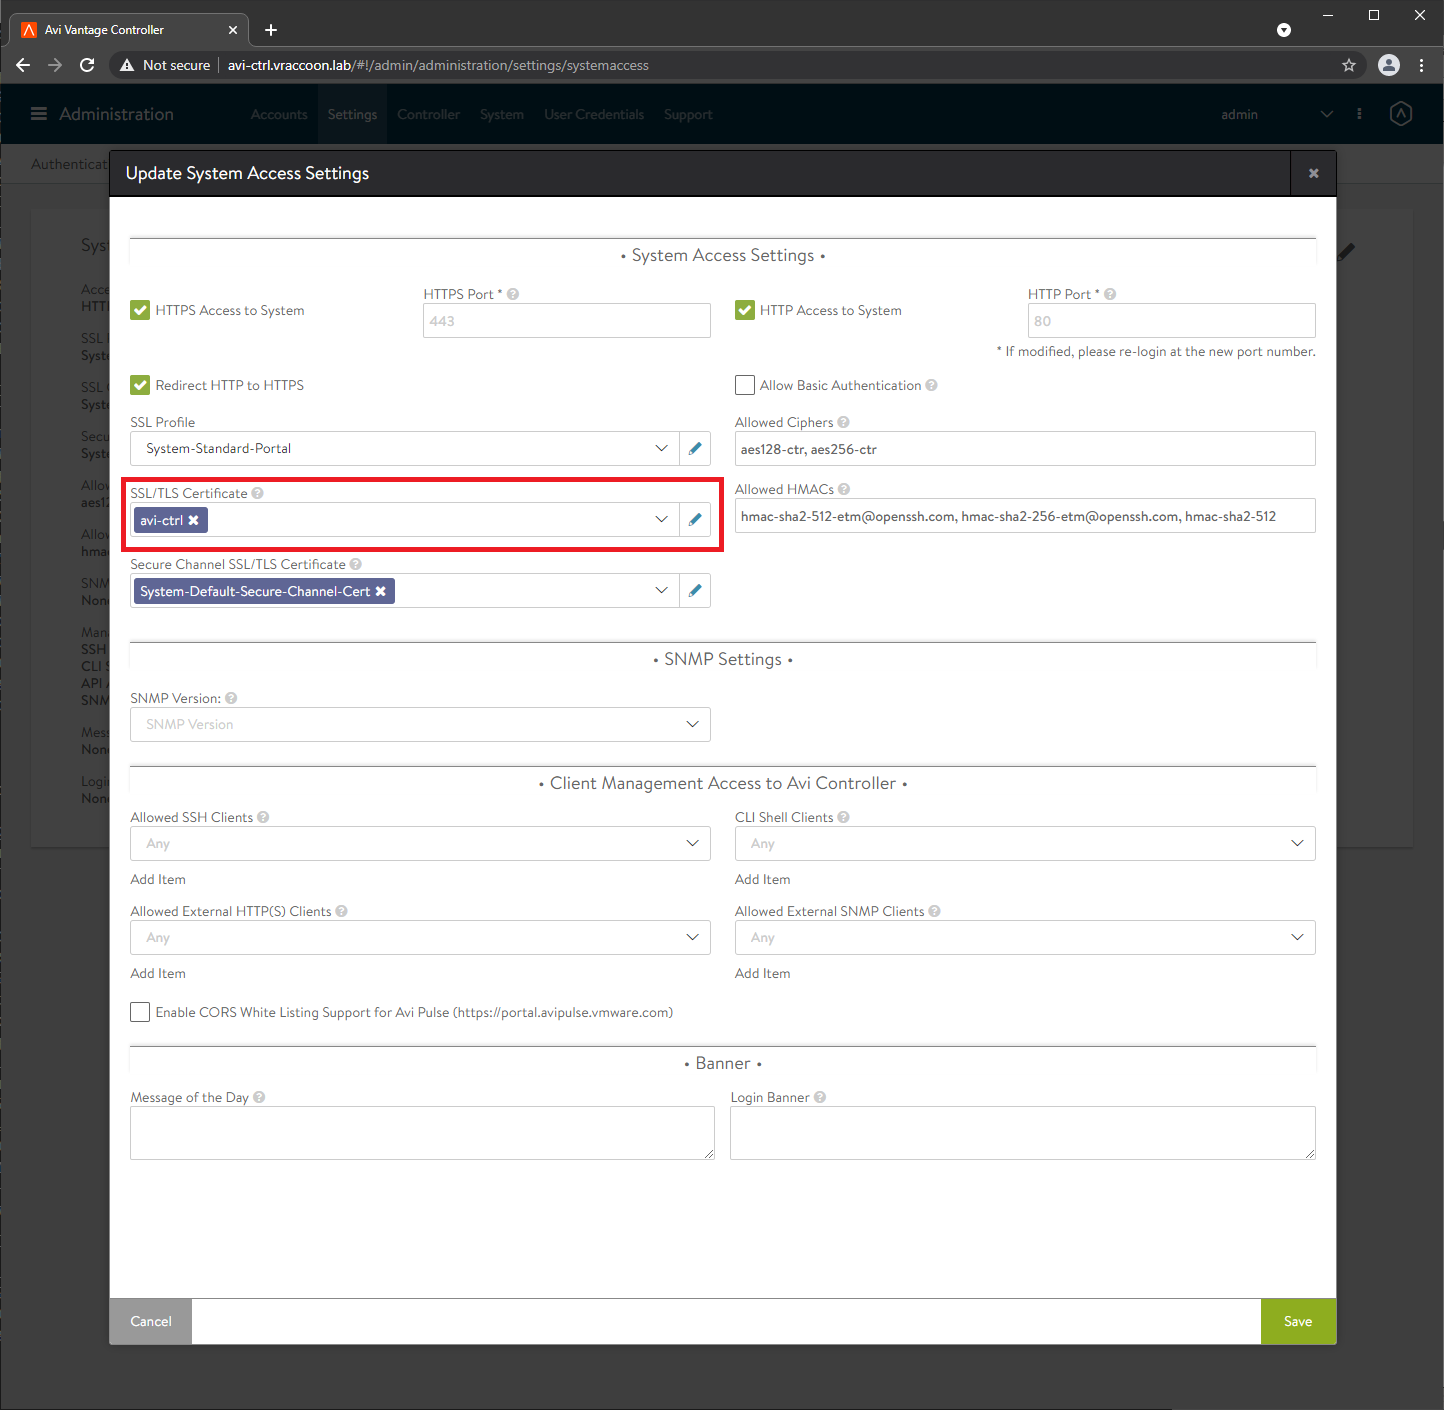
The certificate will now get applied. This can take 1-2 minutes. You might need to clear your browser cache to forget the old self-signed certificate.
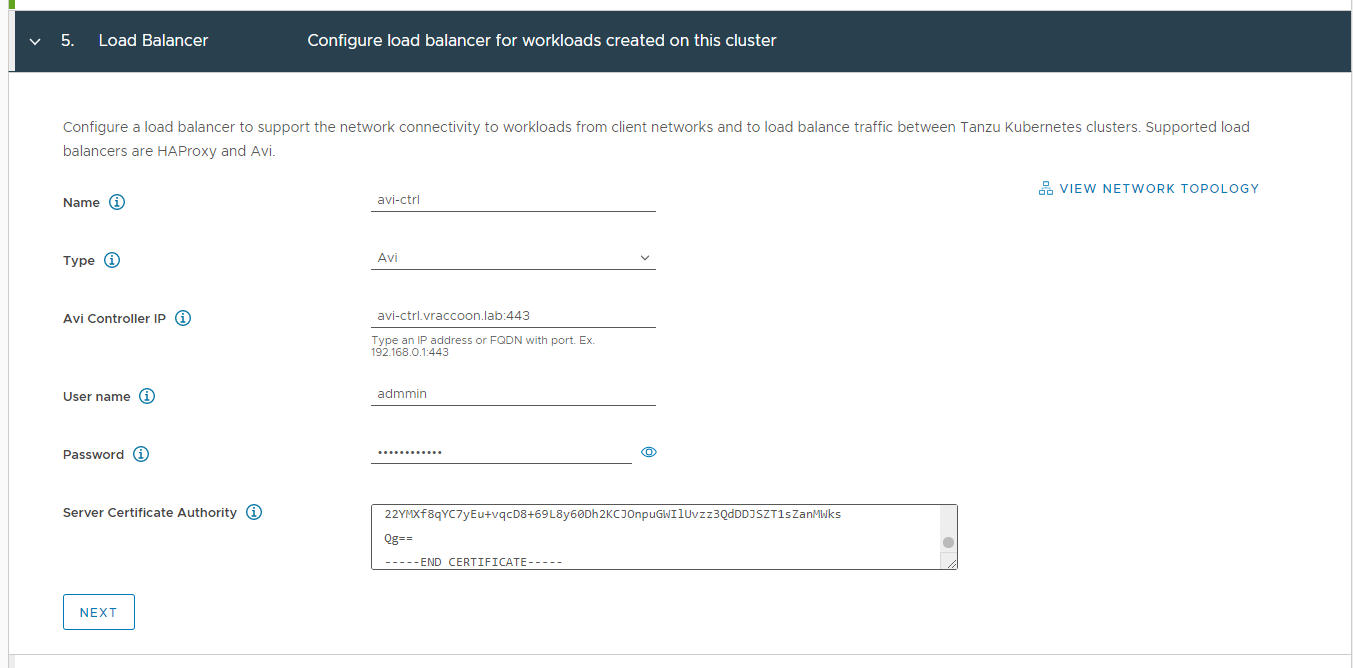
Where to use it in vSphere with Tanzu
Having valid certificates is generally a good idea and not only if you are using Kubernetes. But if you happen to use your AVI instance for vSphere with Tanzu, you would need the certificate at step 5. Load Balancer of the Supervisor Cluster Wizard:
Btw – Tanzu Kubernetes Grid has a wizard with very similar requirements.