Deploy vSphere with Kubernetes (Project Pacific) – Part 1: Inventory and Design
It’s been probably one of the biggest announcements, VMware ever made – integrating Kubernetes into vSphere. And they really went all in, combining the worlds leading virtualization platform with the worlds leading container platform. And when I say “combining”, I mean it. Its natively integrated into each other and not just build on top of each other, like all the other solutions out there.
And now, for a few days, vSphere 7 is GA and so is Project Pacific (in theory at least).
So I decided to make a Guide on how to build it in your HomeLab. I’m basically using a bunch of NUCs in my HomeLab. Luckily, I didn’t run into any compatibility issues 🙂
This Post is part of a series:
–> Deploy vSphere with Kubernetes (Project Pacific) – Part 1: Inventory and Design
Deploy vSphere with Kubernetes (Project Pacific) – Part 2: Prepare base networking
Deploy vSphere with Kubernetes (Project Pacific) – Part 3: Prepare base storage (FreeNAS)
Deploy vSphere with Kubernetes (Project Pacific) – Part 4: Install NSX-T
Deploy vSphere with Kubernetes (Project Pacific) – Part 5: Configure NSX-T
Deploy vSphere with Kubernetes (Project Pacific) – Part 6: Some basic testing
Deploy vSphere with Kubernetes (Project Pacific) – Part 7: Enable Workload Management
Deploy vSphere with Kubernetes (Project Pacific) – Part 8: Deploy first Workloads
Inventory
3x Intel Dawson Canyon (NUC7i7DNHE) each with the following:
- 2,5” SSD 1TB – CT1000MX500SSD1
- M.2 250GB – CT250MX500SSD4
- 2x 16GB SODIMM-2400
3x Intel Hades Canyon (NUC8i7HNK) each with the following:
- 2,5” SSD 1TB – CT1000MX500SSD1
- 2x 32GB SODIMM-2667
1x Cisco SG350-10
Design Decision
Right now, there are two different approaches on how to install vSphere with Kubernetes.
- Using VMware Cloud Foundation SDDC Manager (clearly the preferred Method by VMware, and currently the only official, since Licenses are only being sold together with VCF)
- The manual way. This is the way, we are following here.
For each and every detail, there is really extensive documentation:
https://docs.vmware.com/en/VMware-vSphere/7.0/vsphere-esxi-vcenter-server-70-vsphere-with-kubernetes-guide.pdf
Cluster Layout
When it comes to the Clusterlayout, we have again two options:
Option 1 – Combined MGMT, Edge, Workload Cluster
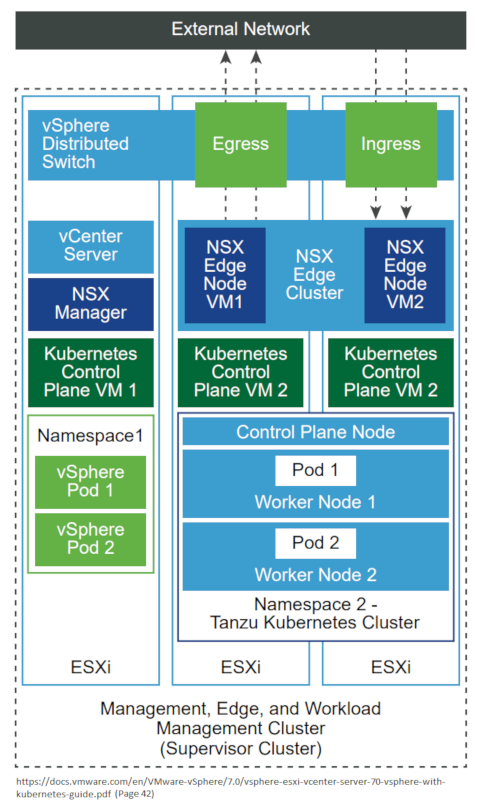
In this Option, you have everything hosted on one Cluster (vCenter, NSX Manager, Edges, Control plane VMs,…) just everything.
Option 2 – Separated MGMT/EDGE Cluster + Workload Cluster
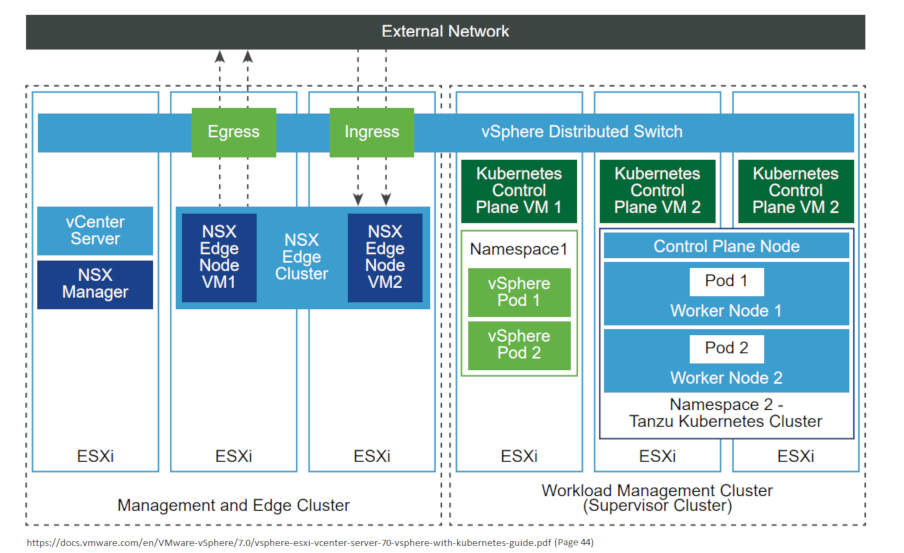
In this Option, you have a Cluster for Management+Edge, hosting vCenter, NSX-T Manager, NSXT EDGE-VMs and a dedicated Workload Cluster, hosting the Control Plane VMs and the actual Workload.
How I gonna build it
Both Options have their pros and cons. I’ll go with Option 2, because I don’t know how much resources I might need for later testings within the workload Cluster. So I decided to offload as much as possible to the Management/Edge Cluster.
Cluster Layout
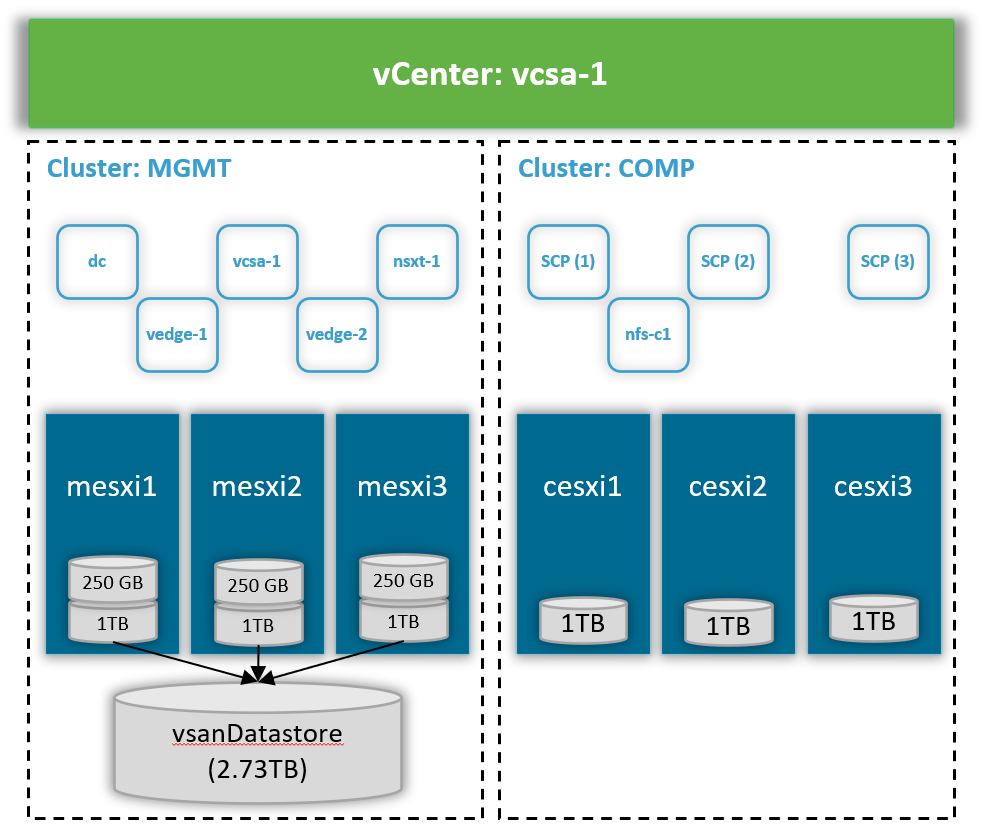
As shown in the picture, I will create two Clusters, MGMT” for vCenter, NSXT Manager and Edges. And “COMP” as the actual Workload Cluster (also hosting our FreeNas Server more on this later).
On Cluster Level, there are actually not many prerequisites, which we need to fulfill:
- DRS enabled in fully automated
- HA enabled
- Shared Storage across the cluster (as if it’s ever been different =D )
- Three (four for VSAN) Nodes with 64GB+ Memory each
I’m not going to cover how to do the base install of ESXi and vCenter. The installation has become pretty easy over the years and there are probably thousands of good blog / videos out there already 🙂