Deploy vSphere with Kubernetes (Project Pacific) – Part 8: Deploy first Workloads
This Post is part of a series:
Deploy vSphere with Kubernetes (Project Pacific) – Part 1: Inventory and Design
Deploy vSphere with Kubernetes (Project Pacific) – Part 2: Prepare base networking
Deploy vSphere with Kubernetes (Project Pacific) – Part 3: Prepare base storage (FreeNAS)
Deploy vSphere with Kubernetes (Project Pacific) – Part 4: Install NSX-T
Deploy vSphere with Kubernetes (Project Pacific) – Part 5: Configure NSX-T
Deploy vSphere with Kubernetes (Project Pacific) – Part 6: Some basic testing
Deploy vSphere with Kubernetes (Project Pacific) – Part 7: Enable Workload Management
–> Deploy vSphere with Kubernetes (Project Pacific) – Part 8: Deploy first Workloads
It’s done when it’s done! It’s done now! Finally, the environment is prepared and ready to use for the native Kubernetes experience on vSphere!
Let’s have a look and then build our first deployment and expose it.
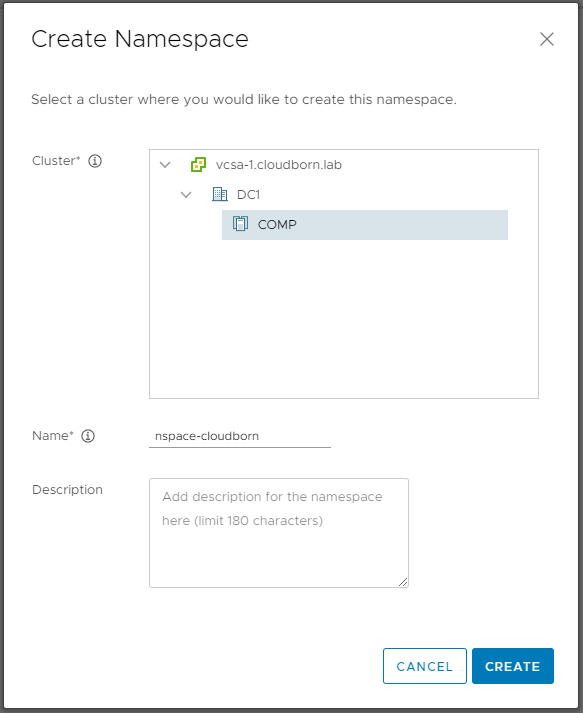
Create Namespace
Last, we left off on Menu –> Workload Management –> Cluster
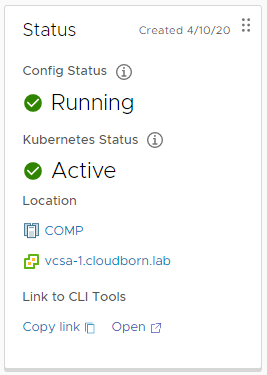
If everything worked as expected, you should now see our COMP Cluster with Config Status Running. You also see the Control Plane Node IP Address, in my case 172.31.60.193. This is actually the first NSX-T LoadBalancer in out Uplink Network (VLAN 60), which is pointing on the internal SupervisorControlPlaneVM IPs. Take a note of this IP, we will need it shortly).

But first, we want to create our first Namespace.
Namespaces are the way to separate tenants, limit resources, manage permissions, …
Let’s click on Namespaces –> NEW NAMESPACE

In the Create Namespace window, select the COMP Cluster and give the namespace a DNS compliant name (–> alphanumeric, up to 63 chars, no special chars except the dash, unique within your k8s-vcenters) and click CREATE
You should be redirected to the newly created Namespace. If not click it (either in the Workload Management Section or below your Cluster)
Assign Permissions to User
Next, we will assing permissions to a specific user. For this, I’ve created a vcenter user “cloudborn@vsphere.local” (of course, you can also add form any Identity Provider, you have configured).
In the middle of the Screen, click ADD PERMISSIONS

In the Add Permissions window, select the select the user, you want to entitle and assign the role Can edit

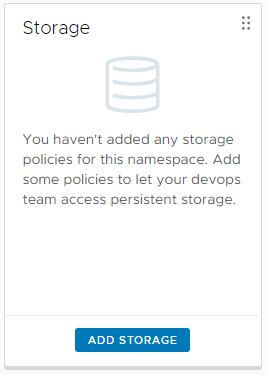
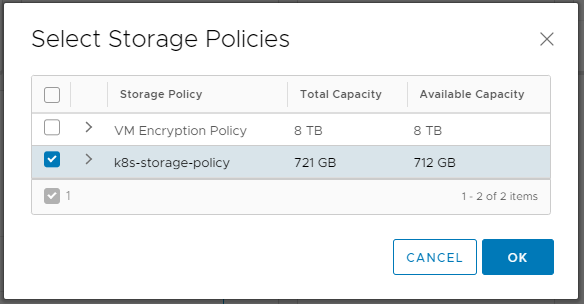
Right next to the Permissions section is the Storage section, click ADD STORAGE
Select k8s-storage-policy, the storage policy, we have already used earlier.
By now, we’ve completed the necessary steps to have a usable namespace.
Install kubectl (inclusive vsphere plugin)
Next, we need to install the kubectl. Because this is a vSphere environment, and we are actually authenticating against it, the kubectl provided by vmware comes with a plugin called kubectl-vsphere. This plugin only deals with the authentication. So, when you login, your credentials are actually verified by your SSO instead of Kubernetes itself.
To get them, either click Open in the Status area of the Namespace, or simply browse to https://172.31.60.193 (the ControlePlane IP, we took a note of at the beginning).
Either way, you’ll end up on the following page, actually telling you exactly how to install the kubectl with the vsphere-plugin.
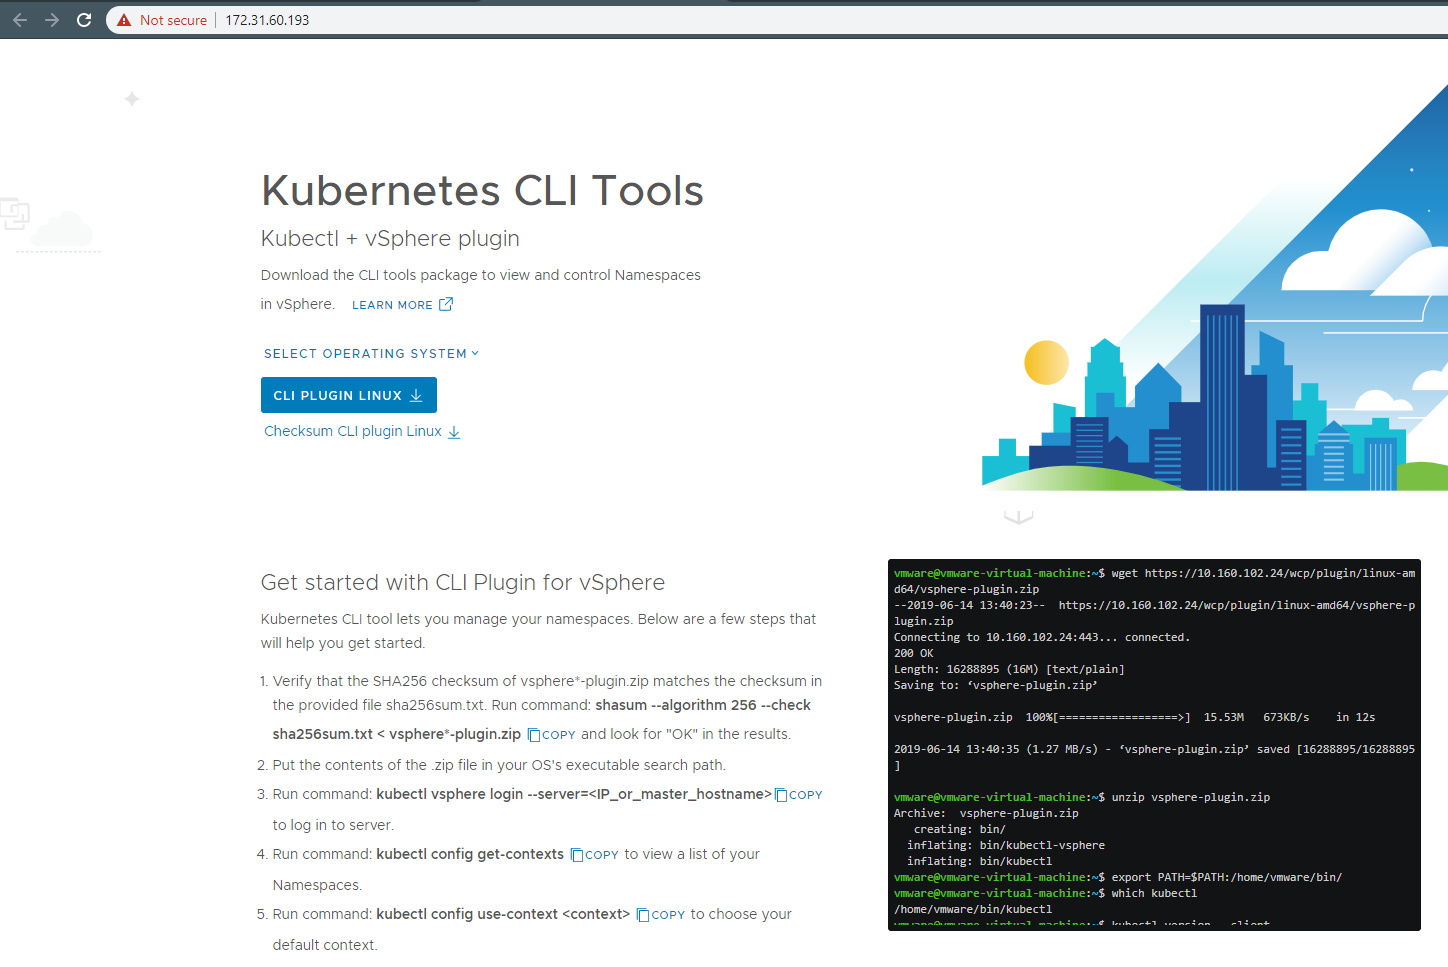
I’m going to install it on my Ubu VM.
cloudborn@ubu:~$ wget https://172.31.60.193/wcp/plugin/linux-amd64/vsphere-plugin.zip --no-check-certificate
--2020-04-10 21:51:15--  https://172.31.60.193/wcp/plugin/linux-amd64/vsphere-plugin.zip
Connecting to 172.31.60.193:443... connected.
WARNING: cannot verify 172.31.60.193's certificate, issued by ‘OU=VMware Engineering,O=vcsa-1.cloudborn.lab,ST=California,C=US,DC=local,DC=vsphere,CN=CA’:
  Unable to locally verify the issuer's authority.
HTTP request sent, awaiting response... 200 OK
Length: 27962481 (27M) [text/plain]
Saving to: ‘vsphere-plugin.zip’

vsphere-plugin.zip                                    100%[==================>]  26.67M  54.1MB/s    in 0.5s

2020-04-10 21:51:16 (54.1 MB/s) - ‘vsphere-plugin.zip’ saved [27962481/27962481]

cloudborn@ubu:~$ unzip vsphere-plugin.zip
Archive:  vsphere-plugin.zip
   creating: bin/
  inflating: bin/kubectl-vsphere
  inflating: bin/kubectl
cloudborn@ubu:~$
cloudborn@ubu:~$ sudo mv bin/* /usr/local/bin/
cloudborn@ubu:~$
Login to SupervisorControlPlane
We are now ready to grab the kubeconfig. To do so, use the kubectl vsphere login command.
–server https://172.31.60.193 (again the ControlPlane IP from earlier)
–vsphere-username cloudborn@vsphere.local (the user, you have entitled to the namespace)
cloudborn@ubu:~$ kubectl vsphere login --insecure-skip-tls-verify --server https://172.31.60.193 --vsphere-username cloudborn@vsphere.local

Password:
Logged in successfully.

You have access to the following contexts:
   172.31.60.193
   nspace-cloudborn

If the context you wish to use is not in this list, you may need to try
logging in again later, or contact your cluster administrator.

To change context, use `kubectl config use-context <workload name>`
cloudborn@ubu:~$ kubectl config get-contexts
CURRENT   NAME               CLUSTER         AUTHINFO                                    NAMESPACE
          172.31.60.193      172.31.60.193   wcp:172.31.60.193:cloudborn@vsphere.local
*         nspace-cloudborn   172.31.60.193   wcp:172.31.60.193:cloudborn@vsphere.local   nspace-cloudborn
cloudborn@ubu:~$
We are successfully logged in. We can now actually deploy something!
Deploy a Pod and expose it
Following is a short yaml file, which declares a Pod called p-nginx running image nginx:1.17.9
Additionally it declares a service called svc-nginx from type LoadBalancer (an NSX LB in fact), that exposes the Pod p-nginx.
apiVersion: v1
kind: Pod
metadata:
  labels:
    app: p-nginx
  name: p-nginx
spec:
  containers:
  - image: nginx:1.17.9
    name: p-nginx
---
apiVersion: v1
kind: Service
metadata:
  labels:
    app: p-nginx
  name: svc-nginx
spec:
  ports:
  - port: 32005
    protocol: TCP
    targetPort: 80
  selector:
    app: p-nginx
  type: LoadBalancer
To deploy it, simply run kubectl create -f <filename>
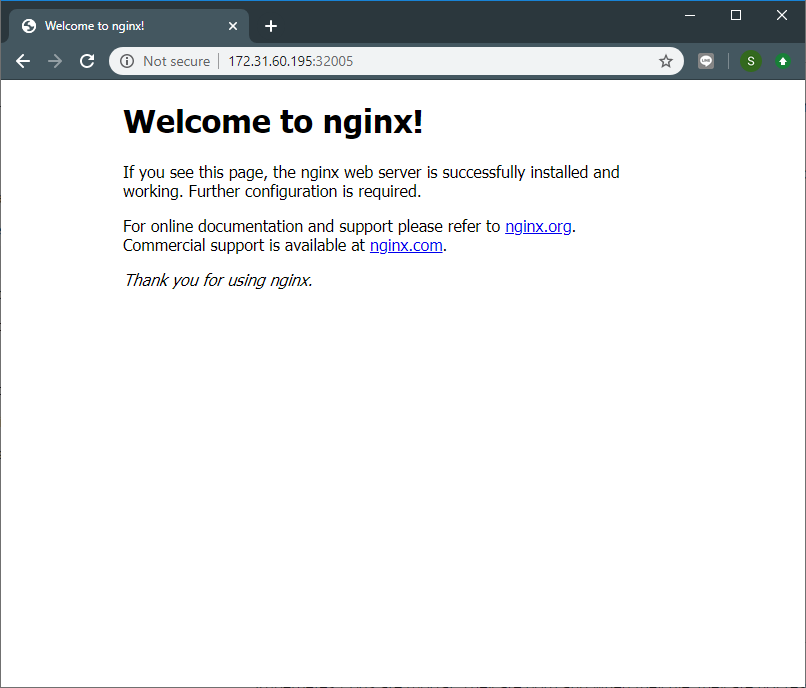
cloudborn@ubu:~$ kubectl create -f vsphere-k8s-test.yaml
pod/p-nginx created
service/svc-nginx created
cloudborn@ubu:~$
The Pod has the STATUS of Running and the service has EXTERNAL-IP 172.31.60.195 assigned. We should be able to access our nginx server http://172.31.60.195:32005/
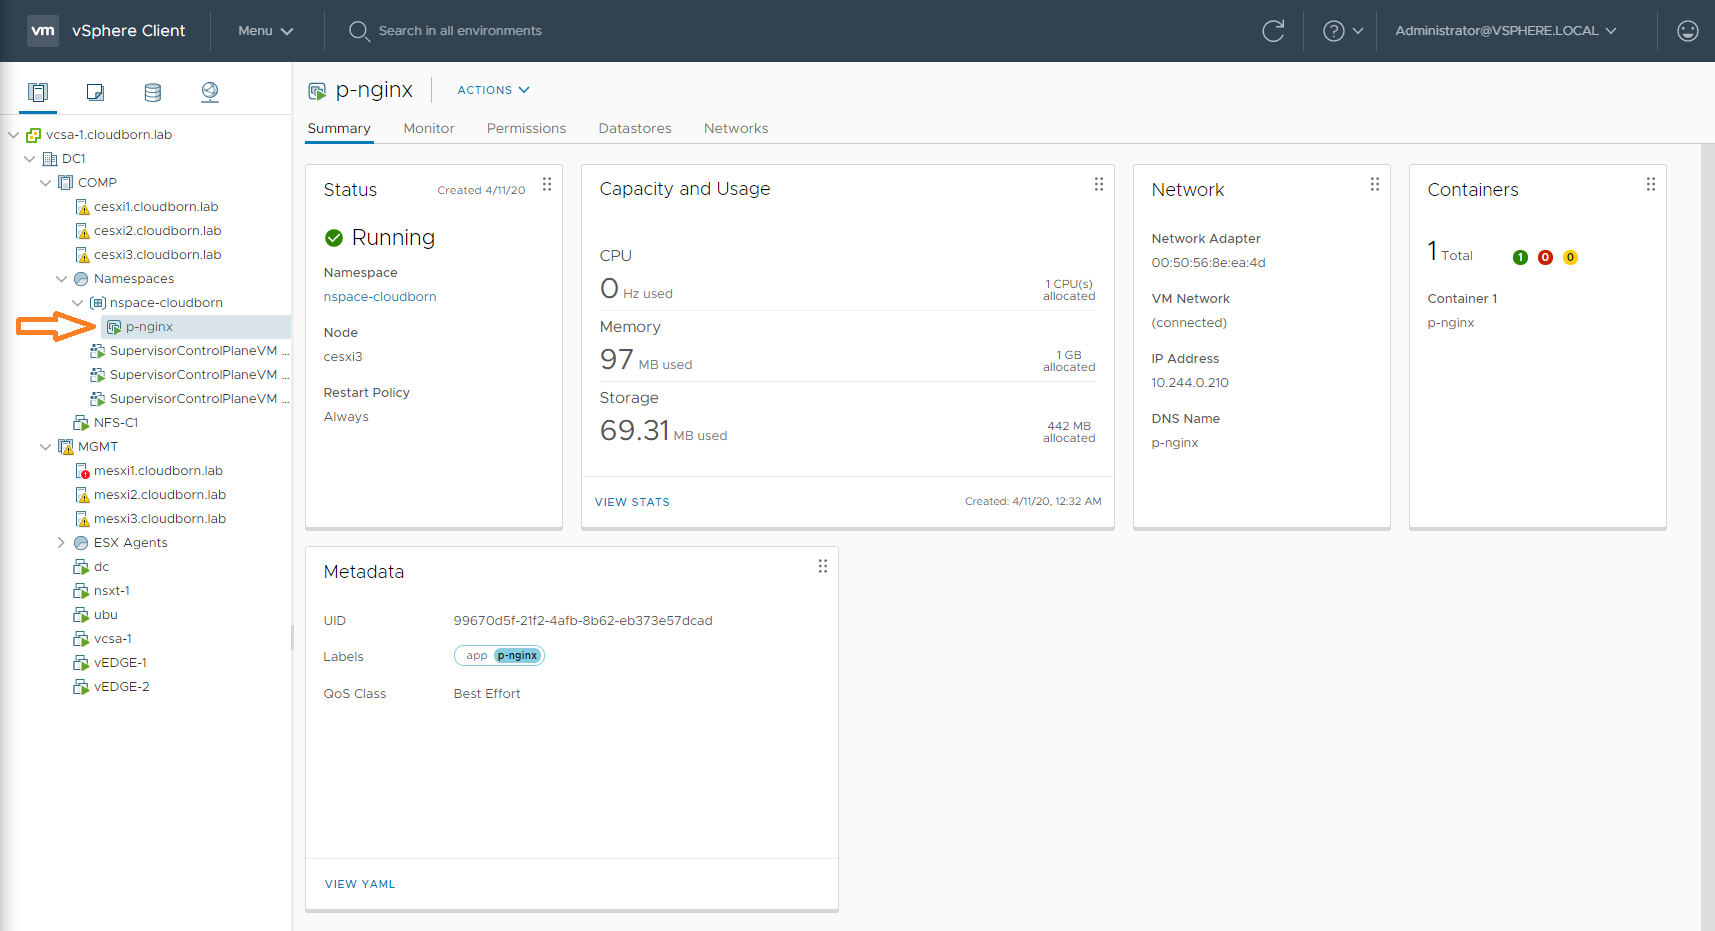
Verify it via vSphere
That is actually the moment we’ve all been waiting for. To see, what actually happened in vSphere. And it still gives me the chills to see these two worlds combined:
This concludes the series on how to deploy vSphere with Kubernetes (Project Pacific). I hope it helped you a bit to understand how all the parts interlock with each other.