Tanzu – LoadBalancer IP from specific IP Pool
Note: When I’m talking about Ingress in this article, I’m not referring to the K8s term, which is L7 LoadBalancing. Instead I’m referring to the NSX-T / vSphere with Tanzu term, which defines an entry area for your traffic e.g. in form of LoadBalancers.
Sometimes you got special services in your K8s clusters, that requires specials IPs to be exposed, that are not following your global settings.
With vSphere with Tanzu + NSX-T you got different options to do that.
During the installation of your Supervisor Cluster, you set two global pools – Ingress and Egress. Ingress is the pool, that is globally used for your L4 LoadBalancers until you specify something else.
If you create a new (Supervisor) Namespace, you got the option to “Override cluster network settings”.
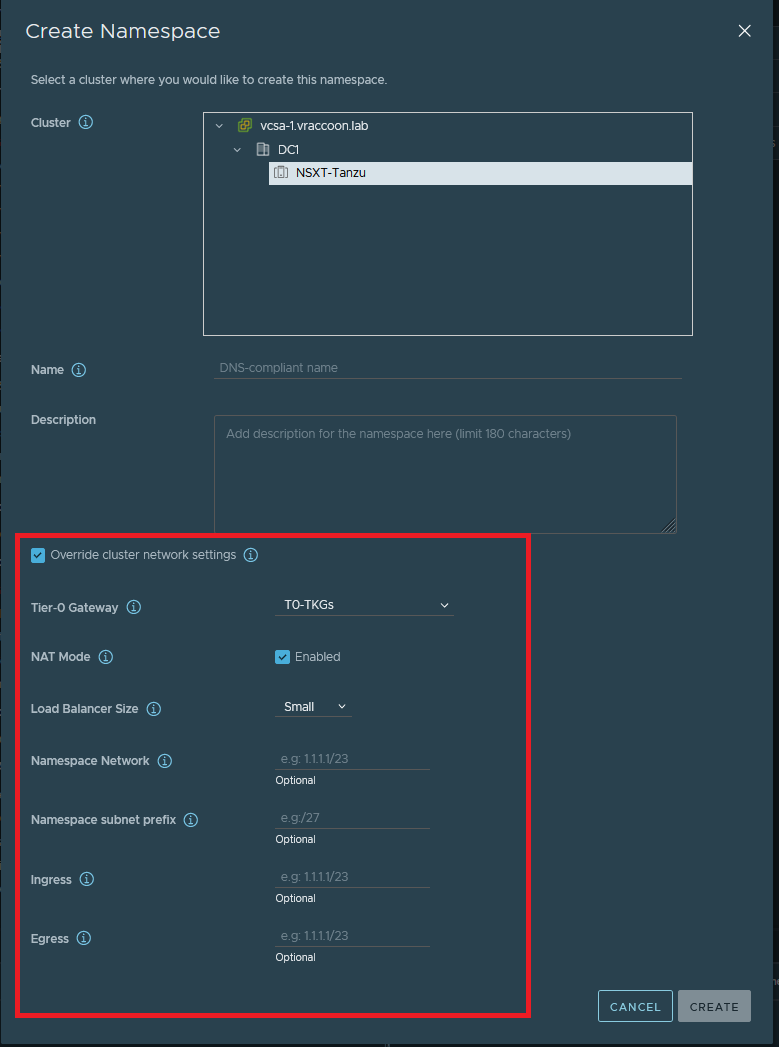
With that, you can (next to other parameters) change the Ingress pool for this namespace. In that case, every LoadBalancer IP get assigned from that pool (no matter if for VMService, your K8s Endpoints or K8s-Service of type LoadBalancer).
But what, if you are good with the global pool and only have one (or a few) services, that are supposed to be served by another IP pool? Building an entire (Supervisor) Namespace for it seems a bit much (and would waste even more of your special IPs).
My Environment
- NSX-T: 3.2.0.1.0.19232396
- vSphere: 7.0U3g (Build 20150588)
- vSphere Namespaces: 0.0.17-20026652
- SupervisorCluster: v1.22.6+vmware.1-vsc0.0.17-20026652
- Global Ingress: 172.31.250.0/24
- Global Egress: 172.31.251.0/24
- Demo Ingress: 172.31.252.0/24
HowTo
NSX-T IP Pool
First I create a new IP Pool in NSX-T with my to be assigned IPs.
Within NSX-T –> Networking (1) –> IP Address Pools (2) –> ADD IP ADDRESS POOL (3)
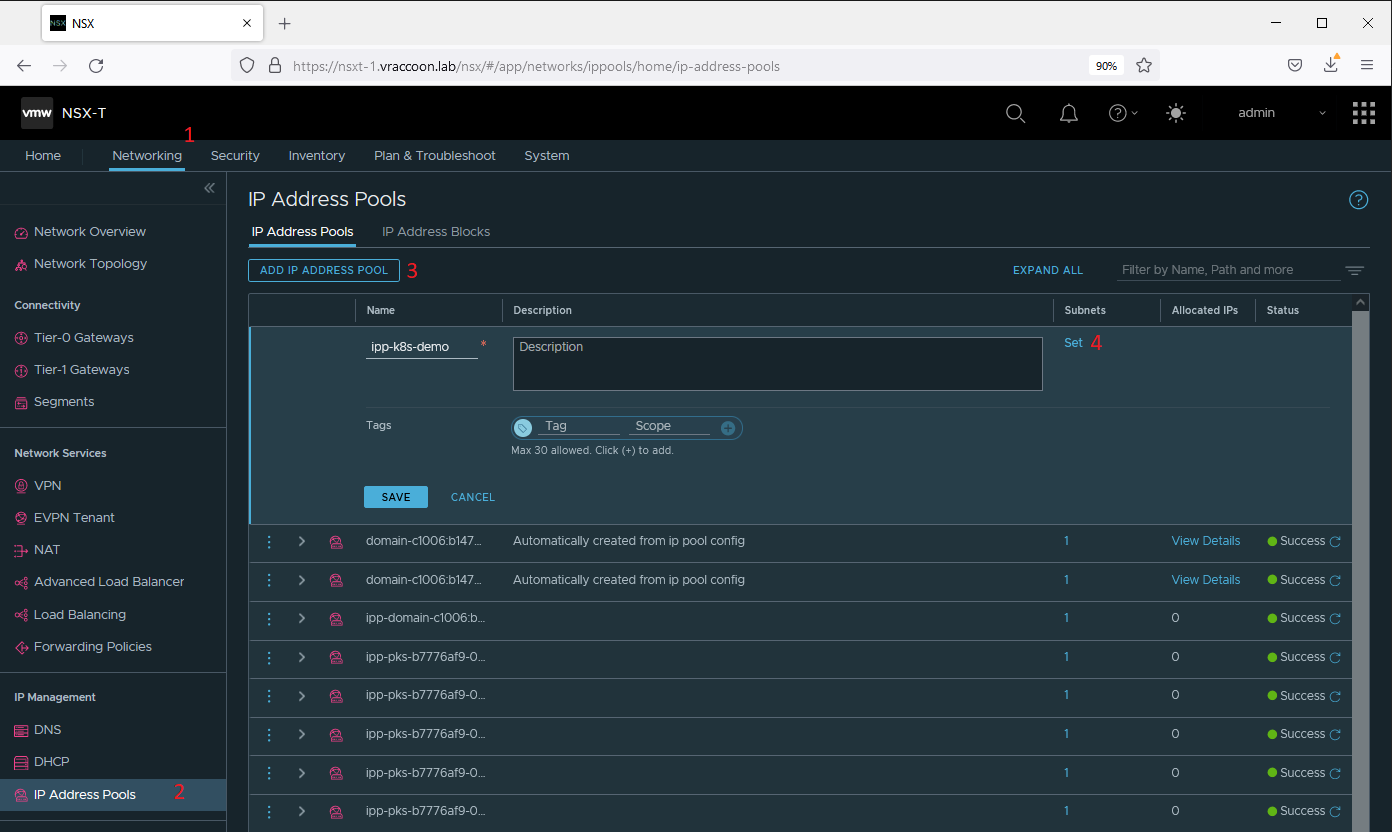
Give it a name (I call it “ipp-k8s-demo“) and click SET (4) below Subnets.
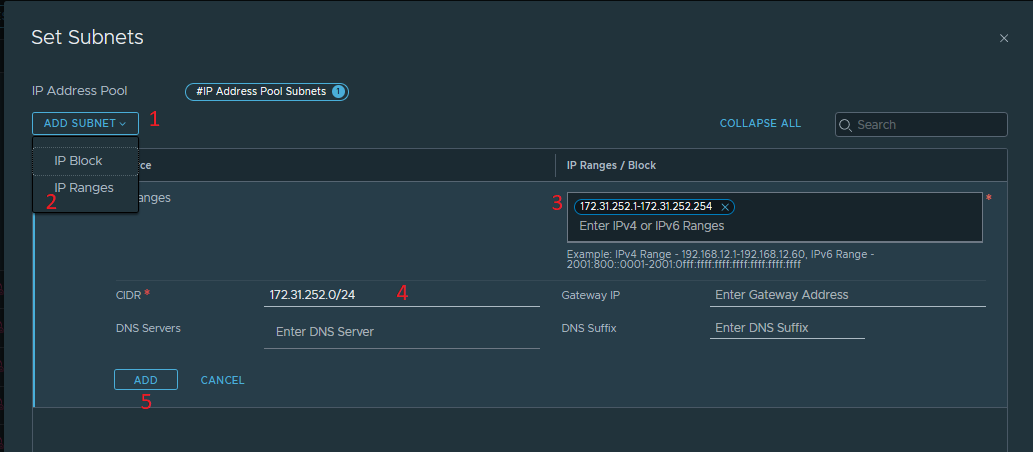
Click ADD SUBNET (1) –> IP Range (2) and fill out IP Range (3) and CIDR (4). Then click ADD to finish, followed by APPLY and SAVE.
Supervisor Namespace
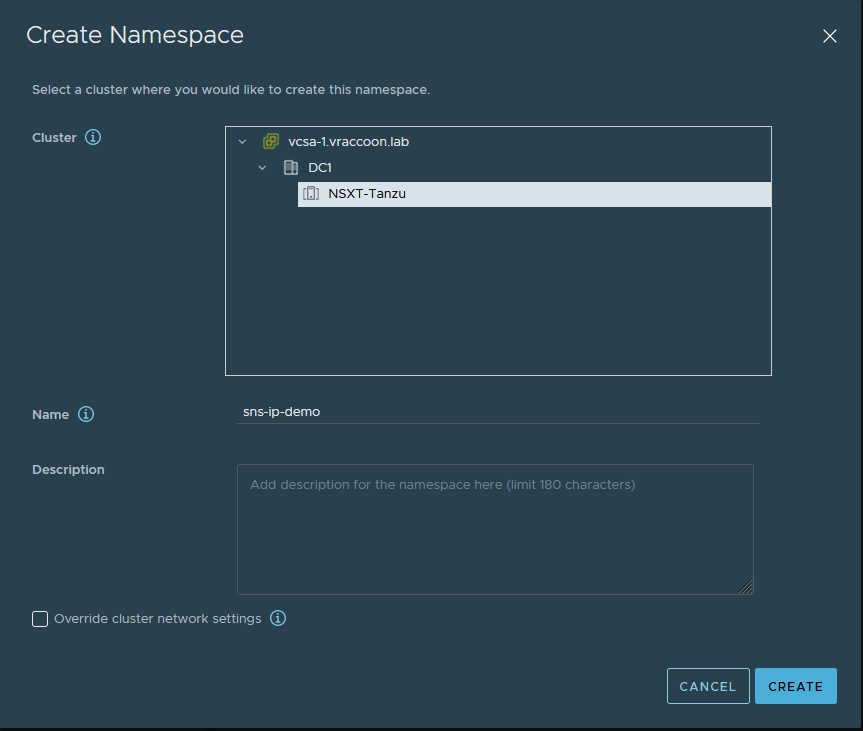
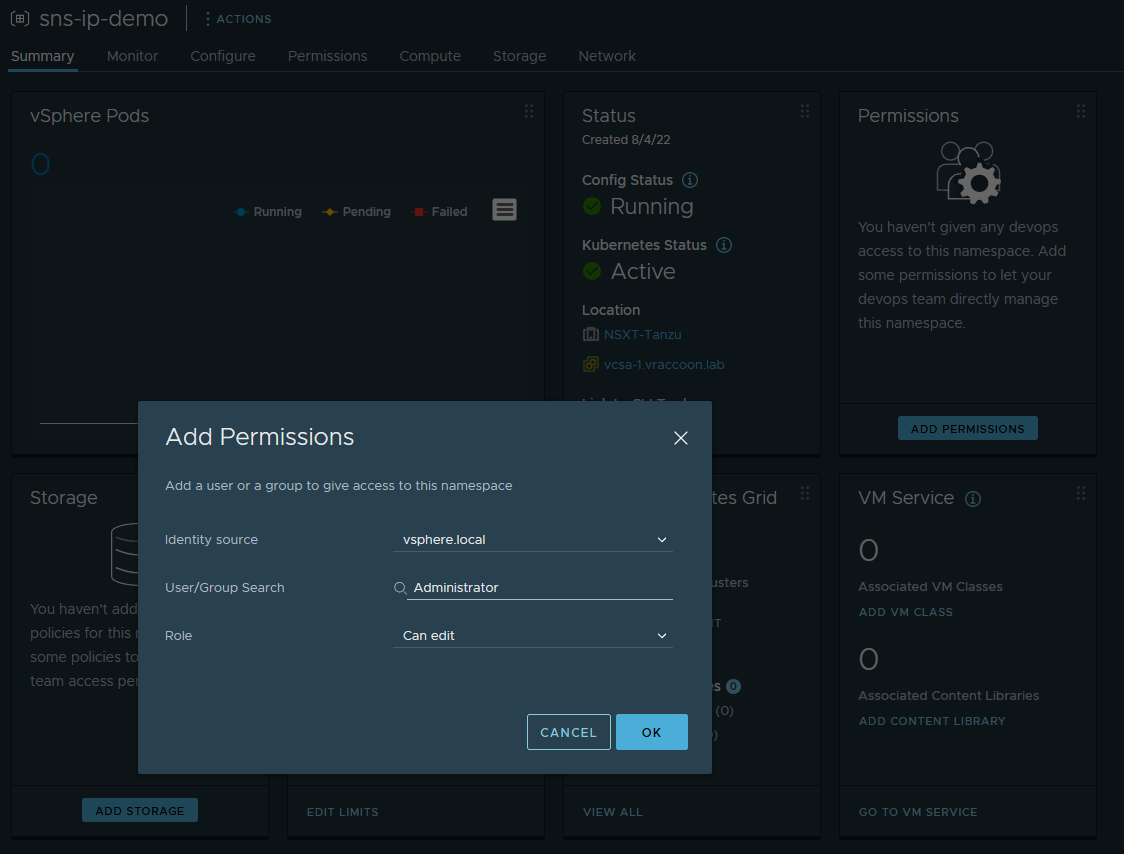
Next, create a Namespace without any override, thus it’s using the global network settings. I call it “sns-ip-demo”.
Since I’m going to demo it with a vSphere Pod, I only need to grant permissions to a user. No Storage or VMClass needed.
Create Pod and Service
First, login and change into the context sns-ip-demo (this context isn’t special to any other context, it is just where I want to place my demo).
╭─vraccoon@home ~
╰─➤  kubectl vsphere login --server 172.31.250.7 -u administrator@vsphere.local  --insecure-skip-tls-verify                                           1 ↵
Welcome to Photon 3.0 (\m) - Kernel \r (\l)

Logged in successfully.

You have access to the following contexts:
   172.31.250.7
   sns-backend
   sns-ip-demo

If the context you wish to use is not in this list, you may need to try
logging in again later, or contact your cluster administrator.

To change context, use `kubectl config use-context <workload name>`
╭─vraccoon@home ~
╰─➤  k config use-context sns-ip-demo
Switched to context "sns-ip-demo".
Next, I’ll create a Pod with a webserver in it (the webserver doesn’t matter, it’s just for demo purposes). I like to take the tutum/hello-world. It’s super old, but also super lightweight.
╭─vraccoon@home ~
╰─➤  kubectl run pod-ip-demo --image tutum/hello-world
pod/pod-ip-demo created
╭─vraccoon@home ~
╰─➤  kubectl get pods
NAME          READY   STATUS    RESTARTS   AGE
pod-ip-demo   1/1     Running   0          12s
Next, we’ll create the server. We are not doing this quick and dirty, like the pod. But we are taking a shortcut 🙂
╭─vraccoon@home ~
╰─➤  kubectl expose pod pod-ip-demo --type LoadBalancer --port 80 --name svc-ip-demo --dry-run=client -o yaml > svc-ip-demo.yaml
This command basically describes a service of type LoadBalancer, that is listening on port 80 and is called svc-ip-demo. But instead of actually creating it, we are only doing a dry-run and redirect it into a yaml file, where we gonna add something. The YAML Files looks as follows:
apiVersion: v1
kind: Service
metadata:
  creationTimestamp: null
  labels:
    run: pod-ip-demo
  name: svc-ip-demo
spec:
  ports:
  - port: 80
    protocol: TCP
    targetPort: 80
  selector:
    run: pod-ip-demo
  type: LoadBalancer
  loadBalancerIP: ipp-k8s-demo
status:
  loadBalancer: {}
I’ve added line 16. Usually you would use the spec.loadBalancerIP key to specify an IP address. But with our NSX-T setup we can also enter the IP pool name, we created earlier.
Next, create the service and verify.
╭─vraccoon@home ~
╰─➤  k create -f svc-ip-demo.yaml
service/svc-ip-demo created
╭─vraccoon@home ~
╰─➤  k get svc
NAME          TYPE           CLUSTER-IP    EXTERNAL-IP   PORT(S)        AGE
svc-ip-demo   LoadBalancer   10.96.0.215   <pending>     80:31732/TCP   96s
Troubleshoot
You might have noticed, for some reason the service’ EXTERNAL IP stays at <pending>.
Let’s check the ncp logs for our ip pool.
Line 4 gives us the hint – we have no access to the IP pool.
╭─vraccoon@home ~
╰─➤  kubectl -n vmware-system-nsx logs nsx-ncp-7fd86bcfb5-w4446 | grep ipp-k8s-demo
[ncp GreenThread-72 E errorCode="NCP00096"] nsx_ujo.ncp.nsx.policy.nsxapi Failed to find valid ip pool ipp-k8s-demo
[ncp GreenThread-72 W] nsx_ujo.ncp.k8s.service_lb_controller Failed to process L4 Lb service bdad0ffd-cf8a-4cb7-9f59-4921d8602843: cluster:domain-c1006:b1476f50-652f-4237-ac88-8514054d5328 has no permission to access LB_POOL: ipp-k8s-demo
ValueError: 'ipp-k8s-demo' does not appear to be an IPv4 or IPv6 address
nsx_ujo.common.exceptions.PoolAccessDenied: cluster:domain-c1006:b1476f50-652f-4237-ac88-8514054d5328 has no permission to access LB_POOL: ipp-k8s-demo
ValueError: 'ipp-k8s-demo' does not appear to be an IPv4 or IPv6 address
nsx_ujo.common.exceptions.PoolAccessDenied: cluster:domain-c1006:b1476f50-652f-4237-ac88-8514054d5328 has no permission to access LB_POOL: ipp-k8s-demo
ValueError: 'ipp-k8s-demo' does not appear to be an IPv4 or IPv6 address
nsx_ujo.common.exceptions.PoolAccessDenied: cluster:domain-c1006:b1476f50-652f-4237-ac88-8514054d5328 has no permission to access LB_POOL: ipp-k8s-demo
[ncp GreenThread-150 E errorCode="NCP00096"] nsx_ujo.ncp.nsx.policy.nsxapi REPEATS: 1 repeats in 3 sec: Failed to find valid ip pool ipp-k8s-demo
[ncp GreenThread-150 W] nsx_ujo.ncp.k8s.service_lb_controller REPEATS: 1 repeats in 3 sec: Failed to process L4 Lb service bdad0ffd-cf8a-4cb7-9f59-4921d8602843: cluster:domain-c1006:b1476f50-652f-4237-ac88-8514054d5328 has no permission to access LB_POOL: ipp-k8s-demo
NSX-T permissions
To fix this, we need to take a note of our “name”, which starts with cluster:domain-… and go back to our IP pool in NSX-T.
Select the Edit on the IP pool. We need to add the following tag:
Scope: ncp/owner
Tag: cluster:domain-c1006:b1476f50-652f-4237-ac88-8514054d5328 (<– the name we captured before)

Verify
We could wait and it should eventually assign an IP, as it keeps trying to access the pool. But since I’m impatient, I’ll delete and recreate the service
╭─vraccoon@home ~
╰─➤  kubectl delete -f svc-ip-demo.yaml
service "svc-ip-demo" deleted
╭─vraccoon@home ~
╰─➤  kubectl create -f svc-ip-demo.yaml
service/svc-ip-demo created
╭─vraccoon@home ~
╰─➤  k get svc
NAME          TYPE           CLUSTER-IP    EXTERNAL-IP    PORT(S)        AGE
svc-ip-demo   LoadBalancer   10.96.0.126   172.31.252.1   80:32266/TCP   3s
And finally do a curl on the IP to check whether it’s working as expected:
╭─vraccoon@home ~
╰─➤  curl 172.31.252.1
<html>
<head>
        <title>Hello world!</title>
        <link href='http://fonts.googleapis.com/css?family=Open+Sans:400,700' rel='stylesheet' type='text/css'>
        <style>
        body {
                background-color: white;
                text-align: center;
                padding: 50px;
                font-family: "Open Sans","Helvetica Neue",Helvetica,Arial,sans-serif;
        }

        #logo {
                margin-bottom: 40px;
        }
        </style>
</head>
<body>
        <img id="logo" src="logo.png" />
        <h1>Hello world!</h1>
                                <h3>Links found</h3>
                                        <b>KUBERNETES</b> listening in 443 available at tcp://10.96.0.1:443<br />
                                </body>
</html>