Replace NSX-T 3 SSL / TLS Certificates – Cluster Certificate
This is the third post out of a small series about replacing NSX-T SSL / TLS Certificates:
- Replace NSX-T 3 SSL / TLS Certificates – GUI Method
- Replace NSX-T 3 SSL / TLS Certificates – Manual Method
- –> Replace NSX-T 3 SSL / TLS Certificates – Cluster Certificate
- Replace NSX-T 3 SSL / TLS Certificates – Common errors
In my last two posts I’ve shown how to replace the manager’s certificates. But in a production environment, we should have 3 Managers running in a cluster. Since this cluster is gonna have a virtual IP Address, this IP needs its own Certificate.
Replacing the certificate with a custom one is pretty similar to the manually repalcing a Manager’s certificate.
Create private Key and CSR
Again, we are starting with the certificate config file.
[ req ]
default_bits = 2048
distinguished_name = req_distinguished_name
req_extensions = req_ext
prompt = no
[ req_distinguished_name ]
countryName = DE
stateOrProvinceName = Germany
localityName = BER
organizationName = vRaccoon Corp
commonName = 172.31.1.75
[ req_ext ]
subjectAltName = @alt_names
[alt_names]
DNS.1 = 172.31.1.75
As you can see, most of it is pretty straight forward. The only thing you have to make sure is:
commonName = <virtual cluster IP>
DNS.1 = <virtual cluster IP>
I’m gonna save this as nsxt-cluster.cnf
Next, we can run the command to create the key and the certificate signing request.
openssl req -nodes -newkey rsa:2048 -keyout nsxt-cluster.key -config nsxt-cluster.cnf -out nsxt-cluster.csr
You will now have three files:
- nsxt-cluster.cnf
- nsxt-cluster.csr
- nsxt-cluster.key
Get the signed Certificate
Take the nsxt-cluster.csr file to your Certificate Authority and get it signed. In my case, I’m using my Windows CA.
Import the Certificate into NSX-T Manager
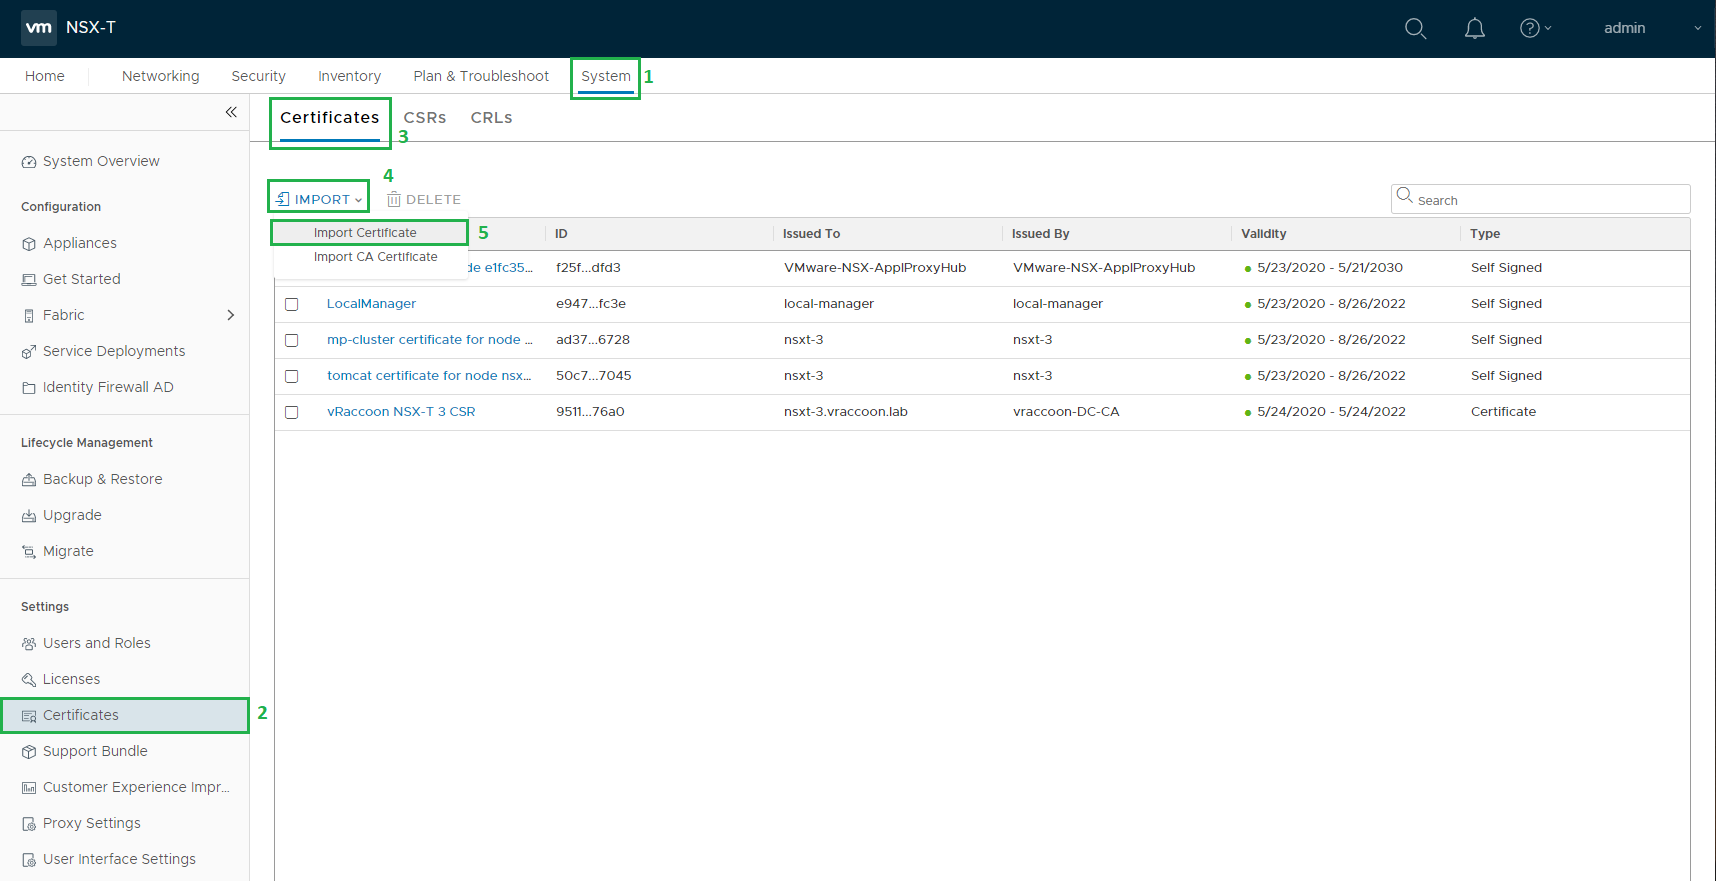
As soon as you got your certificate back, you can import it into your NSX-T Manager. To do so, after logging in, navigate to System (1) –> Certificates (2) –> Certificates (3) –> Import (4) –> Import Certificate (5)
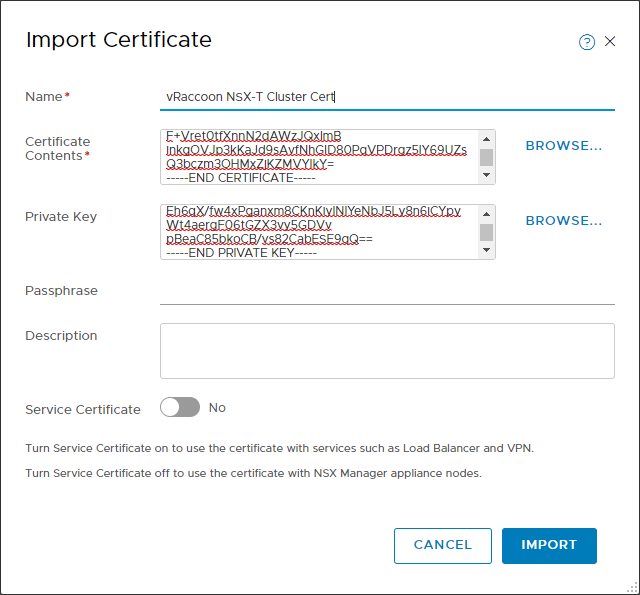
Copy the the required information into the form.
Certificate Contents: Full certificate chain in the following manner:
—–BEGIN CERTIFICATE—–
NSX-T Manager cert
—–END CERTIFICATE—–
—–BEGIN CERTIFICATE—–
Intermediate CA Cert
—–END CERTIFICATE—–
—–BEGIN CERTIFICATE—–
Root CA Cert
—–END CERTIFICATE—–
Private Key: content of the nsxt-cluster.key file
Passphrase: <passphrase> (if you have set one during creation of the key, otherwise, leave it empty)
Service Certificate: No
Activate the Certificate
The certificate should be replicated between the NSX-Managers automatically. Though, it makes sense to double-check on every Manager, if the certificate is really available.
As soon as the availability is confirmed, we can enable it for the NSX-T Cluster.
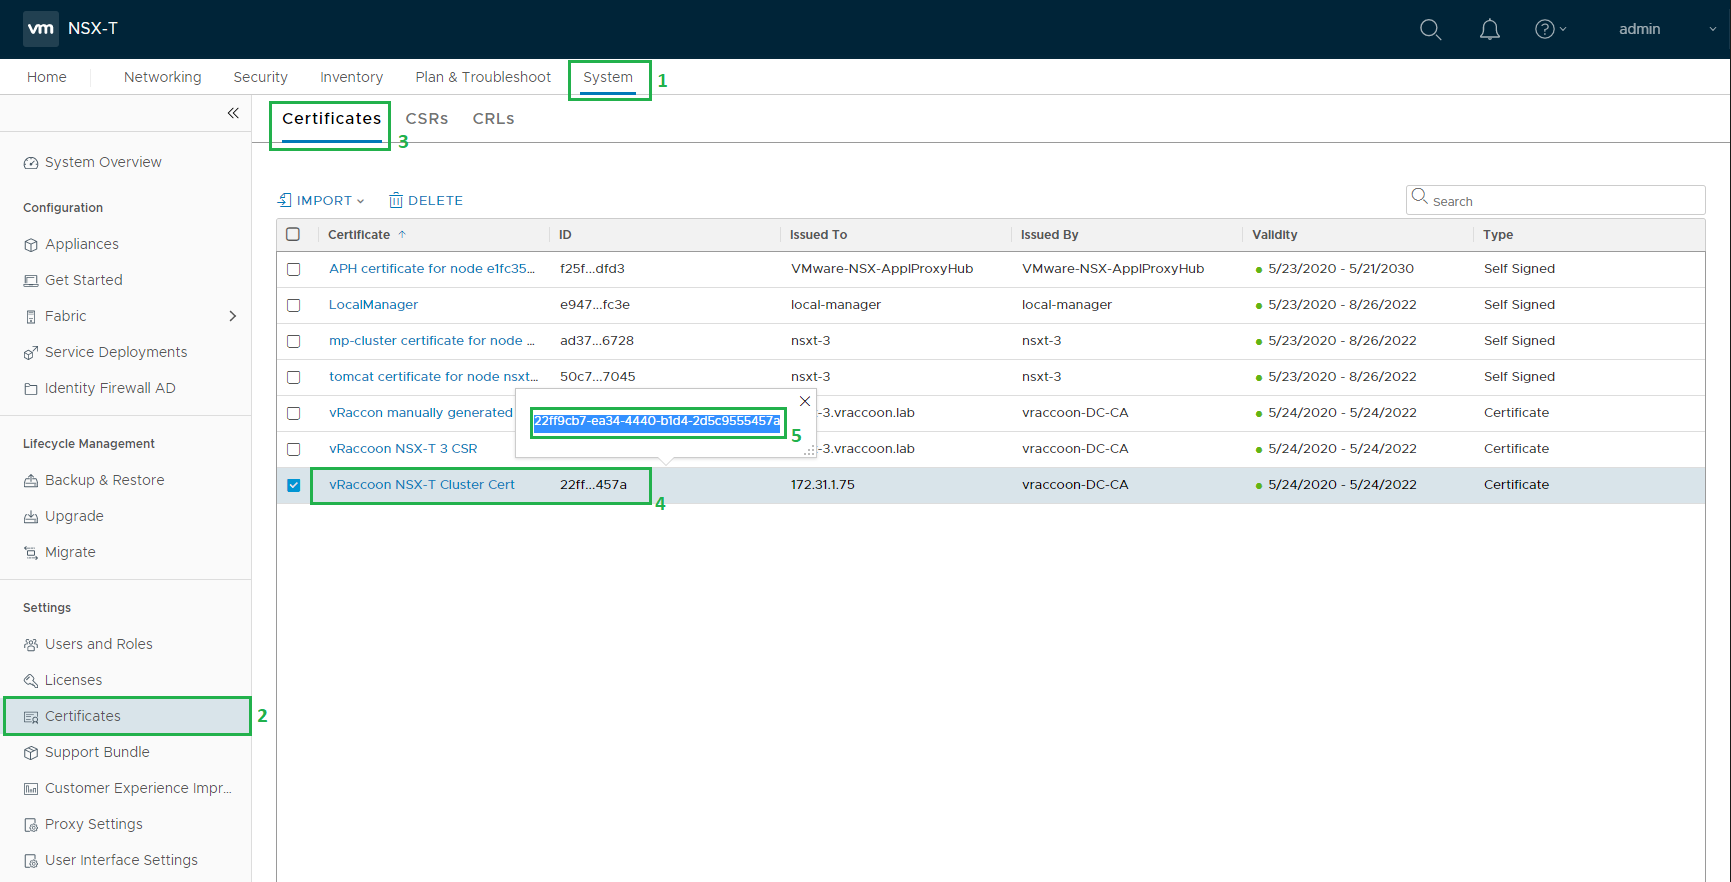
First, make a note of the certificate ID:
System (1) –> Certificates (2) –> Certificates (3) –> Look for the Cert and click the ID (4) –> Copy it (5)
The activation can only be done through the REST API. I’m going to use curl to do so.
We need to run the following command:
curl -k -u <user>:<password> -X POST “https://<nsxt-fqdn>/api/v1/cluster/api-certificate?action=set_cluster_certificate&certificate_id=”
In my case:
vraccoon@ubu:~$ curl --insecure -u admin:'SuperSecret123' -X POST "https://nsxt-3.vraccoon.lab/api/v1/cluster/api-certificate?action=set_cluster_certificate&certificate_id=22ff9cb7-ea34-4440-b1d4-2d5c9555457a"
{
  "certificate_id": "22ff9cb7-ea34-4440-b1d4-2d5c9555457a"
}
vraccoon@ubu:~$
You will get a reply with the Certificate ID. Your new certificate should be in place immediately.
That’s it! We’ve successfully replaced Manager and Cluster Certificates!
During this, I’ve faced some issues – check my last post of this series to learn about some problems I had to solve: Replace NSX-T 3 SSL / TLS Certificates – Common errors
with the cluster ssl cert, do i still need to install ssl certs on the individual nsx-t managers or the cluster one will suffice?
Depends on what you are trying to achieve.
Each NSX Cluster Node has its own certificate AND the cluster VIP has another one.
That means, if you only change the Cluster certificate to be trusted, the nodes would still have their self signed certs.
Thus, connecting to the individual nodes would still be untrusted connections.