Deploy PKS Cluster with predefined IP
When you deploy Tanzu Kubernetes Grid Integrated Cluster (formerly known as Enterprise PKS), you have to define a bunch of IP “Pools”. One of which is the Floating IP Pool, which is used for everything that is supposed to be accessible from “outside” the PKS environment.

To create a cluster, you run a command similar to this:
pks create-cluster <clusterName> --external-hostname <fqdn> --plan <planName>
By doing so, PKS will create an L4 LoadBalancer for your K8s Master Nodes(s). This LB gets an IP out of the Floating IP Pool, which is chosen more or less random (at least it appears that way).
But what if you wanna use a specific IP? In order to achieve this, you have to use network-profiles. Within a Network Profile, you can set a parameter, that looks up the value you have set as external-hostname in DNS before creating the LoadBalancer.
Define the Network Profile
First we have to create a file with the network profile definition (written in json):
{
    "name": "PreDefinedDNSLookup",
    "parameters": {
      "nodes_dns": [
        "172.31.1.10"
        ],
      "fip_pool_ids": [
        "5eea2ee7-d4b1-4c4d-be89-a178c64e7ad1"
        ],
      "dns_lookup_mode": "API"
    }
}
The profile contains the following information,
Lines 4-6: The DNS Server(s) to query
Line 7-9: The Floating IP Pool to take the IP from
Line 10: The instruction to check the DNS Server for the API IP address
Clearly, Line 10 is the magic parameter here.
Create the Network Profile
Next we have to actually create the Network Profile in PKS:
Login to PKS:
vraccoon@ubu:~$ pks login -a pks.vraccoon.lab -u vraccoon --ca-cert ~/certs/pks-api.crt

API Endpoint: pks.vraccoon.lab
User: vraccoon
Login successful.
Create the Network Profile:
vraccoon@ubu:~$ pks create-network-profile PreDefinedDNSLookup.json

Network profile PreDefinedDNSLookup successfully created
View the Network Profile:
vraccoon@ubu:~$ pks network-profile PreDefinedDNSLookup

Name:         PreDefinedDNSLookup
UUID:         a1e220db-974b-402f-8d7b-bceae3063822
Description:
Parameters:   {"dns_lookup_mode":"API","fip_pool_ids":["5eea2ee7-d4b1-4c4d-be89-a178c64e7ad1"],"nodes_dns":["172.31.1.10"]}
Use the Network Profile
Now you can actually use the network profile during cluster creation. Of course, you have to create the DNS entry before (and make sure that the desired IP is not already in use…).
In my example, I want my DNS Name to be called “pks-c1.vraccoon.lab” and have the IP 172.31.60.225 for its API Server.
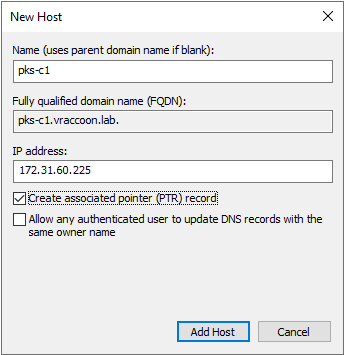
After creating the A- and PTR Record, you can go ahead and start the PKS Cluster creation:
vraccoon@ubu:~$ pks create-cluster pks-c1 --external-hostname pks-c1.vraccoon.lab --network-profile PreDefinedDNSLookup --plan small

PKS Version:              1.6.2-build.4
Name:                     pks-c1
K8s Version:              1.15.10
Plan Name:                small
UUID:                     6aafcb12-2f9a-4027-90fa-80783e31aeac
Last Action:              CREATE
Last Action State:        in progress
Last Action Description:  Creating cluster
Kubernetes Master Host:   pks-c1.vraccoon.lab
Kubernetes Master Port:   8443
Worker Nodes:             3
Kubernetes Master IP(s):  In Progress
Network Profile Name:     PreDefinedDNSLookup

Use 'pks cluster pks-c1' to monitor the state of your cluster
And after a while, the cluster is created:
vraccoon@ubu:~$ pks cluster pks-c1

PKS Version:              1.6.2-build.4
Name:                     pks-c1
K8s Version:              1.15.10
Plan Name:                small
UUID:                     ff9cb3ce-1f3f-40a7-a02d-ef34b961f1ed
Last Action:              CREATE
Last Action State:        succeeded
Last Action Description:  Instance provisioning completed
Kubernetes Master Host:   pks-c1.vraccoon.lab
Kubernetes Master Port:   8443
Worker Nodes:             3
Kubernetes Master IP(s):  172.31.60.225
Network Profile Name:     PreDefinedDNSLookup
As you can see in line 14, it got the desired IP assigned. And line 15 shows the used network profile.
Summary
To pre-define your PKS Cluster IP, you only need to define a network profile and pre-create the DNS entries.
But this was just a sneak peak into network profiles. You can do a lot more. For example, you can also predefine the Ingress IPs, customize the LoadBalancer or even use an entirely different NSX-T EDGE Cluster (in case you want to have a stricter separation between your tenants).
For more information, check the Network-Profile Documentation.