Tanzu Kubernetes with AppArmor through ClusterClasses
Over the years, Kubernetes has become the de facto standard in the data center. And while its use continues to increase, the number of attacks is growing at the same rate, thus making it more and more important to properly secure your K8s clusters.
There are numerous ways you should consider, when it comes to harden your clusters, e.g.
Within K8s:
- Use RBAC
- Use Pod Security Admission Controller
- Use additional Admission Controllers like Kyverno, OPA, or even custom controllers
- …
On Node Level:
- Use SecComp Profiles for Containers
- Use AppArmor for Containers
- Use kernel monitoring tools like falco
- …
An even when using all of this, you still shouldn’t feel secure 😉
This post does not go into the details of how these tools work. Instead, I wanted to show, how you could make use of AppArmor in Tanzu Kubernetes Clusters.
What is AppArmor?
At its core, AppArmor operates through profiles, which serve as the blueprint for securing individual applications. These profiles determine what resources an application (like a container) can access and what operations it can perform (e.g. filesystem access, network interactions, …).
For the sake of this post, I’ll use the example AppArmor Profile from the Kubernetes documentation, which basically denies every write action on the filesystem (of the container in our case):
#include <tunables/global>

profile apparmor-deny-write flags=(attach_disconnected) {
  #include <abstractions/base>

  file,

  # Deny all file writes.
  deny /** w,
}
The important parts here are:
Line 3 – apparmor-deny-write is the name of the profile.
Line 6 – file defines, the action filesystem access
Line 9 – denies writes too all files and directories within the containers filesystem
To be fair, for the most apps, these restrictions would probably prevent the app from running at all.
Installing new AppArmor Profiles on TKG Nodes
The AppArmor module is already installed on the TKG Nodes, so we don’t have to worry about it. The question though is, how can we add additional/custom Profiles to it?
We can’t just copy them onto the Nodes during runtime, as they will dissappear after the next rollout (upgrade, crashes, cluster scaling,…).
Another approach would be to roll out a daemonset, that runs some commands onto each Node to install the AppArmor profile. While this would work pretty straight forward, it requires the Pods within the daemonset to have privilege permissions, which I try to avoid.
So I thought, why not trying to use the relatively newly introduced clusterclasses?
What are clusterClasses (in TKG)?
Clusterclasses are part of ClusterAPI, the magical tool that actually takes care of the cluster provisioning.
In vSphere with Tanzu clusterClasses have been introduced as part of TKG 2.x in the vSphere 8 release.
You can think of a clusterclass as a sort of template for your Kubernetes Clusters. To use clusterClasses in vSphere with Tanzu, you have to use the kind: cluster in apiVersion: cluster.x-k8s.io/v1beta1. They don’t work with tanzuKubernetesCluster objects.
There is a default clusterclass called “tanzukubernetescluster” in vSphere with Tanzu, that is used for all clusters:
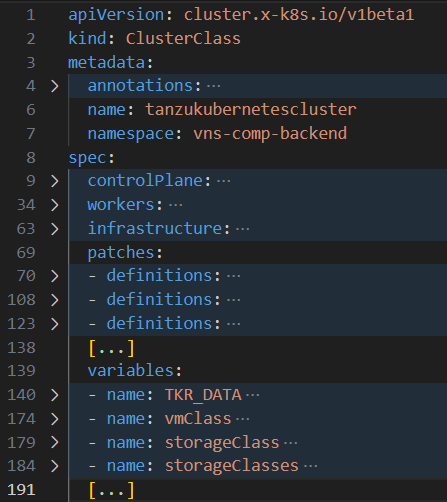
As you can see, there are multiple different section:
controlPlane, workers and infrastructure basically define the (virtual) hardware of the K8s Clusters.
variables define what we can specify in the actual cluster manifest.
patches define things, we want to be patched into the the actual templates being used behind the scenes. Values defined in the variables section can be used in patche definitions.
Creating a custom clusterClass for AppArmor
There are certainly different approaches. In my case, I want to be able to pass the AppArmor Profiles through the cluster manifest into the nodes.
Therefore, we have to create a new clusterClass. But instead of creating it entirely from scratch, we can just copy the default clusterClass and just modify it:
➜ ~ kubectl get cc tanzukubernetescluster -o yaml > cc-apparmor.yaml
Next, we edit the clusterClass:
apiVersion: cluster.x-k8s.io/v1beta1
kind: ClusterClass
metadata:
  annotations:
    run.tanzu.vmware.com/resolve-tkr: ""
  creationTimestamp: "2024-02-20T09:32:30Z"
  generation: 1
  name: tanzukubernetescluster
  namespace: vns-comp-backend
  resourceVersion: "1592474"
  uid: 228b1c30-6c0e-4d8b-8452-d81346fe7421
...
Within the medata section, we delete lines 6,7,10,11 and rename it to cc-apparmor. It should not look similar to this:
apiVersion: cluster.x-k8s.io/v1beta1
kind: ClusterClass
metadata:
  annotations:
    run.tanzu.vmware.com/resolve-tkr: ""
  name: cc-apparmor
  namespace: vns-comp-backend
...
Now, we create a new variable called apparmor, which we will use in the cluster.yaml later.
Within the variables section of the clusterClass, add the following:
  variables:
  - name: apparmor
    required: false
[...]
This enables us, to use this new varibale in our cluster.yaml later. It will contain the AppArmor Profile as base64 encoded string.
Next, we defines two patch definitions to process this varibale. The first patch definition reads the content of the apparmor variable and copy it’s value decoded into a file on the node.
  patches:
  - definitions:
    - jsonPatches:
      - op: add
        path: /spec/template/spec/preKubeadmCommands/-
        valueFrom:
          template: |
            echo {{ .apparmor }} | base64 -d > ~/apparmor
      selector:
        apiVersion: bootstrap.cluster.x-k8s.io/v1beta1
        kind: KubeadmConfigTemplate
        matchResources:
          machineDeploymentClass:
            names:
            - node-pool
    enabledIf: '{{ if .apparmor }}true{{end}}'
    name: apparmor
[...]
Line 8 – Reads the content of the variable apparmor defined in the cluster.yaml, decodes this and writes it into a file in the home directory (FYI – this is run as root)
Lines 9-15 – Applies this only for node-pools, but not for controlplane
Line 16 – Make sure, this is only run if apparmor is actually defined in cluster.yaml
The second patch definition adds the profile to AppArmor.
  patches:
[...]
  - definitions:
    - jsonPatches:
      - op: add
        path: /spec/template/spec/postKubeadmCommands
        valueFrom:
          template: |
            - apparmor_parser -a ~/apparmor
      selector:
        apiVersion: bootstrap.cluster.x-k8s.io/v1beta1
        kind: KubeadmConfigTemplate
        matchResources:
          machineDeploymentClass:
            names:
            - node-pool
    enabledIf: '{{ if .apparmor }}true{{end}}'
    name: nodePoolPostKubeadmCommandsAppArmor
[...]
Line 8 – Actually adds the previous created file to AppArmor
Lines 9-15 – Applies this only for node-pools, but not for controlplane
Line 16 – Make sure, this is only run if apparmor is actually defined in cluster.yaml
Create the cluster.yaml
Now, we can create a cluster.yaml with the new apparmor variable:
apiVersion: cluster.x-k8s.io/v1beta1
kind: Cluster
metadata:
  name: c-cc
  namespace: vns-comp-backend
spec:
  clusterNetwork:
    services:
      cidrBlocks: ["192.168.224.0/20"]
    pods:
      cidrBlocks: ["192.168.240.0/20"]
    serviceDomain: "cluster.local"
  topology:
    class: cc-apparmor
    version: v1.26.5+vmware.2-fips.1
    controlPlane:
      replicas: 1
    workers:
      machineDeployments:
        - class: node-pool
          name: np1
          replicas: 1
    variables:
      - name: vmClass
        value: best-effort-small
      - name: storageClass
        value: sp-svc-comp
      - name: defaultStorageClass
        value: sp-svc-comp
      - name: apparmor
        value: I2luY2x1ZGUgPHR1bmFibGVzL2dsb2JhbD4NCg0KcHJvZmlsZSBhcHBhcm1vci1kZW55LXdyaXRlIGZsYWdzPShhdHRhY2hfZGlzY29ubmVjdGVkKSB7DQogICNpbmNsdWRlIDxhYnN0cmFjdGlvbnMvYmFzZT4NCg0KICBmaWxlLA0KDQogICMgRGVueSBhbGwgZmlsZSB3cml0ZXMuDQogIGRlbnkgLyoqIHcsDQp9DQo=
Line 14 – references the new clusterClass called “cc-apparmor” (default is tanzukubernetescluster)
Line 31 – “apparmor” is a new variable, we have defined in our custom clusterClass
Line 32 – This is the AppArmor Profile base64 encoded
Validate loaded AppArmor Profiles
To validate, whether the Profile has been successfully loaded, we need to ssh into the worker VMs. From there we can check AppArmor:
vmware-system-user@c-cc-np1-wbscw-85787c9f78-m92s4 [ ~ ]$ sudo apparmor_status
apparmor module is loaded.
46 profiles are loaded.
2 profiles are in enforce mode.
   apparmor-deny-write
   cri-containerd.apparmor.d
44 profiles are in complain mode.
   /usr/lib/apache2/mpm-prefork/apache2
   /usr/lib/apache2/mpm-prefork/apache2//DEFAULT_URI
[...]
Line 5 – Here we see our profile apparmor-deny-write, which has successfully been loaded.
Run pod with this AppArmor Profile
Lastly, we can run a Pod and force it to use that profile:
apiVersion: v1
kind: Pod
metadata:
  annotations:
    container.apparmor.security.beta.kubernetes.io/c-apparmor-test: localhost/apparmor-deny-write
  labels:
    run: apparmor-test
  name: apparmor-test
spec:
  containers:
  - image: nginx
    name: c-apparmor-test
After creating the Pod, we will see it Status in CrashLoopBackOff. But this is expected in this case. #
➜ ~ kubectl get pod
NAME            READY   STATUS             RESTARTS      AGE
apparmor-test   0/1     CrashLoopBackOff   3 (27s ago)   86s
If we check the log, we will also see why:
➜  ~ kubectl logs apparmor-test
/docker-entrypoint.sh: 13: cannot create /dev/null: Permission denied
/docker-entrypoint.sh: No files found in /docker-entrypoint.d/, skipping configuration
2024/03/10 17:06:03 [emerg] 1#1: mkdir() "/var/cache/nginx/client_temp" failed (13: Permission denied)
nginx: [emerg] mkdir() "/var/cache/nginx/client_temp" failed (13: Permission denied)
The applied AppArmor profile is simply to strict for nginx to run.
Final Words
Creating proper AppArmor Profiles is a very tedious task and is far beyong the scope of this post. It also requires a very good knowledge of the application, to only allow whatever it really needs.
But I hope, this post gave you another idea of how to implement AppArmor Profiles, using clusterClasses in vSphere with Tanzu.