
Tanzu with HashiCorp Vault Part 2
Introduction
This is Part 2 of my multi series blog post. In this post, I’m going to show how to create a static secret in Vault and bring it into Kubernetes, utilizing the Vault Secret Operator.
- Part One provided an overview of HashiCorp Vault, its terminology, and instructions on how to install it in Kubernetes using HELM
- Part Two will focus on the HashiCorp Vault Secret Operator. I will demonstrate how to create a static secret in Vault and bring it into Kubernetes
- Part three will cover Vault being used as a Public Key Infrastructure (PKI) as Intermediate CA, providing certificates in Kubernetes using cert-manager with the Vault plugin
How it works in general
Before we dive into the actual HowTo, let’s do a little theory session first.
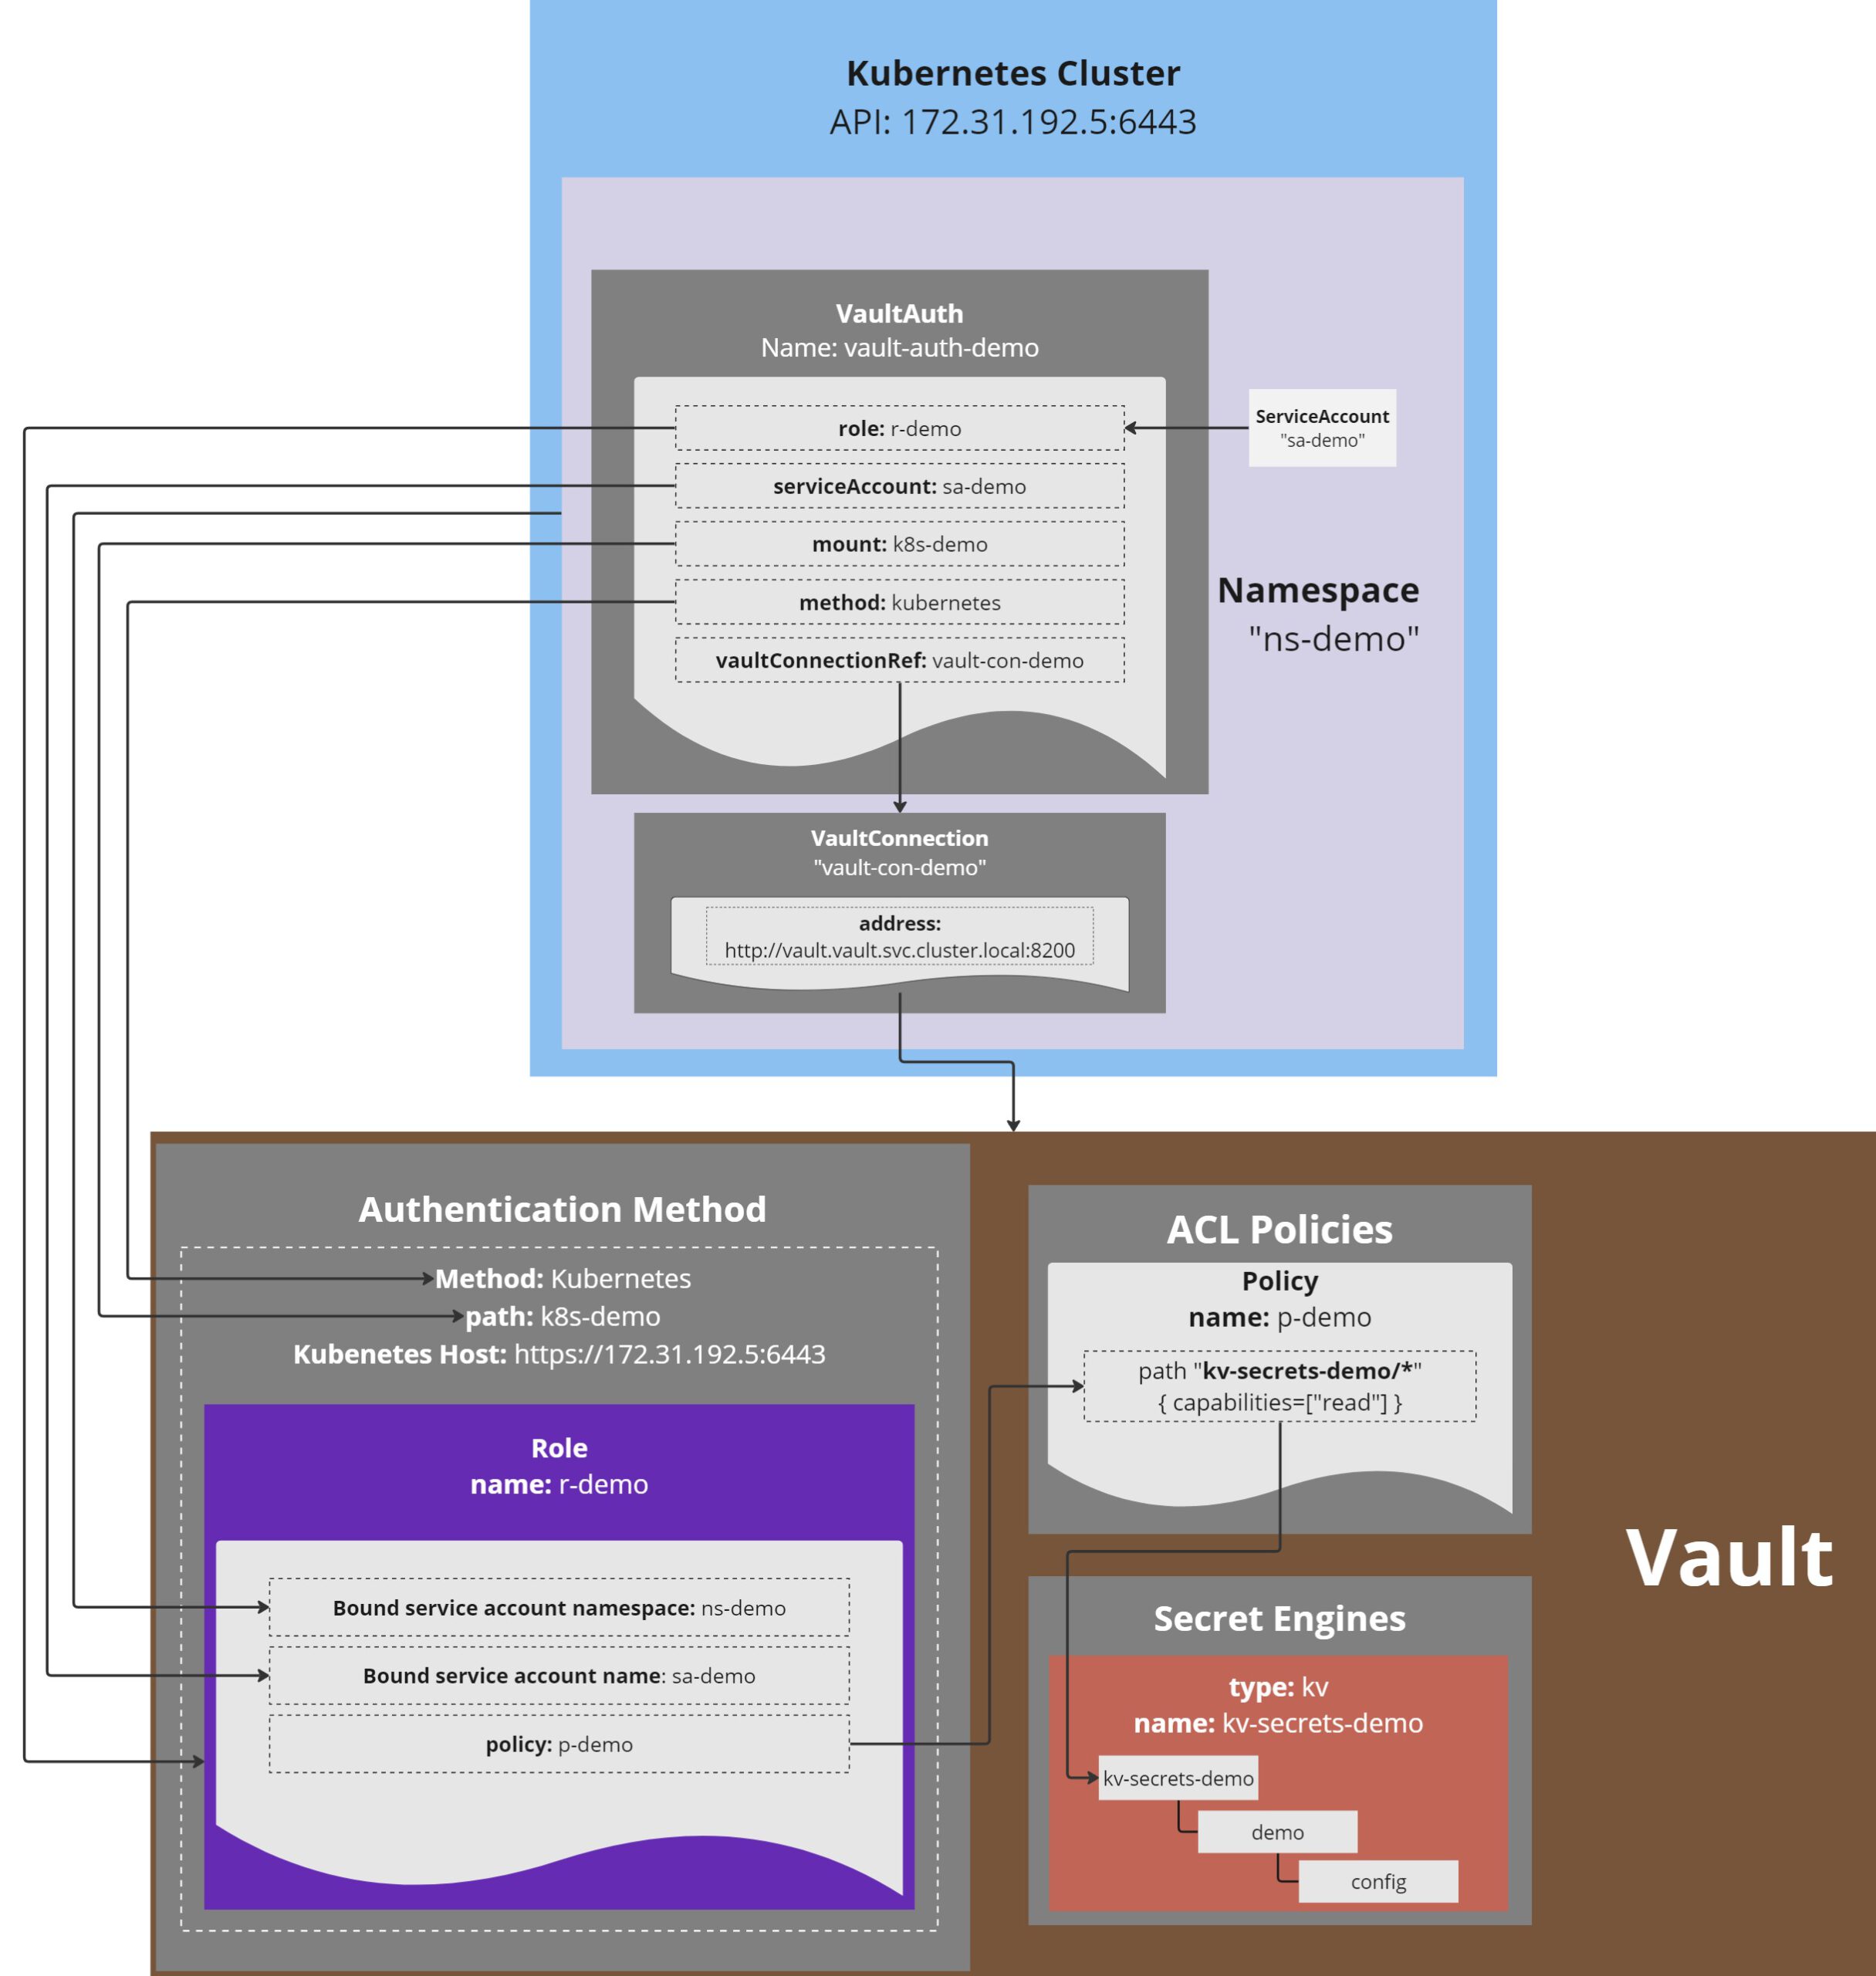
The picture above shows the general workflow and the main components involved into it.
The Vault-part
Let’s zoom into the vault part first.
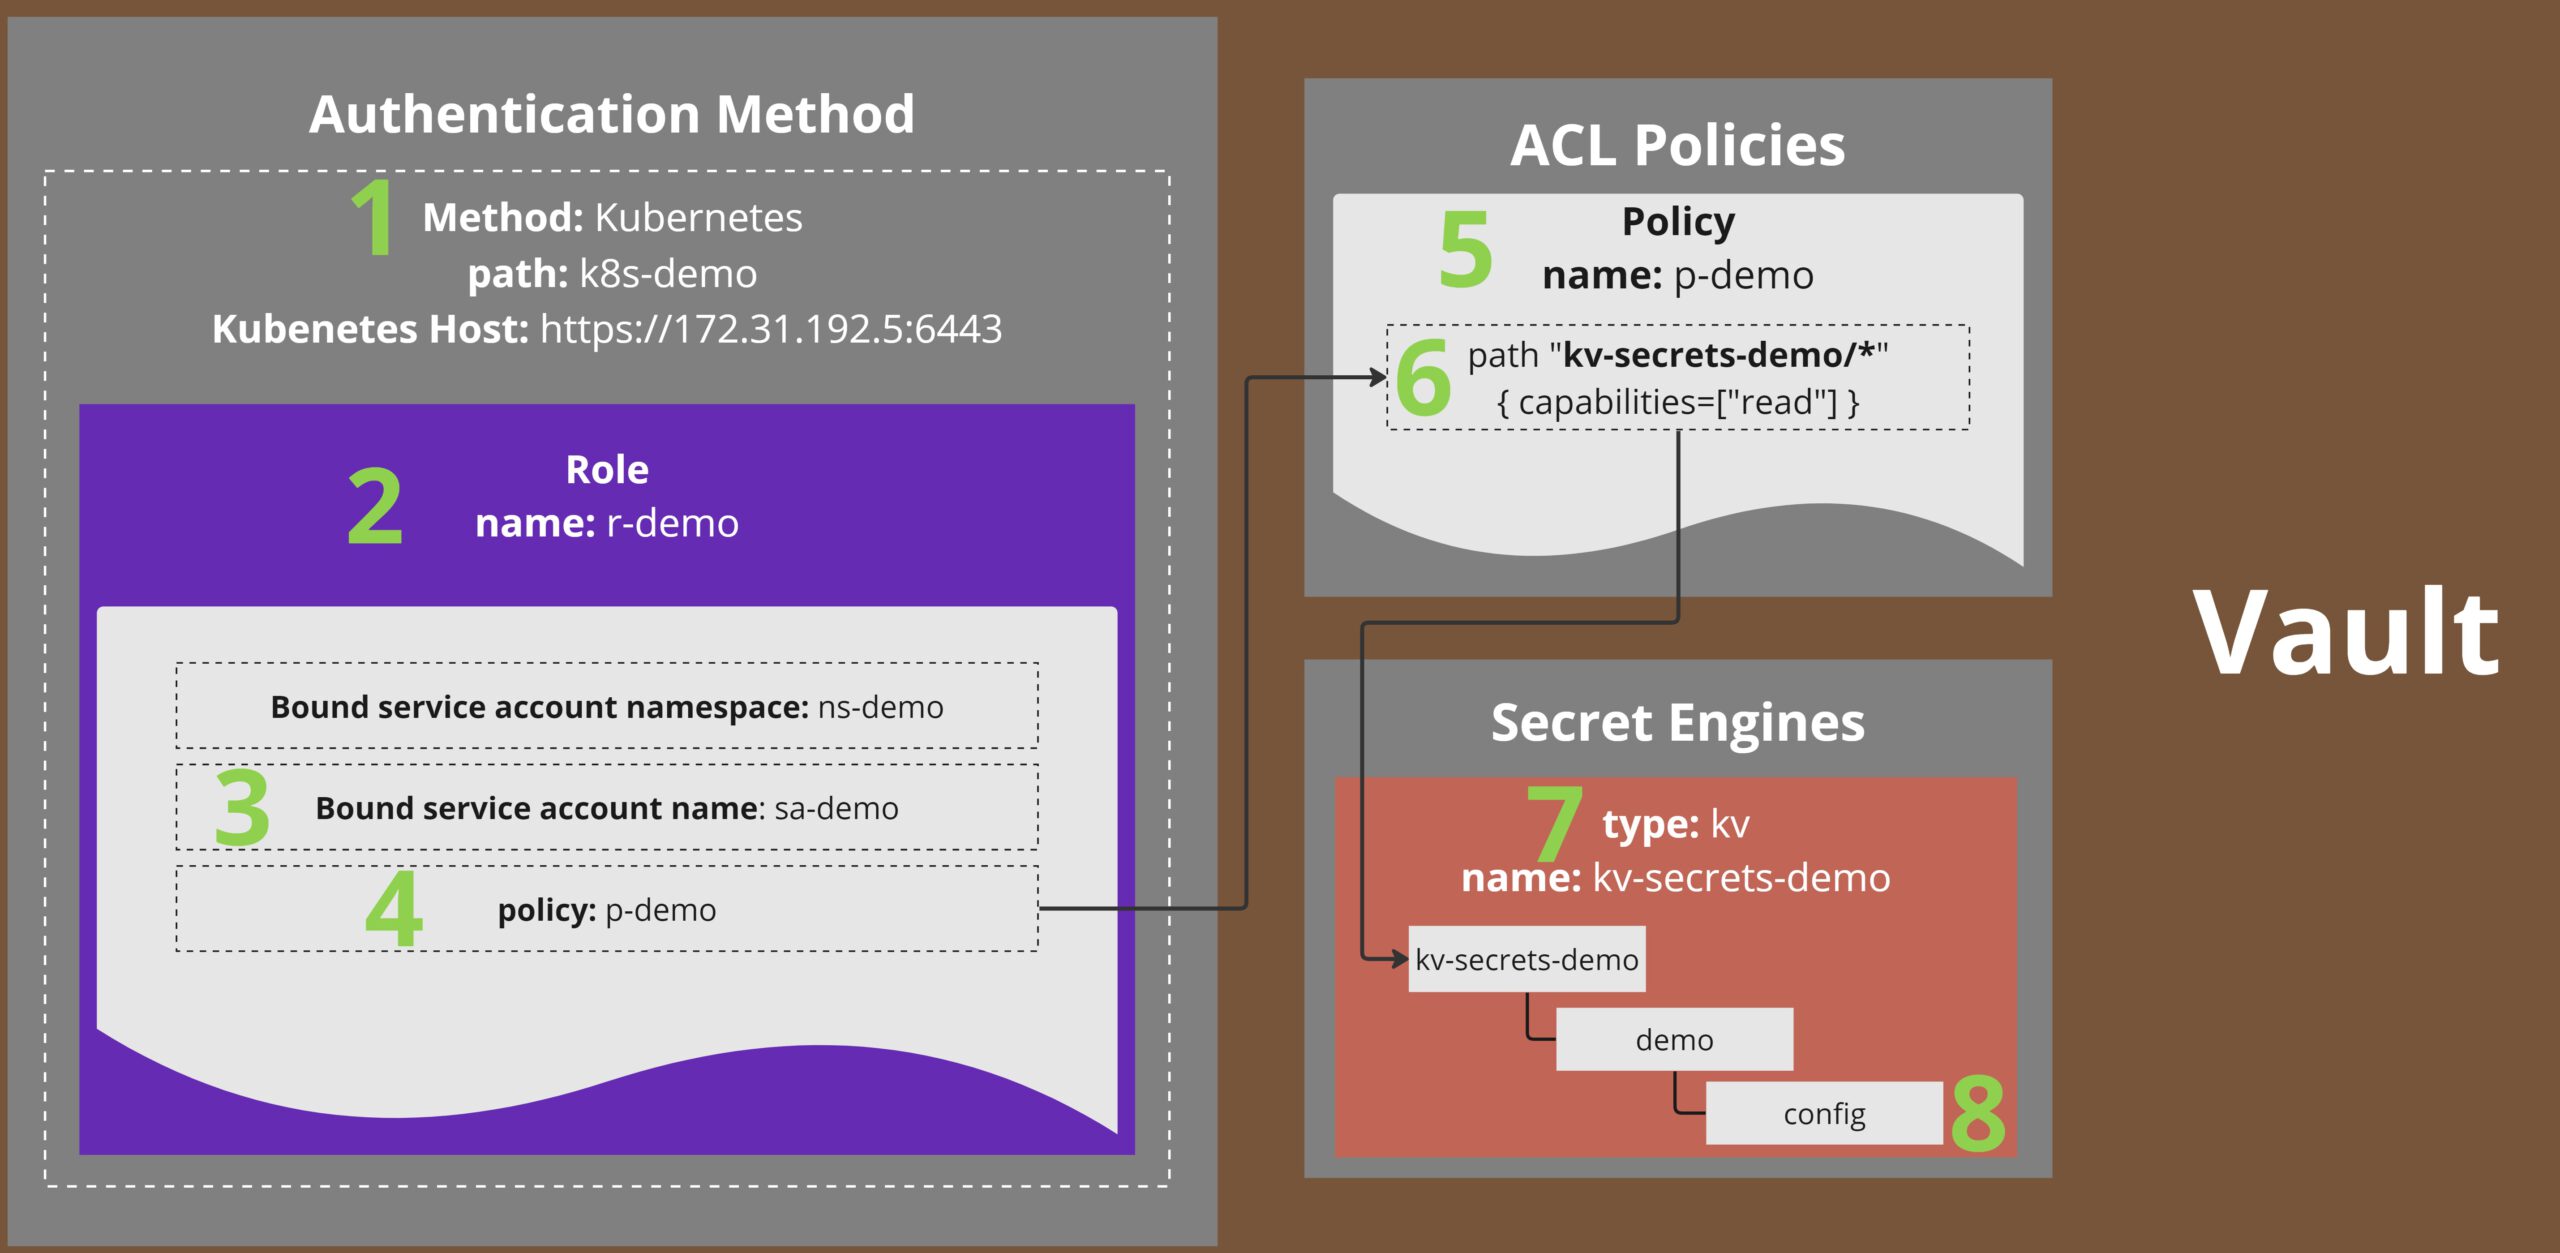
From left to right, the first thing we are going to create is an authentication method from type Kubernetes (1). In there, we will create a role (2) which contains the actual K8s Service information (3) and a policy reference (4).
The policy itself (5) will define the access for that role (6).
Lastly we will create a secret engine of type kv (7) and create a static secret below it in the path demo/config (8).
The K8s-part
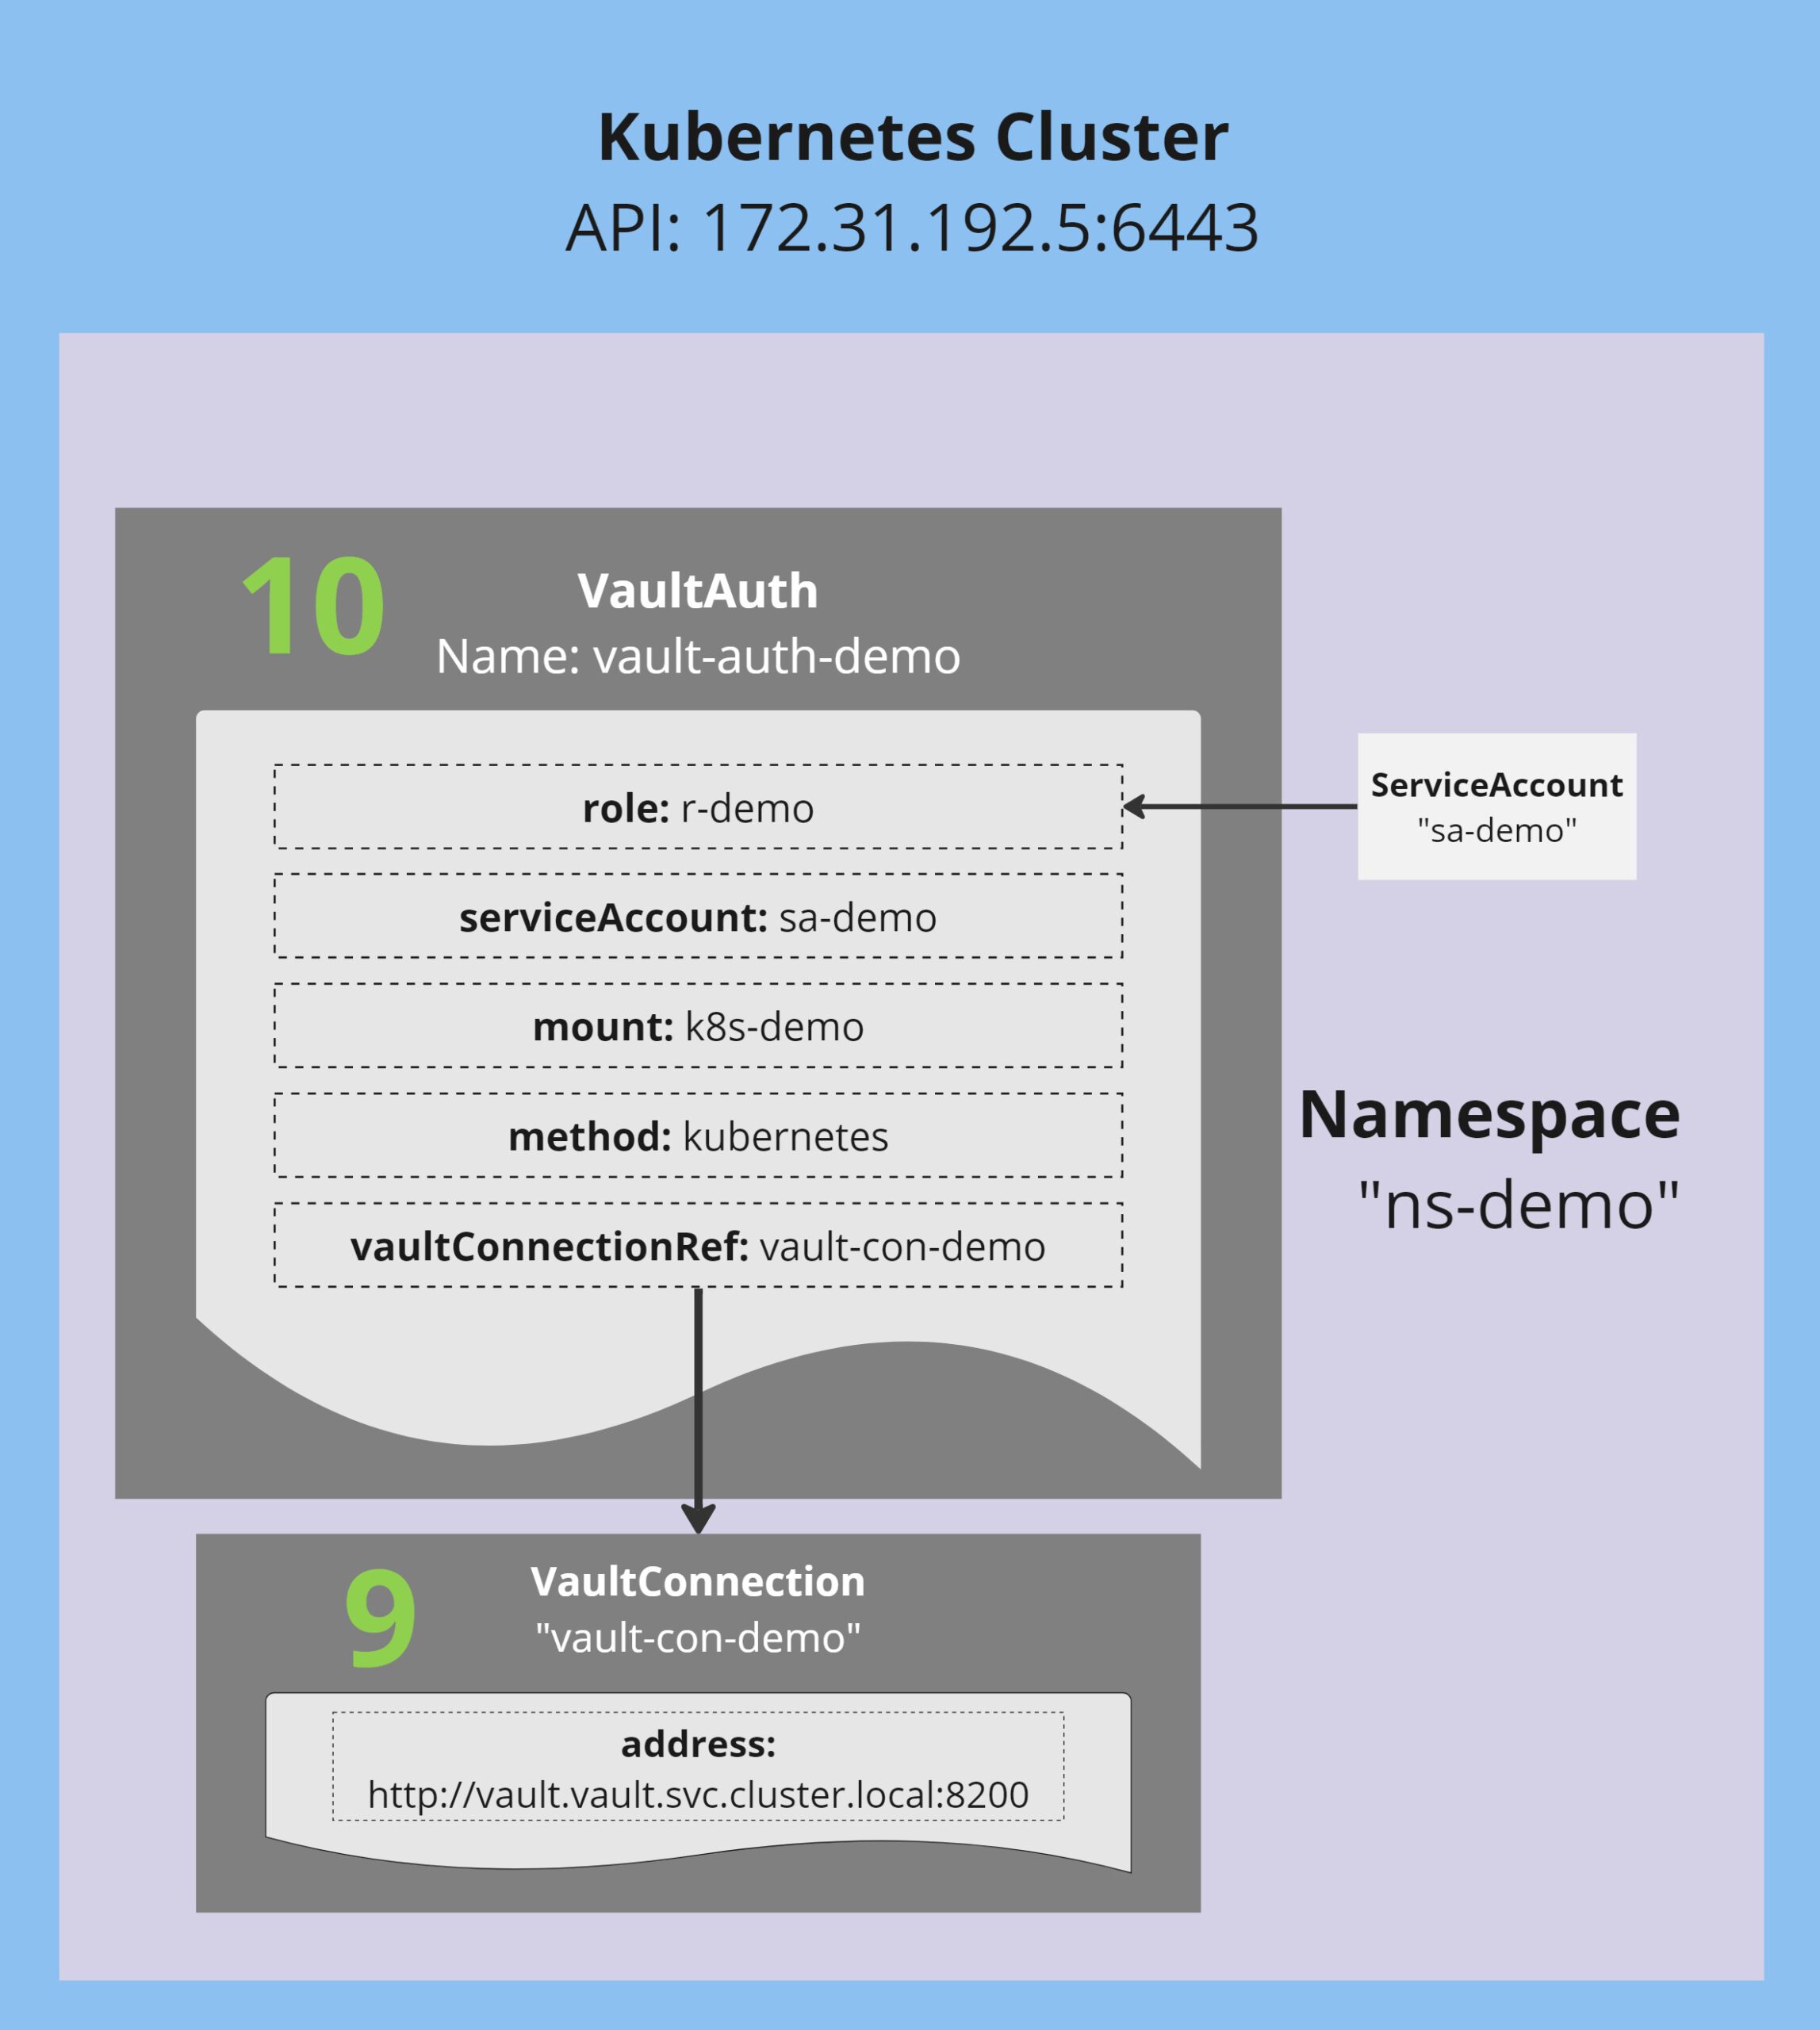
After installing the Vault Secret Operator (not shown in that picture), we will create a VaultConnection object (9). That object contains basic information about the Vault, we are using.
Next we will create a VaultAuth object (10), which contains information about the serviceAccount to be used (it has to match, whatever we configured in the Vault role).
Configuring Vault
The last post showed how to install Vault. The last step we performed, was unsealing the Vault. Now we are going to use it.
All the steps shown below could also be performed in the GUI. But its much faster done in the CLI. ALso, I’m jumping into the vault Pod itself to perform the commands, simple because its already there. You could also download the vault binary to you jump host.
Login to Vault
Jump into the Vault Pod, using the root Token from when we fist initialised the Vault.
❯ kubectl -n vault exec -it vault-0 -- /bin/sh

/ $ vault login
Token (will be hidden):
Success! You are now authenticated. The token information displayed below
is already stored in the token helper. You do NOT need to run "vault login"
again. Future Vault requests will automatically use this token.

Key                  Value
---                  -----
token                hvs.xTu3ObTcYZDMGRDiAfq08nKc
token_accessor       IPdYNRrWdY50DroEJSQLBCFP
token_duration       ∞
token_renewable      false
token_policies       ["root"]
identity_policies    []
policies             ["root"]
/ $
Create Authentication Method and Role
We will beginn with creating a authentication method of type Kubernetes and a path of k8s-demo
/ $ vault auth enable -path k8s-demo kubernetes
Success! Enabled kubernetes auth method at: k8s-demo/
Next, we configure our Kubernetes Cluster API address as Kubernetes Host for this authentication method:
/ $ vault write auth/k8s-demo/config kubernetes_host="https://172.31.192.5:6443"
Success! Data written to: auth/k8s-demo/config
Finally (for authentication), configure a role and bind it to the Kubernetes ServiceAccount+Namespace and a Vault policy (both not existing yet):
/ $ vault write auth/k8s-demo/role/r-demo \
    bound_service_account_names=sa-demo \
    bound_service_account_namespaces=ns-demo \
    policies=p-demo
Success! Data written to: auth/k8s-demo/role/r-demo
Let’s double-check the role:
/ $ vault read auth/k8s-demo/role/r-demo
Key                                 Value
---                                 -----
alias_name_source                   serviceaccount_uid
bound_service_account_names         [sa-demo]
bound_service_account_namespaces    [ns-demo]
policies                            [p-demo]
token_bound_cidrs                   []
token_explicit_max_ttl              0s
token_max_ttl                       0s
token_no_default_policy             false
token_num_uses                      0
token_period                        0s
token_policies                      [p-demo]
token_ttl                           0s
token_type                          default
Create Secret Engine and Secret in Vault
With the authentication method in place, we can proceed and enable a secret engine. We are going to use a simple key-value secret, so we will use the kv secret engine (in version 2) called kv-secrets-demo.
/ $ vault secrets enable -path=kv-secrets-demo kv-v2
Success! Enabled the kv-v2 secrets engine at: kv-secrets-demo/
Next, we can put a secret into that engine. It’s a simple key value pair with username=admin and password=Password123!
/ $ vault kv put kv-secrets-demo/demo/config username="admin" password="Password123!"
========== Secret Path ==========
kv-secrets-demo/data/demo/config

======= Metadata =======
Key                Value
---                -----
created_time       2023-08-22T08:46:32.056062115Z
custom_metadata    <nil>
deletion_time      n/a
destroyed          false
version            1
We can double-check the secret with the following command:
/ $ vault kv get kv-secrets-demo/demo/config
========== Secret Path ==========
kv-secrets-demo/data/demo/config

======= Metadata =======
Key                Value
---                -----
created_time       2023-08-22T08:46:32.056062115Z
custom_metadata    <nil>
deletion_time      n/a
destroyed          false
version            1

====== Data ======
Key         Value
---         -----
password    Password123!
username    admin
Create the policy
Now with both, secret engine and authentication method in place, we only need to glue them together by using a policy.
/ $ vault policy write p-demo - <<EOF
 path "kv-secrets-demo/*" {
    capabilities = ["read"]
 }
EOF
Success! Uploaded policy: p-demo
This policy basically allows read access to the path kv-secrets-demo and all its subdirectories.
Since we referenced this policy already during the role creation earlier, we are now done with the vault part and can move on to Kubernetes.
Installing Vault Secret Operator
Again, we will use the official HELM Chart to install the Secret Operator.
❯ helm repo list
NAME            URL
hashicorp       https://helm.releases.hashicorp.com

❯ helm search repo hashicorp/vault-secrets-operator
NAME                                    CHART VERSION   APP VERSION     DESCRIPTION
hashicorp/vault-secrets-operator        0.1.0           0.1.0           Official Vault Secrets Operator Chart
Installing the HELM Chart is pretty straight forward. We are not going to configure a default connection as part of the installation, so we pretty much run the installer with default values:
❯ helm install vault-secrets-operator hashicorp/vault-secrets-operator --version 0.1.0 -n vault-secrets-operator-system --create-namespace

NAME: vault-secrets-operator
LAST DEPLOYED: Tue Aug 22 09:09:58 2023
NAMESPACE: vault-secrets-operator-system
STATUS: deployed
REVISION: 1
Let’s check the status
❯ kubectl -n vault-secrets-operator-system get pods
NAME                                                         READY   STATUS    RESTARTS   AGE
vault-secrets-operator-controller-manager-6c4776b984-wqp4q   2/2     Running   0          36s

❯ kubectl get crd | grep -i vault
vaultauths.secrets.hashicorp.com                         2023-08-22T14:24:49Z
vaultconnections.secrets.hashicorp.com                   2023-08-22T14:24:49Z
vaultdynamicsecrets.secrets.hashicorp.com                2023-08-22T14:24:49Z
vaultpkisecrets.secrets.hashicorp.com                    2023-08-22T14:24:49Z
vaultstaticsecrets.secrets.hashicorp.com                 2023-08-22T14:24:49Z
As we can see, the Pod is Ready and new CRDs are installed.
Configure Authentication towards Vault
Authentication is namespace based. That means we need to create the namespace (ns-demo), the serviceAccount (sa-demo) and the vault objects VaultConnection (vault-con-demo) and VaultAuth (vault-auth-demo).
Create the Namespace and ServiceAccount
❯ kubectl create namespace ns-demo
namespace/ns-demo created

❯ kubectl -n ns-demo create serviceaccount sa-demo
serviceaccount/sa-demo created

❯ kubectl apply -f - <<EOF
apiVersion: v1
kind: Secret
metadata:
  name: token-sa-demo
  namespace: ns-demo
  annotations:
    kubernetes.io/service-account.name: sa-demo
type: kubernetes.io/service-account-token
EOF
secret/token-sa-demo created
Create the VaultConnection and VaultAuth objects
First, we are going to create the VaultConnection object. That basically specifies which Vault to be used.
Note – We are going to use the K8s internal Vaul address, instead of going through the LoadBalancer or Ingress Object. The later would require additonal configuration, since Vault is not listening (thus not serving) any requests on those IPs.
Its the Vault Service, we are aiming for:
❯ kubectl -n vault get svc
NAME                       TYPE        CLUSTER-IP        EXTERNAL-IP   PORT(S)             AGE
vault                      ClusterIP   192.168.225.225   <none>        8200/TCP,8201/TCP   19h
vault-agent-injector-svc   ClusterIP   192.168.235.156   <none>        443/TCP             19h
vault-internal             ClusterIP   None              <none>        8200/TCP,8201/TCP   19h
vault-ui                   ClusterIP   192.168.233.230   <none>        8200/TCP            19h
This means, our endpoint URL is http://vault.vault.svc.cluster.local:8200
apiVersion: secrets.hashicorp.com/v1beta1
kind: VaultConnection
metadata:
  namespace: ns-demo
  name: vault-con-demo
spec:
  address: http://vault.vault.svc.cluster.local:8200
  skipTLSVerify: true
Now simply create it:
❯ kubectl create -f VaultConnection.yaml
vaultconnection.secrets.hashicorp.com/vault-con-demo created
Before we move on, let’s check if the connection is working:
❯ kubeclt -n ns-demo get vaultconnections.secrets.hashicorp.com vault-con-demo -o yaml

apiVersion: secrets.hashicorp.com/v1beta1
kind: VaultConnection
metadata:
  creationTimestamp: "2023-08-23T09:47:00Z"
  finalizers:
  - vaultconnection.secrets.hashicorp.com/finalizer
  generation: 1
  name: vault-con-demo
  namespace: ns-demo
  resourceVersion: "430752"
  uid: 05a8611c-6ee8-410a-bc80-f3ac9712f834
spec:
  address: http://vault.vault.svc.cluster.local:8200
  skipTLSVerify: true
status:
  valid: true
The very last line shows the status which is valid=true. That means, the general connection is working.
Let’s move on to the authentication.
The VaultAuth object is now glueing it all together:
apiVersion: secrets.hashicorp.com/v1beta1
kind: VaultAuth
metadata:
  name: vault-auth-demo
  namespace: ns-demo
spec:
  kubernetes:
    role: r-demo
    serviceAccount: sa-demo
  method: kubernetes
  mount: k8s-demo
  vaultConnectionRef: vault-con-demo
Wen can see, that the it is refering to the previous created vault-con-demo oject (line 7).
Its utilising the the authentication method kubernetes (line 8) at mount path k8s-demo (line 9). It’s using the configure role r-demo (line 11) and its authenticating itself as serviceAccount sa-demo (line 12).
This of course has to match everything we configured in Vault before!
❯ kubectl create -f demos/Notes/vault/vaultAuth.yaml
vaultauth.secrets.hashicorp.com/vault-auth-demo created
Let’s also check it’s status:
❯ kubectl -n ns-demo get vaultauths.secrets.hashicorp.com vault-auth-demo -o yaml

apiVersion: secrets.hashicorp.com/v1beta1
kind: VaultAuth
metadata:
  creationTimestamp: "2023-08-23T09:54:53Z"
  finalizers:
  - vaultauth.secrets.hashicorp.com/finalizer
  generation: 1
  name: vault-auth-demo
  namespace: ns-demo
  resourceVersion: "432740"
  uid: 1effdb02-f60f-48f1-80f4-f93373fb9476
spec:
  kubernetes:
    role: r-demo
    serviceAccount: sa-demo
    tokenExpirationSeconds: 600
  method: kubernetes
  mount: k8s-demo
  vaultConnectionRef: vault-con-demo
status:
  error: ""
  valid: true
Again, the very last line show the status valid=true, which is obiously good 🙂
Creating the static Secret in Kubernets
This and the last post have been leading to this very moment – we now want to make the secret created in Vault available in Kubernetes. We are doing this by creating a staticSecret object in Kubernetes.
apiVersion: secrets.hashicorp.com/v1beta1
kind: VaultStaticSecret
metadata:
  name: vault-secret-demo
  namespace: ns-demo
spec:
  destination:
    create: true
    name: k8s-secret-demo
  hmacSecretData: true
  mount: kv-secrets-demo
  path: demo/config
  refreshAfter: 30s
  type: kv-v2
  vaultAuthRef: vault-auth-demo
If everything works as expected, this object will cause a query to the actual secret data in Vault and create a Kubernetes Secret (called “k8s-secret-demo”) with its information.
❯ kubectl -n ns-demo get secret k8s-secret-demo -o yaml
apiVersion: v1
data:
  _raw: eyJkYXRhIjp7InBhc3N3b3JkIjoiUGFzc3dvcmQxMjMhIiwidXNlcm5hbWUiOiJhZG1pbiJ9LCJtZXRhZGF0YSI6eyJjcmVhdGVkX3RpbWUiOiIyMDIzLTA3LTE0VDIwOjMyOjA4LjI5NjQ2MzExNVoiLCJjdXN0b21fbWV0YWRhdGEiOm51bGwsImRlbGV0aW9uX3RpbWUiOiIwMDAxLTAxLTAxVDAwOjAwOjAwWiIsImRlc3Ryb3llZCI6ZmFsc2UsInZlcnNpb24iOjF9fQ==
  password: UGFzc3dvcmQxMjMh
  username: YWRtaW4=
kind: Secret
metadata:
  creationTimestamp: "2023-08-23T20:37:37Z"
  labels:
    app.kubernetes.io/component: secret-sync
    app.kubernetes.io/managed-by: hashicorp-vso
    app.kubernetes.io/name: vault-secrets-operator
    secrets.hashicorp.com/vso-ownerRefUID: 6dc10987-d978-4af3-b4e4-accf398c1ba8
  name: k8s-secret-demo
  namespace: ns-demo
  ownerReferences:
  - apiVersion: secrets.hashicorp.com/v1beta1
    kind: VaultStaticSecret
    name: vault-secret-demo
    uid: 6dc10987-d978-4af3-b4e4-accf398c1ba8
  resourceVersion: "6391"
  uid: 50b99a00-1eab-44a6-a04a-dacfd0acb84b
type: Opaque
If the secret hasn’t been created after a minutes or so, check the secret operator pod logs for some hints.
The secret can now be be used like any other secret in K8s.
Next
Coming next – How to create a PKI using Vault.