Velero – Backup and Restore Example
Containers are ephemeral. They are stateless.
I’ve heard these sentences so often. Though, they are not false, but if that would be the whole truth, we would never have to consider backups anymore 😉 Sadly, that’s not what reality is like, as you probably know.
If you want to backup your containers (more specifically on K8s), you have to follow a different approach than on your VMs. Here, you have to backup basically two things:
- The desired state of your Objects (Deployments, Pods, Services, …)
- Your Persistent Volumes
For the first point, you could argue that there is no backup needed, since you are running a fully automated CI/CD Pipeline, which enables you to simply re-trigger all your deployments from your Git … don’t you? 😉
But even if, you would still care about point number two – your Persistent Volumes, since they are storing the data you want to keep.
So how do you to this? One possible solution is Velero.
Velero (previously Ark from Heptio) is an OpenSource Tool, which is now part of the VMware Tanzu family (https://github.com/vmware-tanzu/velero).
Velero can backup your applications (deployment/pods/…), your persistent volumes, whole namespaces or even the entire cluster.
While doing this, Velero does not interact directly with the etcd database (like some other tools). Instead it queries the kube-apiserver.
In this Article, I want to demonstrate how you can backup and restore a simple mysql database, including a persistent volume (where the actual database is saved).
Prerequisites
Kubernetes Cluster
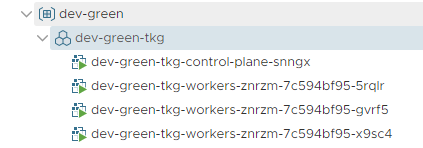
Obvious, isn’t it? 😉 I’m using my Tanzu Kubernetes Cluster.
Object Store
Velero requires an S3 compatible object store. I don’t have access to any of the cloud providers, so I’m using Minio running on a VM. You could also run Minio in your K8s Cluster. In fact, if you check the Velero Git Repo, you’ll see that it actually brings a deployment file to run Minio within K8s.
To install Minio, checkout the Quickstart Guide.
An Application to backup
My example application is a simple mysql deployment, using a pvc to store its database. To validate that the backup worked, I’ve created a Database, a Table and insert some simple information. Following the individual parts of my almost-rocket-science-database.
Persistent Volume Claim (PVC)
A simple PVC. Since I’m using Tanzu Kubernetes Cluster, I don’t have to create the PV manually beforehand. K8s/vSphere take care of it automatically 🙂
apiVersion: v1
kind: PersistentVolumeClaim
metadata:
  name: pvc-mysql
spec:
  storageClassName: vsan-default-storage-policy
  accessModes:
    - ReadWriteOnce
  resources:
    requests:
      storage: 2Gi
Service (LoadBalancer)
The LoadBalancer is actually not needed for the functionality of the mysql server. I only wanted to expose the mysql port, to simplify access to the database later. Also, why not using the NSX-T capabilities, since its there anyway? 🙂
apiVersion: v1
kind: Service
metadata:
  name: svc-mysql
spec:
  type: LoadBalancer
  ports:
  - port: 3306
  selector:
    app: mysql
Deployment
And finally, a simple Deployment File, which only starts a mysql container and mounts a volume.
apiVersion: apps/v1beta2
kind: Deployment
metadata:
  name: d-mysql
  labels:
    application: mysql-app
spec:
  selector:
    matchLabels:
      app: mysql
  template:
    metadata:
      labels:
        app: mysql
    spec:
      containers:
      - image: mysql:5.6
        name: mysql
        env:
        - name: MYSQL_ROOT_PASSWORD
          value: Password123!
        ports:
        - containerPort: 3306
          name: port-mysql
        volumeMounts:
        - name: vol-mysql
          mountPath: /var/lib/mysql
      volumes:
      - name: vol-mysql
        persistentVolumeClaim:
          claimName: pvc-mysql
Create some DB Entries
Check, which IP got assigned to my LoadBalancer.
vraccoon@ubu:~$ kubectl get svc
NAME         TYPE           CLUSTER-IP      EXTERNAL-IP     PORT(S)          AGE
kubernetes   ClusterIP      10.96.0.1       <none>          443/TCP          27h
supervisor   ClusterIP      None            <none>          6443/TCP         27h
svc-mysql    LoadBalancer   10.107.12.123   172.31.60.195   3306:32137/TCP   7m56s
Next, create a Database, a Table and insert some entries using mycli.
mycli -h 172.31.60.195 -u root -p Password123! -e 'CREATE DATABASE TestDB;'
mycli -h 172.31.60.195 -u root -p Password123! -D TestDB -e 'CREATE TABLE TestTable (id INT(4) AUTO_INCREMENT PRIMARY KEY,firstname VARCHAR(30),lastname VARCHAR(30),reg_date TIMESTAMP DEFAULT CURRENT_TIMESTAMP ON UPDATE CURRENT_TIMESTAMP);'
mycli -h 172.31.60.195 -u root -p Password123! -D TestDB -e 'INSERT INTO TestTable(firstname,lastname) VALUES ("Aulus","Augerius")'
mycli -h 172.31.60.195 -u root -p Password123! -D TestDB -e 'INSERT INTO TestTable(firstname,lastname) VALUES ("Numerius","Negidius")'
mycli -h 172.31.60.195 -u root -p Password123! -D TestDB -e 'INSERT INTO TestTable(firstname,lastname) VALUES ("John","Doe")'
And double-check that everything is there.
vraccoon@ubu:~$mycli -h 172.31.60.195 -u root -p Password123! -D TestDB -e 'SELECT * FROM TestTable'
id      firstname      lastname        reg_date
1       Aulus          Augerius        2020-09-06 08:29:21
2       Numerius       Negidius        2020-09-06 08:29:21
3       John           Doe             2020-09-06 08:29:23
So, now we are all set to backup our tremendously complex application =D
Install Velero
First, we have to download the velero binary. I’m using GitHub page to download velero-v1.4.2-linux-amd64.tar.gz. But depending on your OS, you could also use brew (macOS) or choco (Windows).
vraccoon@ubu:~$ wget https://github.com/vmware-tanzu/velero/releases/download/v1.4.2/velero-v1.4.2-linux-amd64.tar.gz
Saving to: ‘velero-v1.4.2-linux-amd64.tar.gz’

velero-v1.4.2-linux-amd64.tar.gz           100%[===========================================>]  22.72M  5.70MB/s    in 5.1s

vraccoon@ubu:~$ tar -xvzf velero-v1.4.2-linux-amd64.tar.gz
velero-v1.4.2-linux-amd64/LICENSE
velero-v1.4.2-linux-amd64/examples/README.md
velero-v1.4.2-linux-amd64/examples/minio
velero-v1.4.2-linux-amd64/examples/minio/00-minio-deployment.yaml
velero-v1.4.2-linux-amd64/examples/nginx-app
velero-v1.4.2-linux-amd64/examples/nginx-app/README.md
velero-v1.4.2-linux-amd64/examples/nginx-app/base.yaml
velero-v1.4.2-linux-amd64/examples/nginx-app/with-pv.yaml
velero-v1.4.2-linux-amd64/velero

vraccoon@ubu:~$ sudo cp velero-v1.4.2-linux-amd64/velero /usr/local/bin/velero
Next, we need to create a credentials file, for our S3 Storage. in my case it looks as follows:
vraccoon@ubu:~$ cat credentials-velero-minio
[default]
aws_access_key_id = minio
aws_secret_access_key = Password123!
Now, as we have the binary and our S3 credentials file, we can continue and deploy velero to our K8s Cluster. Make sure, you have your kubeconfig setup 😉
velero install \
--provider aws \
--plugins velero/velero-plugin-for-aws:v1.1.0 \
--bucket velero \
--secret-file ./credentials-velero-minio \
--use-volume-snapshots=false \
--backup-location-config region=minio,s3ForcePathStyle="true",s3Url=http://minio.vraccoon.lab:9000 \
--use-restic
Let’s explain that command a bit more:
–provider aws and –plugins velero/velero-plugin-for-aws:v1.1.0
Sadly, the vSphere Plugin does not have object store support. Hence, we have to use aws.
–bucket velero
The bucket name inside your Opject Store
–secret-file ./credentials-velero-minio
The credentials file, we created before, to access our object store.
–use-volume-snapshots=false
For not setting the snapshot location automatically.
–backup-location-config region=minio,s3ForcePathStyle=”true”,s3Url=http://minio.vraccoon.lab:9000
Some S3 Parameter, including my Minio Url as the target.
–use-restic
To be able to backup PVCs too.
After running the command, you’ll see how velero install a bunch of objects into Kubernetes, including additional CRDs. If everything goes well, it ends with the following line:
Velero is installed! ⛵ Use ‘kubectl logs deployment/velero -n velero’ to view the status.
Create the Backup
Now, we have everything we need. Our Object Store is up, Velero is installed and we have deployed an example application. So, let’s back it up!
Since our MySQL application has an PVC attached, which we want to backup too, there is one more step we have to do – annotate the volume. Restic will only backup volumes, which are annotated.
vraccoon@ubu:~$ kubectl annotate pod d-mysql-64cdbd97c4-nq9lx backup.velero.io/backup-volumes=vol-mysql
pod/d-mysql-64cdbd97c4-ml5s8 annotated
Next, create the backup. We will backup the whole namespace, which is the “default” namespace.
vraccoon@ubu:~$ velero backup create my-mysql-backup --include-namespaces default
Backup request "my-mysql-backup" submitted successfully.
Run `velero backup describe my-mysql-backup` or `velero backup logs my-mysql-backup` for more details.
Seems successfully. Let’s check it in more detail:
vraccoon@ubu:~$ velero backup describe my-mysql-backup
Name:         my-mysql-backup
Namespace:    velero
Labels:       velero.io/storage-location=default
Annotations:  velero.io/source-cluster-k8s-gitversion=v1.17.8+vmware.1
              velero.io/source-cluster-k8s-major-version=1
              velero.io/source-cluster-k8s-minor-version=17

Phase:  Completed

Errors:    0
Warnings:  0

Namespaces:
  Included:  default
  Excluded:  <none>

Resources:
  Included:        *
  Excluded:        <none>
  Cluster-scoped:  auto

Label selector:  <none>

Storage Location:  default

Velero-Native Snapshot PVs:  auto

TTL:  720h0m0s

Hooks:  <none>

Backup Format Version:  1

Started:    2020-09-06 08:33:17 +0000 UTC
Completed:  2020-09-06 08:33:20 +0000 UTC

Expiration:  2020-10-06 08:33:17 +0000 UTC

Total items to be backed up:  33
Items backed up:              33

Velero-Native Snapshots: <none included>

Restic Backups (specify --details for more information):
  Completed:  1
As you can see, we have basically included every Ressource in the namespace “default” into our backup. The last two lines are referring to restic, which has backed up our PV. You can use the same command with “–details” to get more information about it.
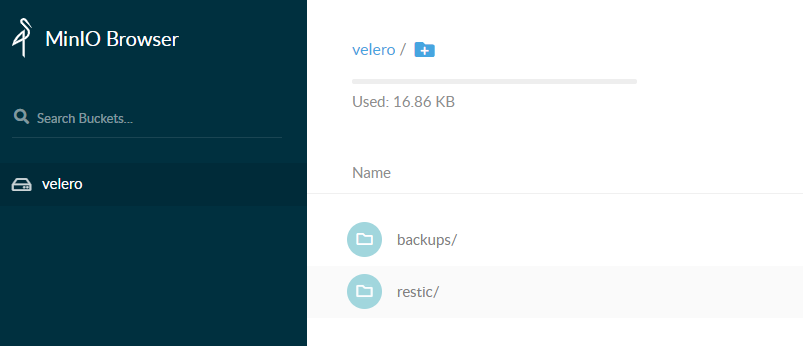
Also, Velero (and restic) have created a bunch of objects in our object store, which you could explore.
Delete the Application
Now, as the backup is created, I’m confident enough to delete my Business-critical MySQL Application.
vraccoon@ubu:~$ kubectl delete -f mysql.yaml
persistentvolumeclaim "pvc-mysql" deleted
service "svc-mysql" deleted
deployment.apps "d-mysql" deleted
And confirm, that everything is gone.
vraccoon@ubu:~$ kubectl get deploy,pods,pv,pvc,svc
NAME                 TYPE        CLUSTER-IP   EXTERNAL-IP   PORT(S)    AGE
service/kubernetes   ClusterIP   10.96.0.1    <none>        443/TCP    40h
service/supervisor   ClusterIP   None         <none>        6443/TCP   40h
Restore the Backup
Restoring the backup is also quite straight forward.
First, display existing backups.
vraccoon@ubu:~$ velero backup get
NAME              STATUS      ERRORS   WARNINGS   CREATED                         EXPIRES   STORAGE LOCATION   SELECTOR
my-mysql-backup   Completed   0        0          2020-09-06 08:33:17 +0000 UTC   29d       default            <none>
Since there is only one backup, there is not much we can choose from 😉
vraccoon@ubu:~$ velero restore create mysql-restore --from-backup my-mysql-backup
Restore request "mysql-restore" submitted successfully.
Once again, we can check the details of the process.
vraccoon@ubu:~$ velero restore describe mysql-restore
Name:         mysql-restore
Namespace:    velero
Labels:       <none>
Annotations:  <none>

Phase:  InProgress

Backup:  my-mysql-backup

Namespaces:
  Included:  all namespaces found in the backup
  Excluded:  <none>

Resources:
  Included:        *
  Excluded:        nodes, events, events.events.k8s.io, backups.velero.io, restores.velero.io, resticrepositories.velero.io
  Cluster-scoped:  auto

Namespace mappings:  <none>

Label selector:  <none>

Restore PVs:  auto

Restic Restores (specify --details for more information):
  New:  1
It should complete within a few seconds, leaving us with restored application.
vraccoon@ubu:~/example-app$ kubectl get deploy,pods,pv,pvc,svc
NAME                      READY   UP-TO-DATE   AVAILABLE   AGE
deployment.apps/d-mysql   1/1     1            1           6m27s

NAME                           READY   STATUS    RESTARTS   AGE
pod/d-mysql-64cdbd97c4-nq9lx   1/1     Running   0          6m27s

NAME                                                        CAPACITY   ACCESS MODES   RECLAIM POLICY   STATUS   CLAIM               STORAGECLASS                  REASON   AGE
persistentvolume/pvc-5e7229e1-8fc8-4e11-9cab-4e5d52f8139e   5Gi        RWO            Delete           Bound    default/pvc-mysql   vsan-default-storage-policy            6m25s

NAME                              STATUS   VOLUME                                     CAPACITY   ACCESS MODES   STORAGECLASS                  AGE
persistentvolumeclaim/pvc-mysql   Bound    pvc-5e7229e1-8fc8-4e11-9cab-4e5d52f8139e   5Gi        RWO            vsan-default-storage-policy   6m27s

NAME                 TYPE           CLUSTER-IP      EXTERNAL-IP     PORT(S)          AGE
service/kubernetes   ClusterIP      10.96.0.1       <none>          443/TCP          40h
service/supervisor   ClusterIP      None            <none>          6443/TCP         40h
service/svc-mysql    LoadBalancer   10.96.156.201   172.31.60.195   3306:31745/TCP   6m27s
Looks good to me so far. Let’s confirm that the mysql tables are still there.
vraccoon@ubu:~$mycli -h 172.31.60.195 -u root -p Password123! -D TestDB -e 'SELECT * FROM TestTable'
id      firstname      lastname        reg_date
1       Aulus          Augerius        2020-09-06 08:29:21
2       Numerius       Negidius        2020-09-06 08:29:21
3       John           Doe             2020-09-06 08:29:23
Great, we have successfully restored the application.
Conclusion
The example demonstrated by me was a very simple scenario to show how it works in general. Though, Velero is a powerful tool to backup your K8s applications. It provides a lot of other features like backup schedules, auto retire backups, restore individual files rather than whole PVs, helps to migrate between Clusters,… and so much more. It’s really worth checking it out.