Add Virtual Container Host (VCH) to vRealize Automation
As part of the Container features, there are also three new roles:
– Container Administrator
– Container Architect
– Container Developer
For the purpose of this guide, I need to assign all thre roles.
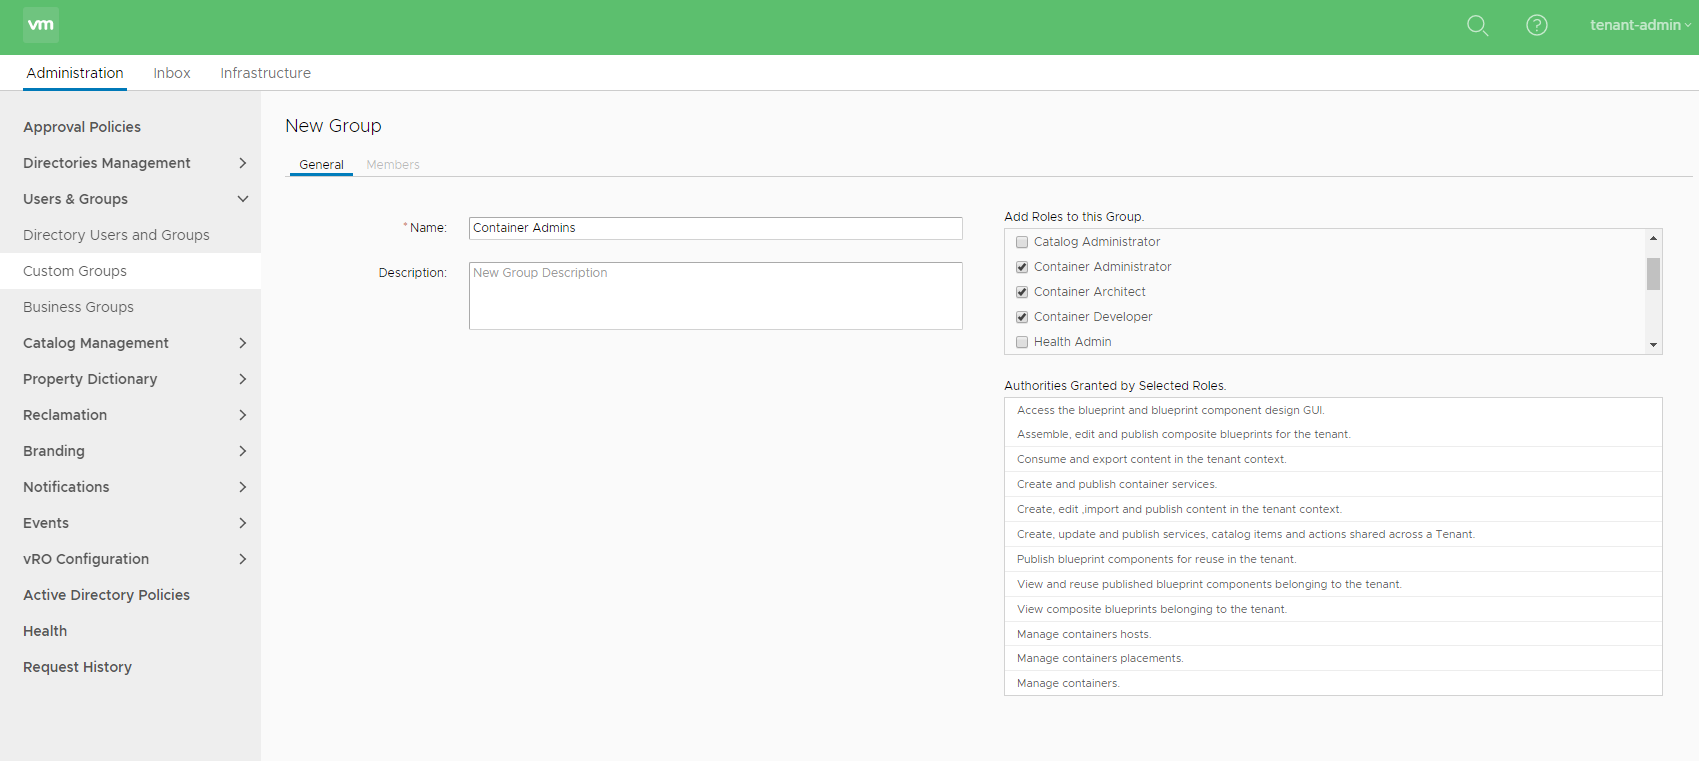
After assigning any of these roles, you are going to see the “Containers” Tab at the Top.

For those of you, who happened to play with VMware Admiral before, this interface should look very familiar.
Deploy the Virtual Container Host (VCH)
First, you need to download the vSphere Integrated Containers Engine Bundle and put it somewhere, from where you can access your vCenter.
I’m using a simple Ubuntu Jump-Host.
After extracting it, it leaves you with the VCH ISO file (appliance.iso) and the cli interfaces for Windows, Linux and MacOS.
root@ubu:~# tar zxvf vic_v1.5.3.tar.gz
vic/
vic/vic-machine-server
vic/autocomplete/
vic/autocomplete/zsh/
vic/autocomplete/zsh/vic-machine-windows.exe
vic/autocomplete/zsh/vic-machine-linux
vic/autocomplete/zsh/vic-machine-darwin
vic/autocomplete/bash/
vic/autocomplete/bash/vic-machine-windows.exe
vic/autocomplete/bash/vic-machine-linux
vic/autocomplete/bash/vic-machine-darwin
vic/LICENSE
vic/bootstrap.iso
vic/vic-machine-windows.exe
vic/vic-machine-linux
vic/appliance.iso
vic/vic-machine-darwin
vic/README
root@ubu:~#
The CLI is ready, so let’s compose the command to create the VCH:
vic-machine-linux create
#Call the Linux CLI
--name VCH-3
#Specifies the name of the VM
--container-name-convention vch-{id}
#Defines the naming convention for the containers "vch-docker-id"
--target vcsa.cloudborn.lab/DC1
#Specifies the vCenter and the Datacenter within it
--compute-resource COMP
#Specifies the exact location where to put the VM; in my case, COMP is a Cluster, but you could also define an esxi host
--user Administrator@VSPHERE.LOCAL
#The user beeing used to deploy the VCH
--image-store vsanDatastore/VCH-Images
#Specifies where the container images are stored "datastore/folder", if the folder does not exists, it'll be created
--volume-store vsanDatastore/VCH-DSs:docker-ds
#Specifies where the (persistent) volumes are created, could also be an NFS mount point - "datastore/path:label"
--bridge-network vDS-COMP-vic-bridge
#The internal network, used for container-to-container communication; it's highly recommended to not share this between multiple VCH
--bridge-network-range 172.16.0.0/24
#Network range for internal container-to-container communication
--public-network vDS-COMP-vic-public
#Public network where the VCH host also publishes the port-mappings from the containers
--public-network-ip 10.0.60.3/24
#Network range for public network
--public-network-gateway 10.0.60.1
#Public Network gateway
--dns-server 10.0.1.10
#DNS server
--ops-user vic-vc@cloudborn.lab
#The User beeing used for ops activities later on (creating containers, files, etc,...)
--ops-grant-perms
#This will grant the required permissions automatically to the --ops-user
--tls-cname VCH-3
#Common name of the vm for SSL certificate
--certificate-key-size 2048
#SSL key size
--no-tlsverify
#This completely disables client authentication via SSL certificate --> everyone who can reach this VMs IP can fire docker cli/api commands against it --> obviously not recommended in production
--thumbprint 6A:1A:98:C4:D3:CB:27:22:C9:46:A6:B1:5B:55:00:63:27:FF:E4:36
#SSL Thumbprint of the vCenter / ESXi, specified as the target
If everything goes well, it should look like this:
root@ubu:~/vic# ./vic-machine-linux create \
> --name VCH-3 \
> --container-name-convention vch-{id} \
> --user Administrator@VSPHERE.LOCAL \
> --target vcsa.cloudborn.lab/DC1 \
> --compute-resource COMP \
> --image-store vsanDatastore/VCH-Images \
> --volume-store vsanDatastore/VCH-DSs:docker-ds \
> --bridge-network vDS-COMP-vic-bridge \
> --bridge-network-range 172.16.0.0/16 \
> --public-network vDS-COMP-vic-public \
> --public-network-ip 10.0.60.3/24 \
> --public-network-gateway 10.0.60.1 \
> --dns-server 10.0.1.10 \
> --tls-cname VCH-3 \
> --no-tlsverify \
> --thumbprint 6A:1A:98:C4:D3:CB:27:22:C9:46:A6:B1:5B:55:00:63:27:FF:E4:36 \
> --ops-user vic-vc@cloudborn.lab \
> --ops-grant-perms
INFO[0000] ### Installing VCH ####
INFO[0000] vSphere password for Administrator@VSPHERE.LOCAL:
INFO[0003] vSphere password for vic-vc@cloudborn.lab:
INFO[0003] Generating self-signed certificate/key pair - private key in VCH-3/server-key.pem
WARN[0004] Configuring without TLS verify - certificate-based authentication disabled
INFO[0004] Validating supplied configuration
WARN[0004] If ops-user (vic-vc@cloudborn.lab) belongs to the Administrators group, permissions on some resources might have been restricted
INFO[0004] Configuring static IP for additional networks using port group "vDS-COMP-vic-public"
INFO[0004] Network configuration OK on "vDS-COMP-vic-bridge"
INFO[0004] vCenter settings check OK
INFO[0004] Firewall status: ENABLED on "/DC1/host/COMP/esxi2.cloudborn.lab"
INFO[0004] Firewall status: ENABLED on "/DC1/host/COMP/esxi3.cloudborn.lab"
INFO[0004] Firewall status: ENABLED on "/DC1/host/COMP/esxi4.cloudborn.lab"
INFO[0004] Firewall configuration OK on hosts:
INFO[0004]      "/DC1/host/COMP/esxi2.cloudborn.lab"
INFO[0004]      "/DC1/host/COMP/esxi3.cloudborn.lab"
INFO[0004]      "/DC1/host/COMP/esxi4.cloudborn.lab"
INFO[0004] vCenter settings check OK
INFO[0004] License check OK on hosts:
INFO[0004]   "/DC1/host/COMP/esxi2.cloudborn.lab"
INFO[0004]   "/DC1/host/COMP/esxi3.cloudborn.lab"
INFO[0004]   "/DC1/host/COMP/esxi4.cloudborn.lab"
INFO[0004] DRS check OK on:
INFO[0004]   "/DC1/host/COMP"
INFO[0004]
INFO[0004] Creating Resource Pool "VCH-3"
INFO[0004] Creating appliance on target
INFO[0004] Network role "client" is sharing NIC with "public"
INFO[0004] Network role "management" is sharing NIC with "public"
INFO[0004] Creating the VCH folder
INFO[0004] Creating the VCH VM
INFO[0007] Creating directory [vsanDatastore] VCH-DSs
INFO[0007] Datastore path is [vsanDatastore] VCH-DSs
INFO[0007] Uploading ISO images
INFO[0007] Uploading appliance.iso as V1.5.3-21112-4B85AEE4-appliance.iso
INFO[0014] Uploading bootstrap.iso as V1.5.3-21112-4B85AEE4-bootstrap.iso
WARN[0018] If ops-user (vic-vc@cloudborn.lab) belongs to the Administrators group, permissions on some resources might have been restricted
INFO[0019] Waiting for IP information
INFO[0028] Waiting for major appliance components to launch
INFO[0028] Obtained IP address for client interface: "10.0.60.3"
INFO[0028] Checking VCH connectivity with vSphere target
INFO[0029] vSphere API Test: https://vcsa.cloudborn.lab vSphere API target responds as expected
INFO[0034] Initialization of appliance successful
INFO[0034]
INFO[0034] VCH ID: vm-2787
INFO[0034]
INFO[0034] VCH Admin Portal:
INFO[0034] https://10.0.60.3:2378
INFO[0034]
INFO[0034] VCH Default Bridge Network Range: 172.16.0.0/16
INFO[0034] VCH Default Bridge Network Width: 16
INFO[0034]
INFO[0034] Published ports can be reached at:
INFO[0034] 10.0.60.3
INFO[0034]
INFO[0034] Management traffic will use:
INFO[0034] 10.0.60.3
INFO[0034]
INFO[0034] Docker environment variables:
INFO[0034] DOCKER_HOST=10.0.60.3:2376 COMPOSE_TLS_VERSION=TLSv1_2
INFO[0034]
INFO[0034] Environment saved in VCH-3/VCH-3.env
INFO[0034]
INFO[0034] Connect to docker:
INFO[0034] docker -H 10.0.60.3:2376 --tls info
INFO[0034] Installer completed successfully
Line 67 shows the URL for the admin portal of the VCH. It gives you a brief status report and a lot of logs.
Line 79 shows you the docker endpoint. Let’s check if it is responding:
root@ubu:~/vic# export DOCKER_HOST=10.0.60.3:2376
root@ubu:~/vic# docker --tls info
Containers: 0
 Running: 0
 Paused: 0
 Stopped: 0
Images: 0
Server Version: v1.5.3-21112-4b85aee4
Storage Driver: vSphere Integrated Containers v1.5.3-21112-4b85aee4 Backend Engine
VolumeStores: docker-ds
vSphere Integrated Containers v1.5.3-21112-4b85aee4 Backend Engine: RUNNING
 VCH CPU limit: 17613 MHz
 VCH memory limit: 38.66 GiB
 VCH CPU usage: 63 MHz
 VCH memory usage: 1.509 GiB
 VCH storage usage: 0 B
 VMware Product: VMware vCenter Server
 VMware OS: linux-x64
 VMware OS version: 6.7.0
 Registry Whitelist Mode: disabled.  All registry access allowed.
Plugins:
 Volume: vsphere
 Network: bridge
 Log:
Swarm: inactive
Operating System: linux-x64
OSType: linux-x64
Architecture: x86_64
CPUs: 17613
Total Memory: 38.66GiB
ID: vSphere Integrated Containers
Docker Root Dir:
Debug Mode (client): false
Debug Mode (server): false
Registry: registry-1.docker.io
Experimental: false
Live Restore Enabled: false

root@ubu:~/vic#
Looks good to me!
In case, the deployment goes wrong, check the vpxd.log in the CLI directory.
If you happen to have the vSphere Integrated Container Appliance in place and connected to your vCenter, you could also deploy the VCH, using the GUI, as shown in my posts “Deploy Virtual Container Host for vSphere integrated Containers“
Adding the VCH to vRealize Automation
The only thing left now, is to add the VCH to our vRA environment.
So login with an account that has at least the role “Container Administrator”.
Navigate to Containers –> Infrastructure –> Container Host Clusters
Click +Cluster
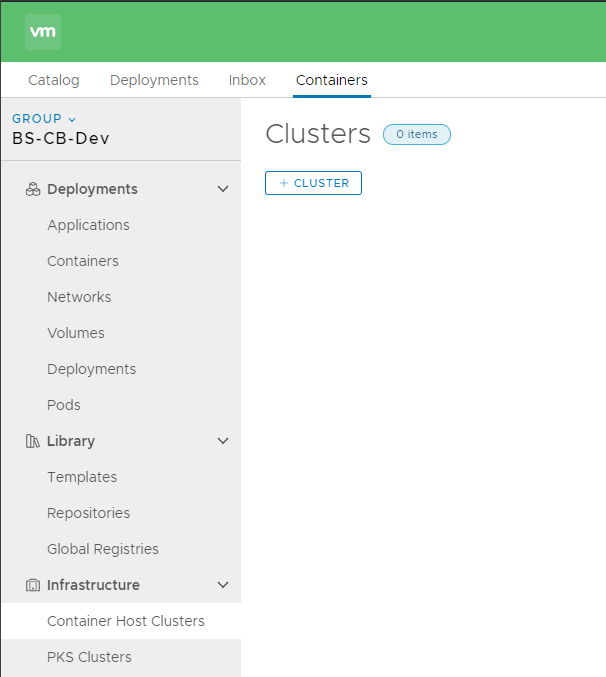
Now enter a name, choose Type “VCH” and enter the docker endpoint as URL.
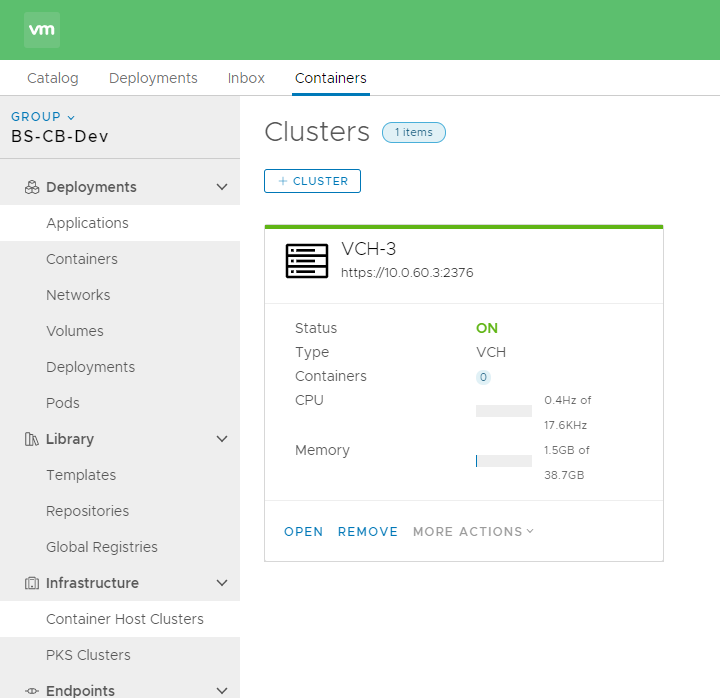
Since I’ve deployed the host with the “–no-tlsverify” flag, I don’t have to provide any Credentials.

Hit Save, check and accept the Host certificate.
It should only take a few seconds until your host appears.
If you face an error saying “Project context is required”, make sure that your user is part of at least one Business Group. You can select it in the upper left corner.

vRA has now a VCH to provision containers to.