Tanzu Kubernetes Grid on vSphere 6.7
Tanzu Kubernetes Grid for vSphere (formerly Project Pacific) has been quite an announcement and is probably gonna be a huge game-changer soon.
But what if you don’t have a vSphere 7 environment yet?
Since vSphere is likely to be the foundation of your whole infrastructure, upgrading it to the next major version can be quite challenging. In most environments, there are a lot of dependencies and some 3rd Party applications might not even support vSphere 7 yet.
Also as of now, the Addon for Kubernetes license is only available within VMware Cloud Foundation License Bundle. This circumstance might cause discussions with your purchasing department.
But luckily, there is a possibility to deploy a standalone Tanzu Kubernetes Grid on vSphere 6.7 too! And in this Article, I will demonstarate how 🙂
Note: The following setup is intended to be used on vSphere 6.7. Technically it is possible, to run it on vSphere 7, but it is not supported.
High-Level description
Deploying Tanzu Kubernetes Grid basically consists of three steps:
1. Run the Bootstrap Environment
For the Bootstrap environment, we need some some sort of Management station. This can be Linux, Mac or even Windows. This Management Station has to have access to the Internet and also to the destination platform, which is either vSphere or AWS (there is a way to deploy this in Air-Gapped environments, but I’m not going to cover this here).
You probably guessed it by now, the Bootstrap environment is going to run here as a Container 🙂
2. Deploy the Management Cluster
The next step is to deploy the actual Management Cluster. This will be configured and provisioned from the Bootstrap-Environment (using ClusterAPI). In the end, management functionality will failover from the Bootstrap environment to the Management Cluster.
3. Deploy Production Cluster(s)
Now we can use the Management Cluster up to actually provision our Production Clusters. This happens again by using ClusterAPI.
Prerequisites
Before we can start, there are a few things to prepare.
DHCP Server
You have to have a DHCP Server that can provide IPs in the destination Network(s).
Note: As of now, only IPv4 is supported.
vSphere Templates
Both, the Bootstrap environment and the Management Cluster make use of vSphere Templates in order to provision the VMs.
There are two different Images beeing used:
VMware Tanzu Kubernetes Grid 1.1.0 Kubernetes v1.18.2 OVA
The image for the actual Kubernetes VMs (Master and Worker).
VMware Tanzu Kubernetes Grid 1.1 Load Balancer OVA
The LoadBalancer used for the Clusters. Internally, it is a HAProxy.
Download both OVAs from https://www.vmware.com/go/get-tkg (note that the versions might differ).
Deploy the OVAs
Deploy them just like any other OVA. Only select the datastore, where you want to put the templates and the Network, through which the Template should be available (this is also the network, where the DHCP Server will assign IPs too). Leave everything else default (even the Name).
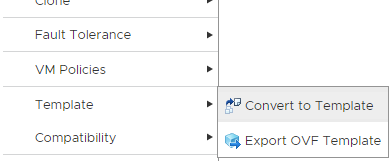
When the OVAs are successfully deployed, convert them to templates.
General vSphere Settings
- You can run this on a Standalone Host, but obiously it makes much more sense to deploy it to a DRS enabled vSphere Cluster
- If you want, create dedicated Resource Pools
I’m going to to create a Resource Pool called “TKG-MGMT” for my Management Cluster. Alternatively, you can also use entire Clusters - Create VM-Folder(s), in my case it’s “TKG-VMs“
Management Station
Believe it or not, I’m going to use my Windows Laptop! Why? Because!
I’m just curious whether it works with Windows.
Install Docker runtime
It feels like there are thousands of HowTos out there, I’m not going to re-invent the wheel here 😉 The official docker documentation explains it quite well.
Download TKG CLI
Go to https://www.vmware.com/go/get-tkg and download the VMware Tanzu Kubernetes Grid CLI for whatever OS you need it.
No matter which OS you are using, the CLI comes always as gzip file. Unzip it and put it somewhere, where you can execute it (maybe in your $PATH directory). If you are using Linux, make it executable. I’ve also renamed it to “tkg.exe”.
Note: You also need kubectl running on the management station. If you are using Windows, Docker Desktop brings its own version of kubectl with it, which is probably to old and tkg will throw an error later. You than have to tweak your $env:path variables a bit in order to use the correct executable.
Create SSH Key
We need to create an SSH Key-Pair for our Management Cluster. Im using ssh-keygen to create them.
vraccoon@ubu:~$ ssh-keygen -t rsa -b 4096 -C "mail@vraccoon.lab" -f tkg_key
vraccoon@ubu:~$ ll tkg_key*
-rw------- 1 vraccoon vraccoon 3381 Jun 6 09:39 tkg_key
-rw-r--r-- 1 vraccoon vraccoon 743 Jun 6 09:39 tkg_key.pub
Create the Bootstrap Cluster
When all the prep-work is done, we can actually start bootstrapping our environment. To do so, we need to use the CLI, which we downloaded earlier. From here on, we can either fire up a Web-UI or use CLI only. Since I’m using Windows, what would make more sense than using the Web-UI too? =D
(Besides, using the UI-Installer is the recommended way)
To start it, simply run the tkg init –ui:
PS C:\Users\vRaccoon> tkg init --ui
Logs of the command execution can also be found at: C:\Users\vRaccoon\AppData\Local\Temp\tkg-20200606T122533005177407.log
Validating the pre-requisites…
Serving kickstart UI at http://127.0.0.1:8080
This will fire up the Web-UI and probably open a Browser with it (if not, just browse to http://127.0.0.1:8080
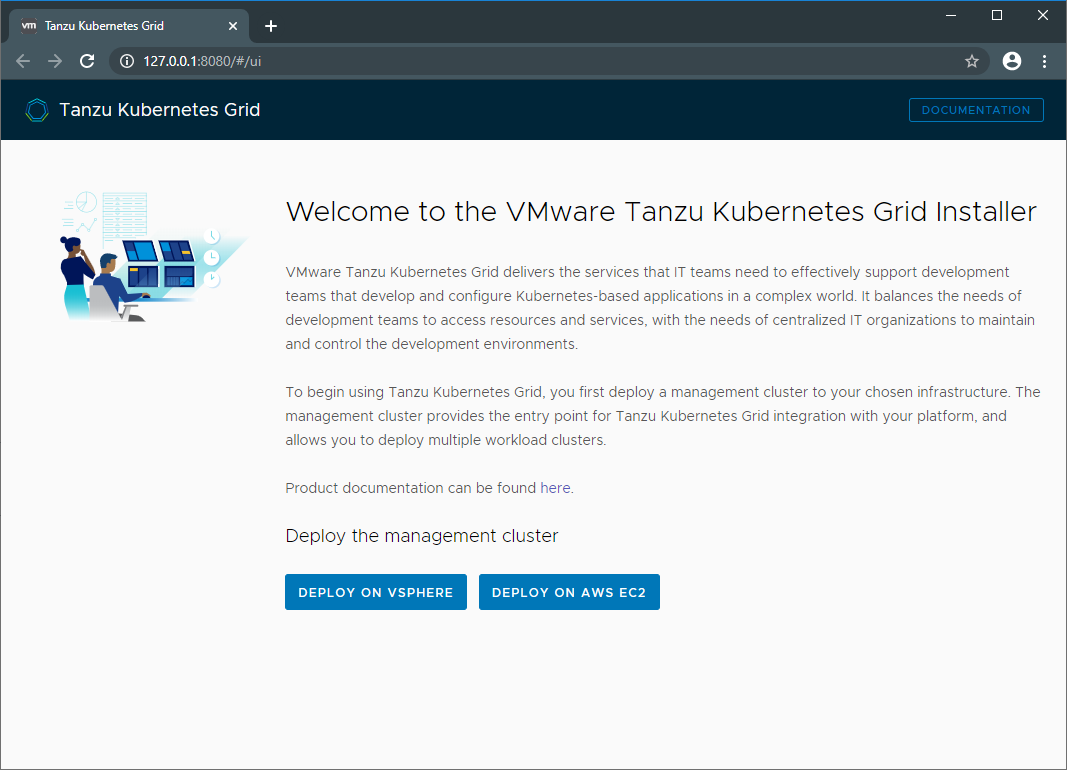
Create the Management Cluster
Now we have our Bootstrap environment up and running. Let’s proceed with configuring our Management Cluster. For those of you, who have already played with Tanzu Mission Control, the installer will look quite familiar.
On the recently opened page, click Deploy to vSphere to start.
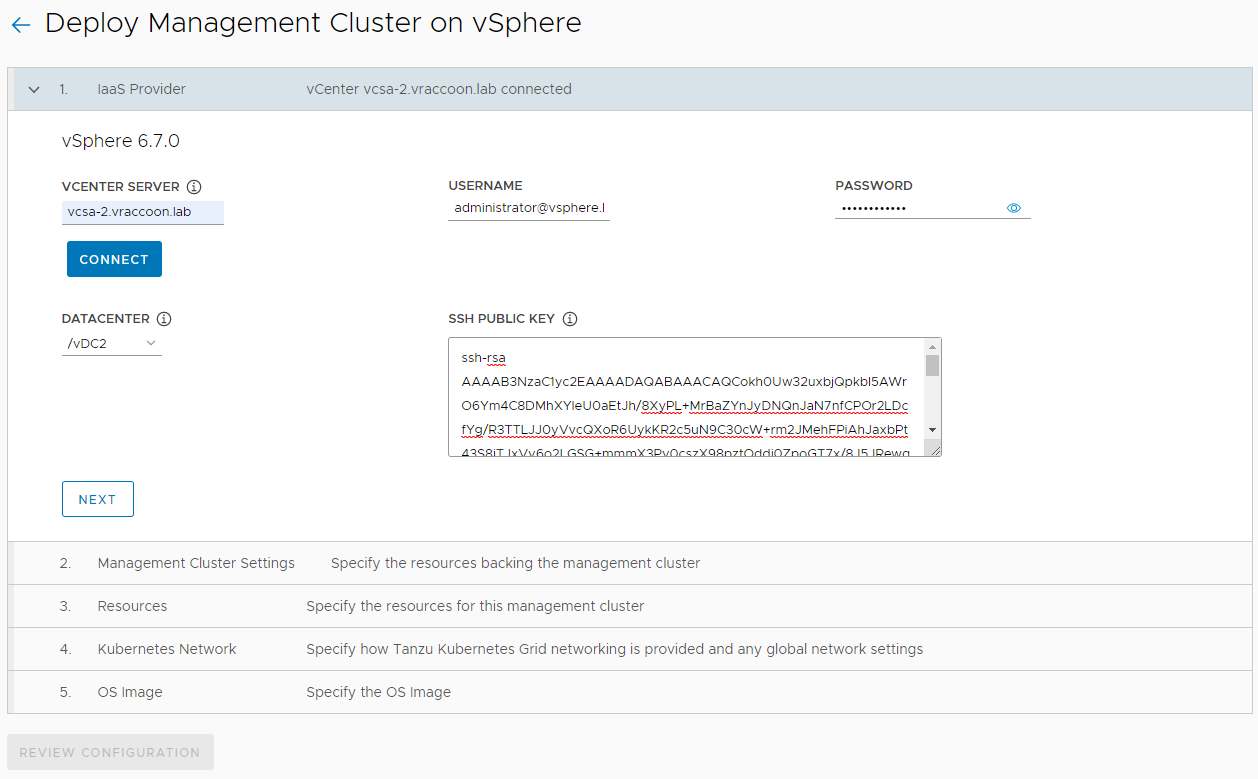
Step 1 – IaaS Provider
- Enter vCenter Information
- Click Connect
- Choose a Datacenter
- Insert the Public-Key of the Key-Pair created earlier
- Click Next
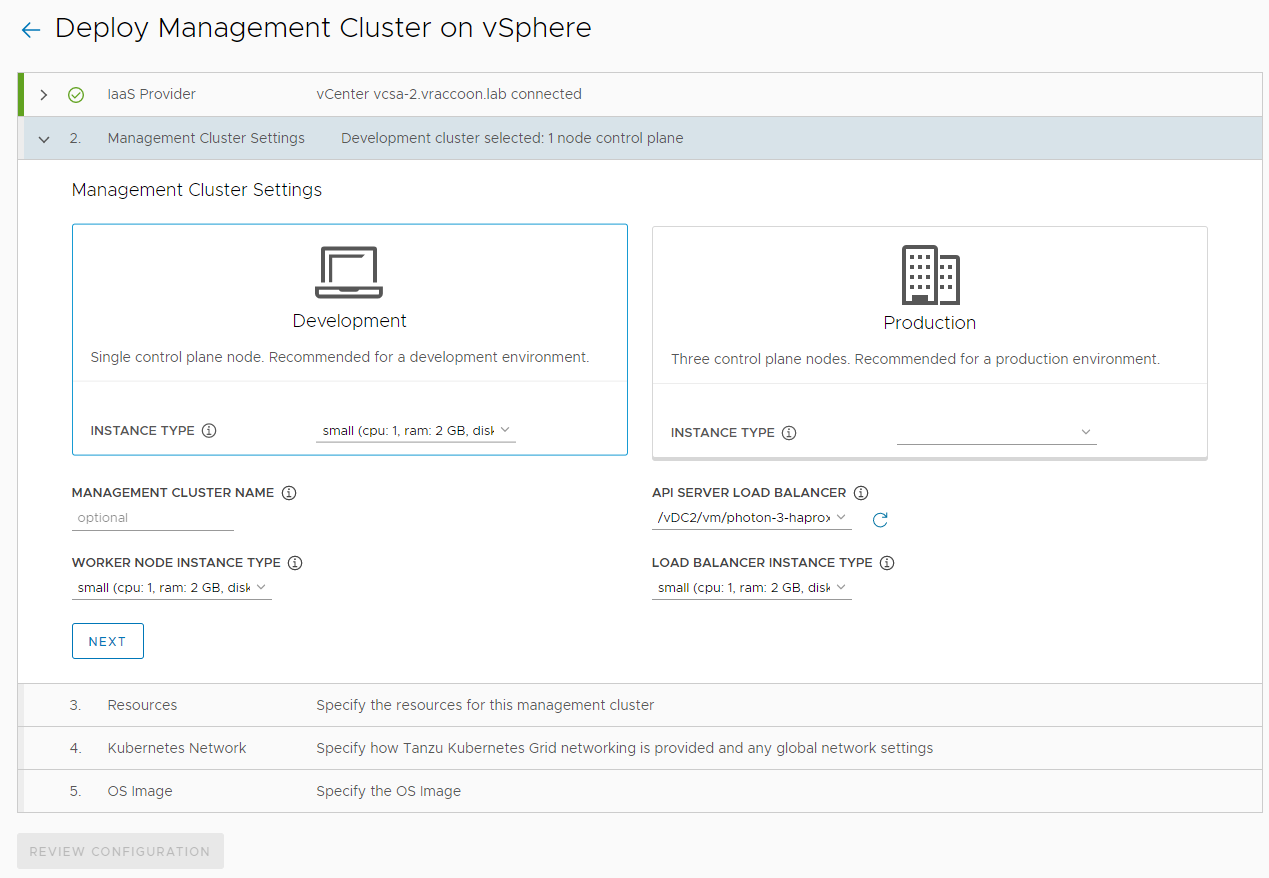
Step 2 – Management Cluster Settings
Here you can choose one of two templates for your Management Cluster. You can either provision it in a Development fashion (with a single control plane) or in a Production fashion (with 3 Masters, thus a high available control plane). I’ll go with Development.
Instance Type: small
Management Cluster Name: I’ll leave it empty, but feel free to assign a name
Worker Node Instance Type: small
API Server Load Balancer: select the Template of the HA Proxy, uploaded as part of the prerequisites
Loab Balancer Instance Type: small
Click Next.
Step 3 – Resources
VM Folder: /vDC2/vm/TKG-VMs (this is the folder, created as part of the prerequisites)
Datastores: /vDC2/datastore/DS-NFS-M3
Cluster,Hosts and Resource Pools: Select TKG-MGMT

Step 5 – Kubernetes Network
Network Name: vDS-vCOMP-MGMT (this is the Network, where the DHCP Server will save addresses too)
Cluster Service CIDR: leave default
Clsuter POD CIDR: leave default
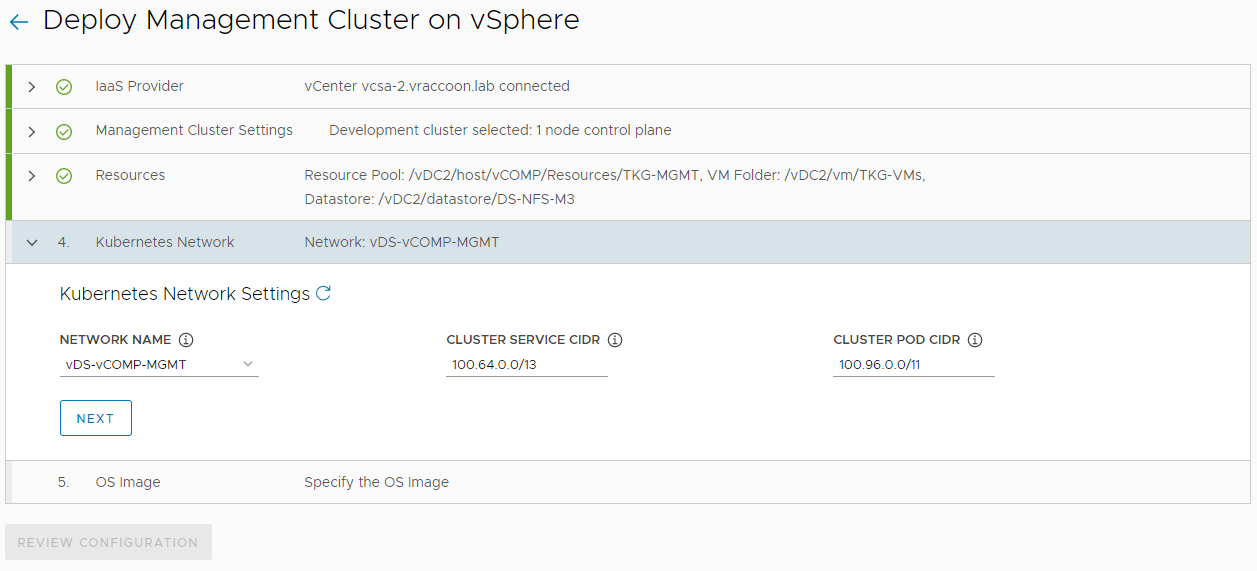
Step 6 – OS Image
OS Image: select the Template of the K8s VMs, uploaded as part of the prerequisites
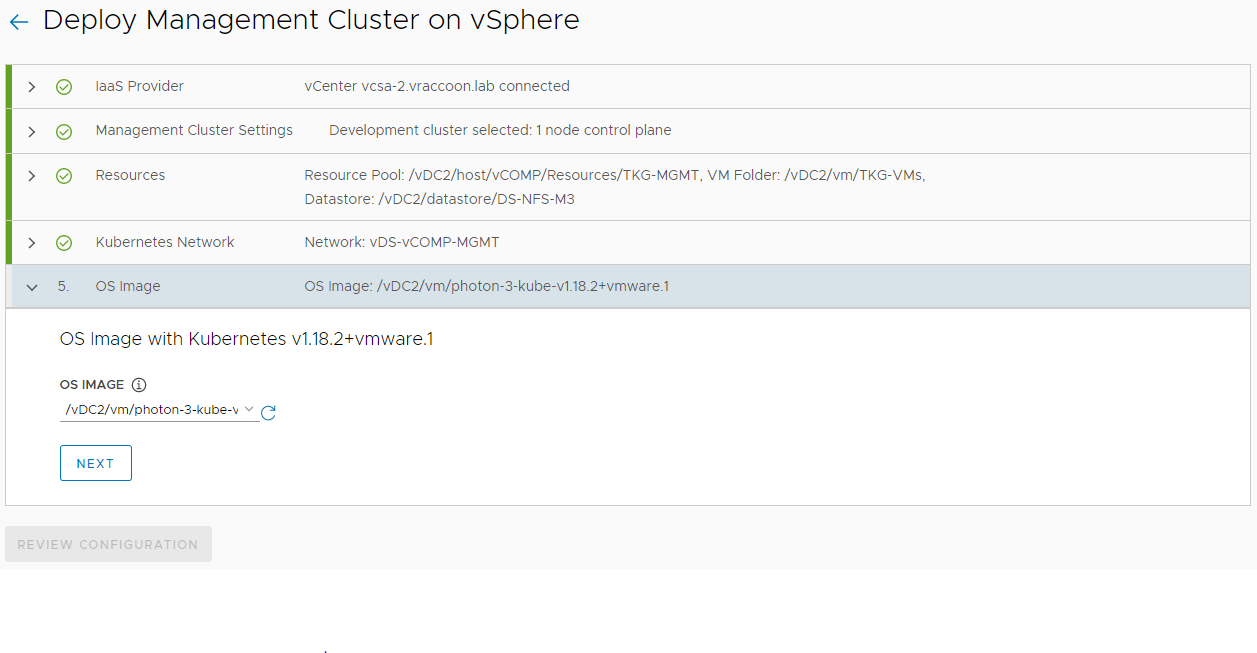
Review Config
Click Review Configuration
If it is all good, click Deploy Management Cluster

Cluster Creation
The installer will now start creating the Management Cluster. This will take a few min.
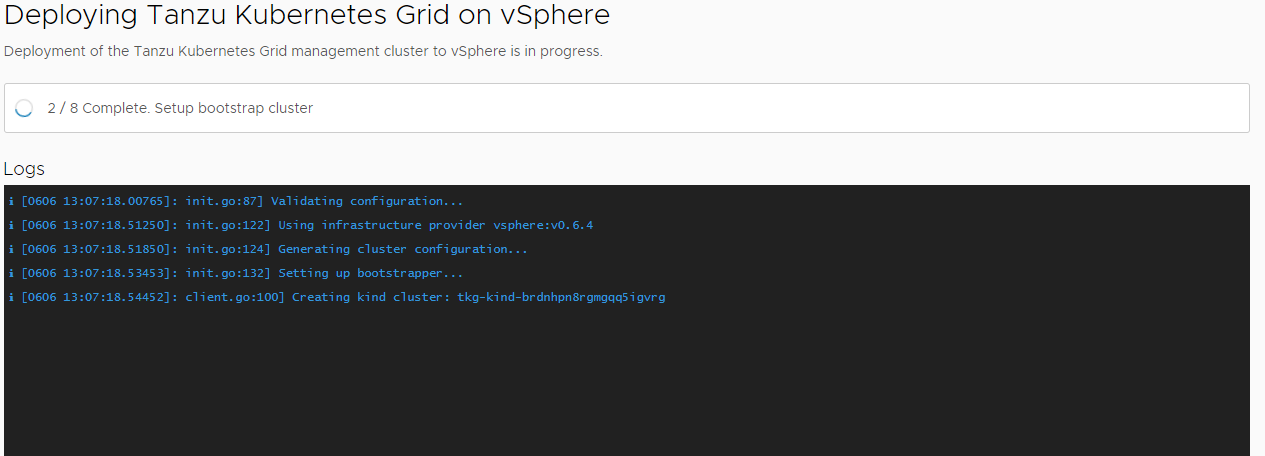
In my case, it took ~15min until it finished.
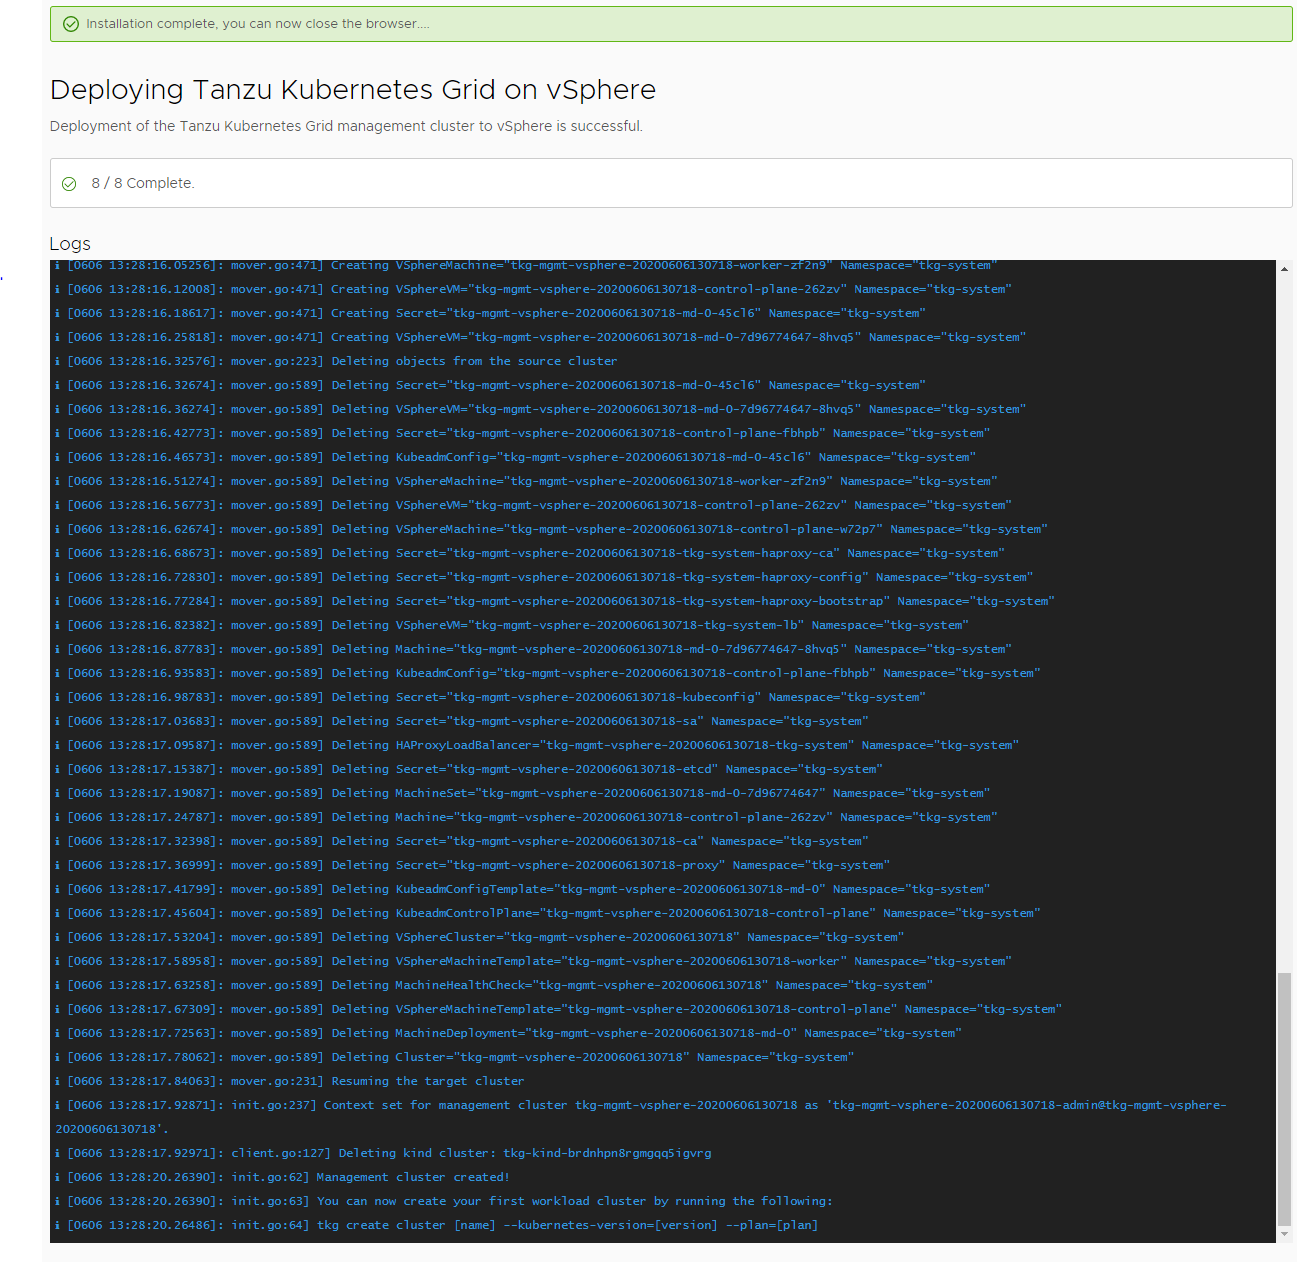
Also the tkg process ended automatically:
PS C:\Users\vRaccoon> tkg init --ui
Logs of the command execution can also be found at: C:\Users\vRaccoon\AppData\Local\Temp\tkg-20200606T130631816304979.log

Validating the pre-requisites...
Serving kickstart UI at http://127.0.0.1:8080
Validating configuration...
web socket connection established
sending pending 2 logs to UI
Using infrastructure provider vsphere:v0.6.4
Generating cluster configuration...
Setting up bootstrapper...
Installing providers on bootstrapper...
Fetching providers
Installing cert-manager
Waiting for cert-manager to be available...
Installing Provider="cluster-api" Version="v0.3.5" TargetNamespace="capi-system"
Installing Provider="bootstrap-kubeadm" Version="v0.3.5" TargetNamespace="capi-kubeadm-bootstrap-system"
Installing Provider="control-plane-kubeadm" Version="v0.3.5" TargetNamespace="capi-kubeadm-control-plane-system"
Installing Provider="infrastructure-vsphere" Version="v0.6.4" TargetNamespace="capv-system"
Start creating management cluster...
Unable to remove file C:\Users\vRaccoon\AppData\Local\Temp\kubeapply-099800317, Error: remove C:\Users\vRaccoon\AppData\Local\Temp\kubeapply-099800317: The process cannot access the file because it is being used by another process.
Saving management cluster kuebconfig into C:\Users\vRaccoon/.kube/config
Unable to remove file C:\Users\vRaccoon\AppData\Local\Temp\kubeapply-600018488, Error: remove C:\Users\vRaccoon\AppData\Local\Temp\kubeapply-600018488: The process cannot access the file because it is being used by another process.
Installing providers on management cluster...
Fetching providers
Installing cert-manager
Waiting for cert-manager to be available...
Installing Provider="cluster-api" Version="v0.3.5" TargetNamespace="capi-system"
Installing Provider="bootstrap-kubeadm" Version="v0.3.5" TargetNamespace="capi-kubeadm-bootstrap-system"
Installing Provider="control-plane-kubeadm" Version="v0.3.5" TargetNamespace="capi-kubeadm-control-plane-system"
Installing Provider="infrastructure-vsphere" Version="v0.6.4" TargetNamespace="capv-system"
Waiting for the management cluster to get ready for move...
Moving all Cluster API objects from bootstrap cluster to management cluster...
Performing move...
Discovering Cluster API objects
Moving Cluster API objects Clusters=1
Creating objects in the target cluster
Deleting objects from the source cluster
Context set for management cluster tkg-mgmt-vsphere-20200606130718 as 'tkg-mgmt-vsphere-20200606130718-admin@tkg-mgmt-vsphere-20200606130718'.

Management cluster created!


You can now create your first workload cluster by running the following:

  tkg create cluster [name] --kubernetes-version=[version] --plan=[plan]

PS C:\Users\vRaccoon>
Verify
To make sure, our cluster is really running and accessible, we can use tkg:
PS C:\Users\vRaccoon> tkg get mc -o yaml
- name: tkg-mgmt-vsphere-20200606130718
  context: tkg-mgmt-vsphere-20200606130718-admin@tkg-mgmt-vsphere-20200606130718
  file: C:\Users\vRaccoon\.kube-tkg\config
  isCurrentContext: true
PS C:\Users\vRaccoon>
This command shows us some details about the management cluster. But most important, it shows us where we find the kubeconfig file, which we can use to access the cluster.
Important: Save the kubeconfig file of your Management Cluster.
During creating, a kubeconfig file was created. This is basically your access to the Management Cluster. If you loose it, you loose access too and have to restore it manually.
The tkg-cli output tells you where it put the files, but usually its <HOME>/.kube/config
In my case it was C:\Users\vRaccoon/.kube/config
If you lost it, there is a Pivotal KB on how to restore it.
Next Steps
Now, we can deploy production clusters. I’m going to cover this in another post.